
四位数码管这东西看着老派,其实到处都在用:家电面板上的时间、加油站的价格牌、面包板上的温度读数,背后都是同一套七段管逻辑。裸的四位数码管要 12 个引脚才能驱动,新手一看到就头大。好在市面上现成的模块背面都焊了一颗 TM1637 驱动芯片,硬是把 12 根线收成了 4 根:两根供电,两根跑数据。
这篇就把接 Arduino 这件事从头到尾理一遍:怎么接线、亮度怎么调、中间那个冒号怎么让它闪起来,最后顺手做个时钟和温度显示。示例代码取自库作者公开的例程,逐字符搬过来没动过,新手照抄就能跑。
TM1637 是怎么把 12 根线变 4 根的
一个裸的四位七段数码管,每一位有 7 段 LED 加一个小数点,段位标号 A 到 G,加起来通常要 12 个引脚。这占用太夸张了,留给其他传感器的地方就没多少。TM1637 芯片焊在模块背面,负责把段码驱动这件事包揽下来,外部只留 4 个引脚:VCC、GND 负责供电,CLK 和 DIO 两根线负责传数据。
厂商给的规格参数是:工作电压 3.3 至 5 伏,工作电流 80 毫安,亮度 8 档可调;四位数码管部分尺寸 30×14 毫米(0.36 英寸位),整个模块 42×24×12 毫米。TM1637 芯片出自 Titan Micro Electronics 这家公司。
市面上用这颗芯片的模块五花八门,颜色、尺寸、有没有小数点、引脚排列顺序都不一样。好在只要驱动是 TM1637,下面这些代码就通用,不用换着写。
四根线怎么接:两根供电,两根跑数据
接线非常省事,照着下面这张图连四根线就行。用的是 Arduino UNO。
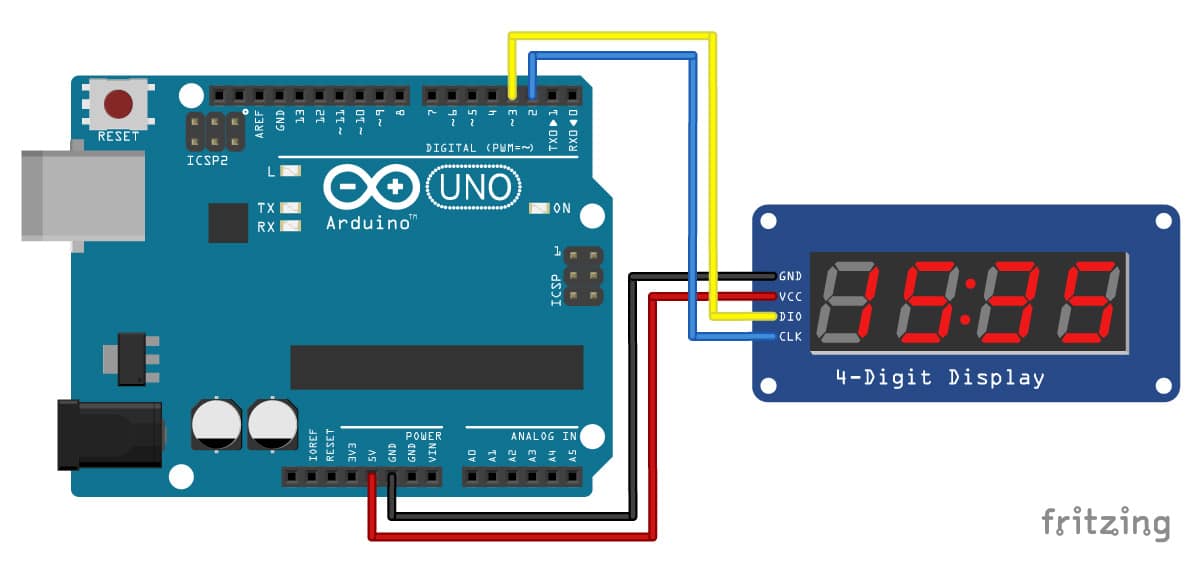
| TM1637 数码管模块 | Arduino UNO |
|---|---|
| VCC | 5V |
| GND | GND |
| CLK | 数字引脚 2 |
| DIO | 数字引脚 3 |
要提醒一句:不同厂家的模块,引脚的顺序和位置可能不一样,接线前先看板上的丝印。CLK 和 DIO 接哪两个数字脚随你定,这篇按 CLK 接 2、DIO 接 3 来写,换了脚就把代码里对应的宏定义改掉。
装库和五个核心函数
驱动这块屏用的是 TM1637Display 库,作者是 Avishay Orpaz。装库最省事的路子是在 Arduino IDE 里打开库管理器,搜 tm1637,认准 Avishay Orpaz 这位作者,选最新版本点安装。也可以从 GitHub 下载 zip 包,然后走 Sketch 菜单里的 Include Library,再选 Add .ZIP Library 装进去。
这个库的常用函数就五个:setSegments() 逐段控制每一位显示什么;showNumberDec() 直接显示十进制数;showNumberDecEx() 显示数字的同时还能控制小数点或冒号;setBrightness() 调亮度;clear() 清屏。
showNumberDec() 应该是你用得最多的一个,参数依次是要显示的数、要不要前导零、显示几位、从哪一位开始。后三个参数都可以省。要显示 12 且不要前导零、放在第二三位上,就这么写:
// Print the number 12 without leading zeros on the second and third digit:
display.showNumberDec(12, false, 2, 1);
第二个参数 true 就是开前导零,10 会显示成 0010;false 则显示成空两格再接 10。注意前导零不支持负数。第三、四个参数的含义和 setSegments() 一样:length 是要改动的位数(0 到 4),position 是起始位(0 是最左边那位,3 是最右边那位)。
setSegments() 配合段位宏可以拼出字符和符号,比如拼一个摄氏度符号放在第三四位上:
// Create degree Celsius symbol:
const uint8_t celsius[] = {
  SEG_A | SEG_B | SEG_F | SEG_G,  // Circle
  SEG_A | SEG_D | SEG_E | SEG_F   // C
};

display.setSegments(celsius, 2, 2);
showNumberDecEx() 只比 showNumberDec() 多了第二个参数 dots,专门管小数点和冒号。按你手上模块的类型对号入座:每位之间都带点的屏,0b10000000 显示 0.000,0b01000000 显示 00.00,0b00100000 显示 000.0,0b11100000 显示 0.0.0.0;只有中间一个冒号的屏,用 0b01000000 就是 00:00;点冒号都有的屏,0b11100000 是 0.0:0.0。
要显示一个带中间冒号的数字,比如 1234,就这么写:
// Print 1234 with the center colon:
display.showNumberDecEx(1234, 0b11100000, false, 4, 0);
setBrightness() 控制亮度,范围 0 到 7,0 最暗、7 最亮。它还有第二个参数,填 false 可以直接把屏熄了。拉满亮度就是:
// Set the display brightness (0-7):
display.setBrightness(7);
把五个函数串起来的完整示例在下面。它依次演示全亮全灭、0 到 100 计数、数字换位显示、亮度逐档扫一遍、带冒号的 1234、24 摄氏度符号,最后显示 dOnE 停住。整段代码没改一个字符,编译不过八成是库没装对。
/* Example code for TM1637 4 digit 7 segment display with Arduino.
   www.www.makerguides.com */

// Include the library:
#include "TM1637Display.h"

// Define the connections pins:
#define CLK 2
#define DIO 3

// Create display object of type TM1637Display:
TM1637Display display = TM1637Display(CLK, DIO);

// Create array that turns all segments on:
const uint8_t data[] = {0xff, 0xff, 0xff, 0xff};

// Create array that turns all segments off:
const uint8_t blank[] = {0x00, 0x00, 0x00, 0x00};

// You can set the individual segments per digit to spell words or create other symbols:
const uint8_t done[] = {
  SEG_B | SEG_C | SEG_D | SEG_E | SEG_G,           // d
  SEG_A | SEG_B | SEG_C | SEG_D | SEG_E | SEG_F,   // O
  SEG_C | SEG_E | SEG_G,                           // n
  SEG_A | SEG_D | SEG_E | SEG_F | SEG_G            // E
};

// Create degree Celsius symbol:
const uint8_t celsius[] = {
  SEG_A | SEG_B | SEG_F | SEG_G,  // Circle
  SEG_A | SEG_D | SEG_E | SEG_F   // C
};

void setup() {
  // Clear the display:
  display.clear();
  delay(1000);
}

void loop() {
  // Set the brightness:
  display.setBrightness(7);
  // All segments on:
  display.setSegments(data);

  delay(1000);
  display.clear();
  delay(1000);

  // Show counter:
  int i;
  for (i = 0; i < 101; i++) {
    display.showNumberDec(i);
    delay(50);
  }

  delay(1000);
  display.clear();
  delay(1000);

  // Print number in different locations, loops 2 times:
  int j;
  for (j = 0; j < 2; j++) {
    for (i = 0; i < 4; i++) {
      display.showNumberDec(i, false, 1, i);
      delay(500);
      display.clear();
    }
  }

  delay(1000);
  display.clear();
  delay(1000);

  // Set brightness (0-7):
  int k;
  for (k = 0; k < 8; k++) {
    display.setBrightness(k);
    display.setSegments(data);
    delay(500);
  }

  delay(1000);
  display.clear();
  delay(1000);

  // Print 1234 with the center colon:
  display.showNumberDecEx(1234, 0b11100000, false, 4, 0);

  delay(1000);
  display.clear();
  delay(1000);

  int temperature = 24;
  display.showNumberDec(temperature, false, 2, 0);
  display.setSegments(celsius, 2, 2);

  delay(1000);
  display.clear();
  delay(1000);

  display.setSegments(done);
  while(1);
}
说说这段代码的工作原理。开头先 include 库,然后用 #define 给 CLK 和 DIO 两个引脚起名字,编译器会把代码里出现的 CLK 全部替换成 2。接着用这两个脚创建一个 TM1637Display 类型的对象 display,对象名随你起,比如 temperature_display 也行;想同时控制好几块屏,就多建几个对象,给不同的名字和不同的引脚,库里对数量没有限制。
段码的控制有两种写法。一种是直接写十六进制数:0xff 换成二进制是 11111111,八段全亮;0xef 换成二进制是 11101111,就熄掉其中一段。注意位序是从右往左数的,11111111 对应的是小数点加 G 到 A 这八段。另一种是库自带的 SEG 宏,用按位或把要点亮的段拼在一起,四个元素对应四位数码管的四个位,元素之间用逗号隔开。示例里那个 done 数组就是这么拼出 dOnE 这个词的,读起来比十六进制直观得多。
setup 部分只做了一件事:clear() 清屏,稳一秒再进 loop。loop 里把每个函数都过了一遍,你上传之后盯着屏看一分钟,五个函数各自的效果就都心里有数了。
冒号时钟:加一块 DS3231 就能当钟用
四位数码管最经典的用法就是显示时间。TM1637 加一块 DS3231 实时时钟模块,就能做一个 24 小时制的钟。DS3231 走 I2C 跟 Arduino 通信,读时间只要两根线,数码管那边还按原来的接法不动。
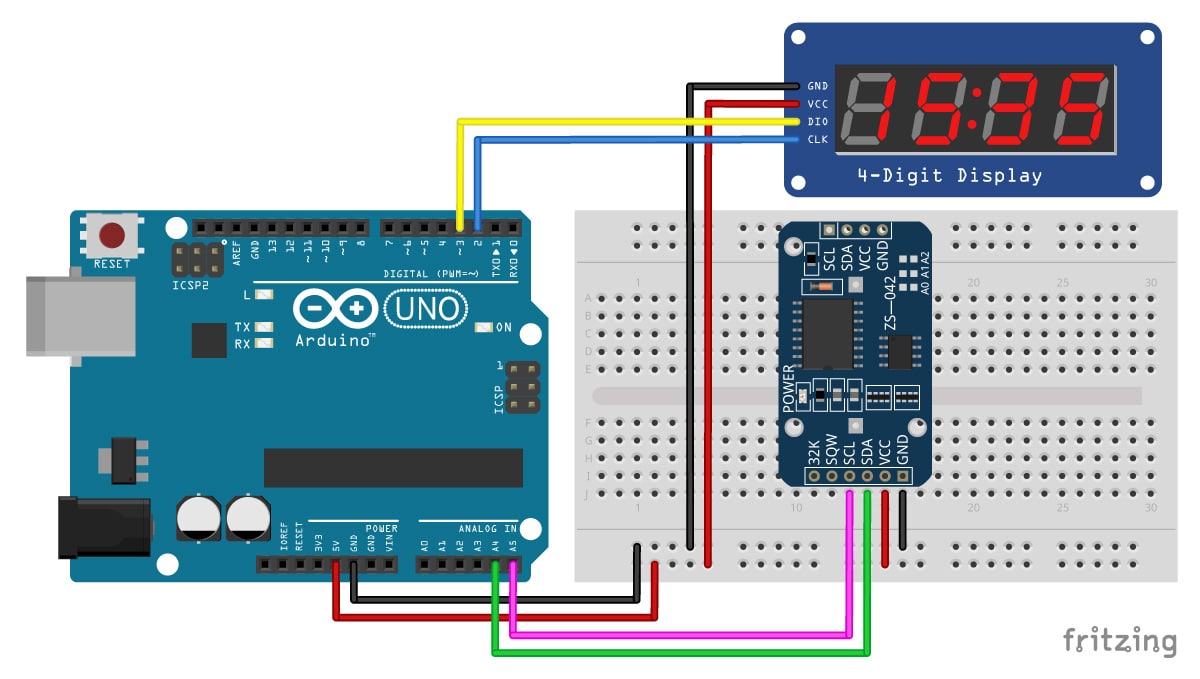
| DS3231 RTC 模块 | Arduino UNO |
|---|---|
| VCC | 5V |
| GND | GND |
| SDA | A4 |
| SCL | A5 |
代码用的 Adafruit RTClib,库管理器里搜 RTClib 安装,或者去 GitHub 下 zip。要显示的时间是这样拼的:小时乘以 100 加上分钟,比如 13 点 25 分就变成 1325,四位屏刚好装下。中间冒号想让它每秒闪一下,诀窍是交替调用两个函数——先带冒号显示一秒,再不带冒号显示一秒:
/* Arduino example code to display a 24 hour time format clock on a
  TM1637 4 digit 7 segment display with a DS32321 RTC.
  www.www.makerguides.com */

// Include the libraries:
#include "RTClib.h"
#include "TM1637Display.h"

// Define the connections pins:
#define CLK 2
#define DIO 3

// Create rtc and display object:
RTC_DS3231 rtc;
TM1637Display display = TM1637Display(CLK, DIO);

void setup() {
  // Begin serial communication at a baud rate of 9600:
  Serial.begin(9600);
  // Wait for console opening:
  delay(3000);

  // Check if RTC is connected correctly:
  if (!rtc.begin()) {
    Serial.println("Couldn't find RTC");
    while (1);
  }
  // Check if the RTC lost power and if so, set the time:
  if (rtc.lostPower()) {
    Serial.println("RTC lost power, lets set the time!");
    // The following line sets the RTC to the date & time this sketch was compiled:
    rtc.adjust(DateTime(F(__DATE__), F(__TIME__)));
    // This line sets the RTC with an explicit date & time, for example to set
    // January 21, 2014 at 3am you would call:
    //rtc.adjust(DateTime(2014, 1, 21, 3, 0, 0));
  }

  // Set the display brightness (0-7):
  display.setBrightness(5);
  // Clear the display:
  display.clear();
}

void loop() {
  // Get current date and time:
  DateTime now = rtc.now();

  // Create time format to display:
  int displaytime = (now.hour() * 100) + now.minute();

  // Print displaytime to the Serial Monitor:
  Serial.println(displaytime);

  // Display the current time in 24 hour format with leading zeros enabled and a center colon:
  display.showNumberDecEx(displaytime, 0b11100000, true);

  // Remove the following lines of code if you want a static instead of a blinking center colon:
  delay(1000);

  display.showNumberDec(displaytime, true); // Prints displaytime without center colon.

  delay(1000);
}
这段代码在 setup 里先开 9600 波特率的串口,等三秒再初始化。rtc.begin() 返回假说明 RTC 没接对,程序会卡在串口提示 Couldn't find RTC 上;rtc.lostPower() 返回真说明 RTC 掉过电,这时会把时间设成代码编译那一刻的时间。想手动指定一个时间,把代码里那行注释掉的 rtc.adjust 打开、按格式填日期时间就行。
有两个细节值得留意。一是首次上电时,程序会把 RTC 设成代码编译那一刻的时间,之后断电也不怕,模块背面装上纽扣电池就能保住时间。二是常见国产模块的充电电路有过充纽扣电池的风险,在意的话可以考虑 Adafruit 的 DS3231 模块替代。想让冒号常亮不闪,把 loop 里最后那几行交替显示的代码删掉就行。
再进一步:把温度打到屏上,顺便避开新手坑
数码管显传感器读数也是一把好手。拿最常见的 DHT11 三针版来说,它在数码管接法不变的基础上,自己只要再接三根线:信号脚 s 接数字引脚 4,正负极分别接 5V 和 GND。同样提醒,不同厂家引脚顺序可能不同,看丝印为准。
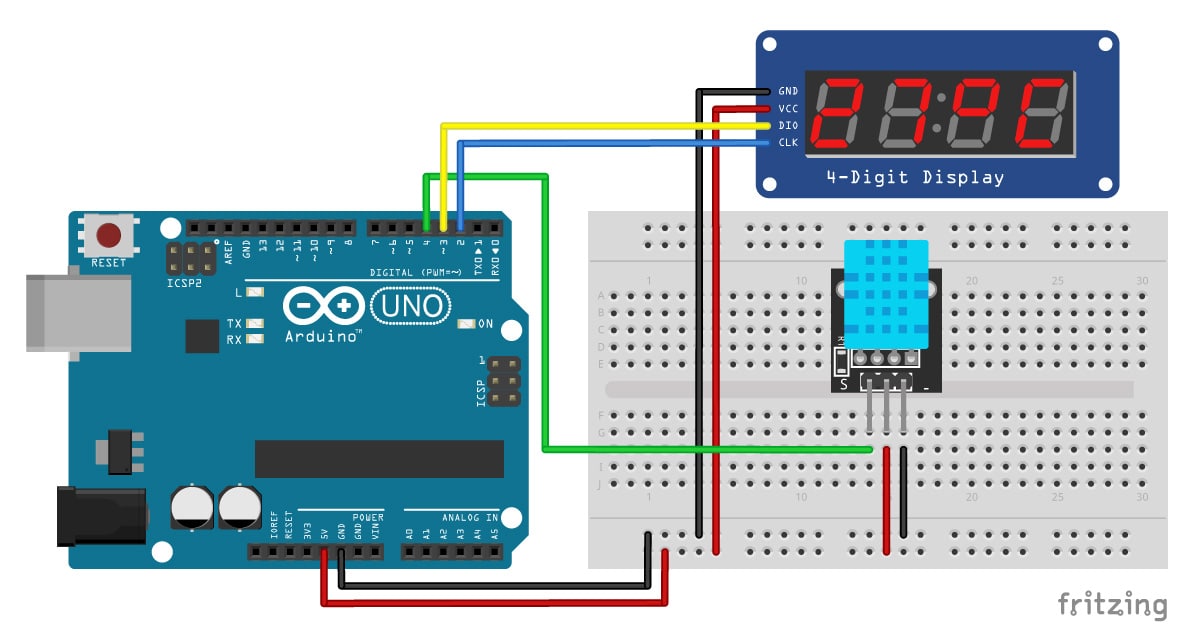
代码用 Adafruit 的 DHT 传感器库,装它还得带上 Adafruit Unified Sensor 这一块,缺了编译必报错。下面这段程序每 2 秒切换一次,交替显示摄氏度和华氏度,度数符号就是靠 setSegments() 拼出来的:
/* Arduino example sketch to display DHT11 temperature readings
  on a TM1637 4-digit 7-segment display.
  www.www.makerguides.com */

// Include the libraries:
#include "TM1637Display.h"
#include "Adafruit_Sensor.h"
#include "DHT.h"

// Define the connections pins:
#define CLK 2
#define DIO 3
#define DHTPIN 4

// Create variable:
int temperature_celsius;
int temperature_fahrenheit;

// Create degree Celsius symbol:
const uint8_t celsius[] = {
  SEG_A | SEG_B | SEG_F | SEG_G,  // Circle
  SEG_A | SEG_D | SEG_E | SEG_F   // C
};

// Create degree Fahrenheit symbol:
const uint8_t fahrenheit[] = {
  SEG_A | SEG_B | SEG_F | SEG_G,  // Circle
  SEG_A | SEG_E | SEG_F | SEG_G   // F
};

// Set DHT type, uncomment whatever type you're using!
#define DHTTYPE DHT11   // DHT 11
//#define DHTTYPE DHT22   // DHT 22  (AM2302)
//#define DHTTYPE DHT21   // DHT 21 (AM2301)

// Create display object of type TM1637Display:
TM1637Display display = TM1637Display(CLK, DIO);
// Create dht object of type DHT:
DHT dht = DHT(DHTPIN, DHTTYPE);

void setup() {
  // Set the display brightness (0-7):
  display.setBrightness(0);
  // Clear the display:
  display.clear();
  // Setup sensor:
  dht.begin();
  // Begin serial communication at a baud rate of 9600:
  Serial.begin(9600);
  // Wait for console opening:
  delay(2000);
}

void loop() {
  // Read the temperature as Celsius and Fahrenheit:
  temperature_celsius = dht.readTemperature();
  temperature_fahrenheit = dht.readTemperature(true);
  // Print the temperature to the Serial Monitor:
  Serial.println(temperature_celsius);
  Serial.println(temperature_fahrenheit);

  // Show the temperature on the TM1637 display:
  display.showNumberDec(temperature_celsius, false, 2, 0);
  display.setSegments(celsius, 2, 2);

  delay(2000);

  display.showNumberDec(temperature_fahrenheit, false, 2, 0);
  display.setSegments(fahrenheit, 2, 2);

  delay(2000);
}
最后把新手最容易卡的几个点收一收。第一,编译报错先查库:TM1637Display、RTClib、DHT 库加 Unified Sensor,少一个都不行。第二,模块引脚顺序各家不一样,接错 VCC 和 GND 有烧板风险,接线前看丝印。第三,亮度别无脑拉满,全亮时模块工作电流能到 80 毫安,做电池供电的小东西时留点余量。第四,想让冒号闪就是每秒交替 showNumberDecEx 和 showNumberDec,想常亮就只调 showNumberDecEx。
四根线、五个函数、一个 RTC 模块,这就是 TM1637 的全部门槛。数码管这类器件单价不高,新手拿它练手性价比不错,点亮那一刻的成就感一点也不比点灯少。




刚入坑,正愁四位数码管线太多,看完这篇感觉能下手了,先按 CLK 接 2、DIO 接 3 抄一遍。
闪烁冒号那个交替调用的思路挺妙的,一秒带冒号一秒不带,根本不用额外的指令去控制它。周末把家里落灰的 DS3231 翻出来试试。
这库去年就替朋友装过,确实省心。以前直接驱动四位数码管,UNO 十几个 IO 口全占完,别的传感器根本没法接。TM1637 这个方案就是留了 CLK 和 DIO 两个口,我顺手又挂了个 DHT11,屏上直接出温度,电线反倒更清爽了。亮度那档也实用,晚上调到 3 以下,不刺眼还省电,比裸屏自己算扫描省事太多。
showNumberDec 的第三、四个参数才是精髓,length 和 position 搞明白,想在哪几位显什么就显什么。前导零不支持负数这个坑,踩过一次才记住。