
ESP32 少见地把经典蓝牙和 BLE 双模做进了同一颗芯片,但不少刚上手的人只拿它跑 Wi-Fi,蓝牙这块一直空着。这篇把海外教程里 BLE 入门这条线理顺:用 Arduino IDE 自带的 ESP32 BLE 库做一个 BLE Server,手机连上去读数据,两块板子互扫验证的办法也一并讲清。关键参数和代码都对照 Random Nerd Tutorials 的入门教程与乐鑫 ESP-IDF 官方文档核过,可以直接照抄。
BLE 和经典蓝牙差在哪,GATT 是什么骨架
BLE 是蓝牙的低功耗变体,主打短距离、小数据量传输。经典蓝牙是常开的,BLE 平时待在休眠模式里,只在发起连接时才醒,教程里给的量级对比是功耗大约只有经典蓝牙的百分之一。电池供电的项目里,这个差距基本能决定方案成不成立。
在 ESP32 上,BLE 和经典蓝牙也不是二选一。乐鑫 ESP-IDF 官方文档写明:ESP-IDF 支持两套主机协议栈,Bluedroid 是默认栈,同时支持经典蓝牙和 BLE,适合两种技术都要用的场景;NimBLE 只支持 BLE,代码体积和内存占用更小,适合资源紧张的场合。同一块 ESP32 上两种可以并存,区别只是用哪套协议栈、吃多少资源。
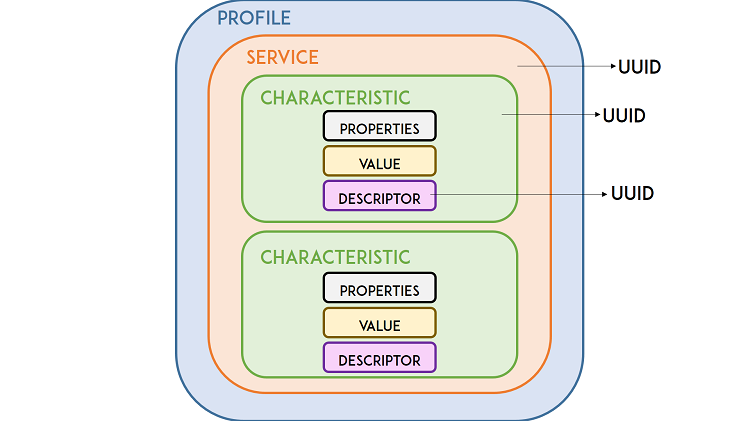
数据怎么组织,BLE 靠的是 GATT 这套骨架:server 持有数据,按服务(Service)分层,每个服务下面挂若干特征(Characteristic),客户端(client)对特征做读、写、订阅。教程把服务端要做的六步列得很清楚:创建 BLE Server、创建 Service、创建 Characteristic、创建 Descriptor、启动服务、开始广播。特征可以声明的属性有八种:Broadcast、Read、Write without response、Write、Notify、Indicate、Authenticated Signed Writes、Extended Properties,入门示例只用了 READ 和 WRITE 两种,够演示手机读写。
环境:装好 ESP32 支持包,示例自带
Arduino IDE 装好 ESP32 支持包之后,BLE 库已经随包自带,就是 GitHub 上 Neil Kolban 的 ESP32_BLE_Arduino 库(经 Evandro Copercini 移植到 Arduino),不用再找第三方库。Server 草图只要三个头文件:BLEDevice.h、BLEUtils.h、BLEServer.h。
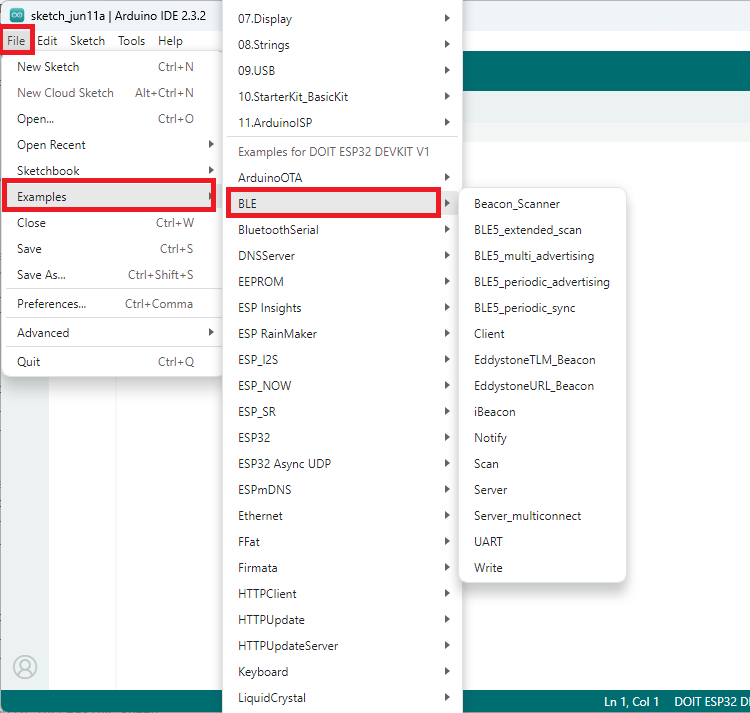
现成示例就在 File > Examples > ESP32 > BLE_server,打开就能烧。UUID 是 128 位的服务或特征标识,蓝牙 SIG 给常见服务预留了缩短版 UUID;自己定义的话,到 uuidgenerator.net 生成一组随机 UUID 就行,格式类似 55072829-bc9e-4c53-938a-74a6d4c78776。
BLE Server 代码逐段拆
示例草图全文如下,两个 UUID 用的是库里默认值:服务 4fafc201-1fb5-459e-8fcc-c5c9c331914b,特征 beb5483e-36e1-4688-b7f5-ea07361b26a8。头文件的尖括号引号写法与原代码等价,站内展示统一用引号。
/*
  Complete Getting Started Guide: https://RandomNerdTutorials.com/esp32-bluetooth-low-energy-ble-arduino-ide/
  Based on Neil Kolban example for IDF: https://github.com/nkolban/esp32-snippets/blob/master/cpp_utils/tests/BLE%20Tests/SampleServer.cpp
  Ported to Arduino ESP32 by Evandro Copercini
*/

#include "BLEDevice.h"
#include "BLEUtils.h"
#include "BLEServer.h"

// See the following for generating UUIDs:
// https://www.uuidgenerator.net/

#define SERVICE_UUID        "4fafc201-1fb5-459e-8fcc-c5c9c331914b"
#define CHARACTERISTIC_UUID "beb5483e-36e1-4688-b7f5-ea07361b26a8"

void setup() {
  Serial.begin(115200);
  Serial.println("Starting BLE work!");

  BLEDevice::init("MyESP32");
  BLEServer *pServer = BLEDevice::createServer();
  BLEService *pService = pServer->createService(SERVICE_UUID);
  BLECharacteristic *pCharacteristic = pService->createCharacteristic(
                                         CHARACTERISTIC_UUID,
                                         BLECharacteristic::PROPERTY_READ |
                                         BLECharacteristic::PROPERTY_WRITE
                                       );

  pCharacteristic->setValue("Hello World says Neil");
  pService->start();
  // BLEAdvertising *pAdvertising = pServer->getAdvertising();  // this still is working for backward compatibility
  BLEAdvertising *pAdvertising = BLEDevice::getAdvertising();
  pAdvertising->addServiceUUID(SERVICE_UUID);
  pAdvertising->setScanResponse(true);
  pAdvertising->setMinPreferred(0x06);  // functions that help with iPhone connections issue
  pAdvertising->setMinPreferred(0x12);
  BLEDevice::startAdvertising();
  Serial.println("Characteristic defined! Now you can read it in your phone!");
}

void loop() {
  // put your main code here, to run repeatedly:
  delay(2000);
}
逐段过一遍:Serial.begin(115200) 起串口;BLEDevice::init("MyESP32") 给设备取名,这个名字就是手机扫描时看到的,可以随便改;createServer 把设备声明成 server;createService 用前面的服务 UUID 建服务;createCharacteristic 建特征,同时声明 READ 和 WRITE 两个属性;setValue 把特征值设为 "Hello World says Neil",这段文本同样可改,往后替换成传感器读数或灯的状态就是最朴素的 BLE 遥测。
最后是广播:pService->start() 先启动服务,然后拿 BLEDevice::getAdvertising() 取广播器,addServiceUUID 把服务 UUID 塞进广播包,setScanResponse(true) 开扫描响应,setMinPreferred(0x06) 和 (0x12) 两行注释写明是为 iPhone 连接问题做准备,最后 startAdvertising。串口打出 Characteristic defined 那句,server 就在等连接了。
先扫描一遍,确认广播在发
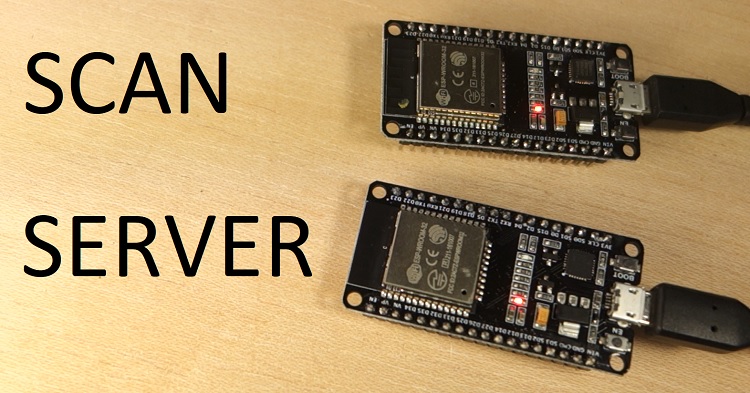
手机连接之前,可以先拿另一块 ESP32 跑 BLE_scan 示例,确认服务端真的在广播。扫描草图全文如下:
/*
  Complete Getting Started Guide: https://RandomNerdTutorials.com/esp32-bluetooth-low-energy-ble-arduino-ide/
  Based on Neil Kolban example for IDF: https://github.com/nkolban/esp32-snippets/blob/master/cpp_utils/tests/BLE%20Tests/SampleScan.cpp
  Ported to Arduino ESP32 by Evandro Copercini
*/

#include "BLEDevice.h"
#include "BLEUtils.h"
#include "BLEScan.h"
#include "BLEAdvertisedDevice.h"

int scanTime = 5; // in seconds
BLEScan* pBLEScan;

class MyAdvertisedDeviceCallbacks: public BLEAdvertisedDeviceCallbacks {
  void onResult(BLEAdvertisedDevice advertisedDevice) {
    Serial.printf("Advertised Device: %s \n", advertisedDevice.toString().c_str());
  }
};

void setup() {
  Serial.begin(115200);
  Serial.println("Scanning...");

  BLEDevice::init("");
  pBLEScan = BLEDevice::getScan(); //create new scan
  pBLEScan->setAdvertisedDeviceCallbacks(new MyAdvertisedDeviceCallbacks());
  pBLEScan->setActiveScan(true); //active scan uses more power, but get results faster
  pBLEScan->setInterval(100);
  pBLEScan->setWindow(99);  // less or equal setInterval value
}

void loop() {
  // put your main code here, to run repeatedly:
  BLEScanResults *foundDevices = pBLEScan->start(scanTime, false);
  Serial.print("Devices found: ");
  Serial.println(foundDevices->getCount());
  Serial.println("Scan done!");
  pBLEScan->clearResults();   // delete results fromBLEScan buffer to release memory
  delay(2000);
}
几个要点:BLEDevice::init("") 传空串,扫描器不需要名字;setActiveScan(true) 是主动扫描,更费电但拿结果快;setInterval(100) 和 setWindow(99) 设扫描间隔与窗口,窗口值不能大于间隔;每个广播设备进来时 onResult 回调会把设备信息整串打到串口。串口里能看到 MyESP32 和它的服务 UUID,广播就验证通过了。
手机连接与数据收发:nRF Connect 走一遍
手机端工具用 Nordic 官方的 nRF Connect for Mobile,Android 和 iOS 都有,应用商店直接搜名字安装,装完先把手机的蓝牙开关打开。
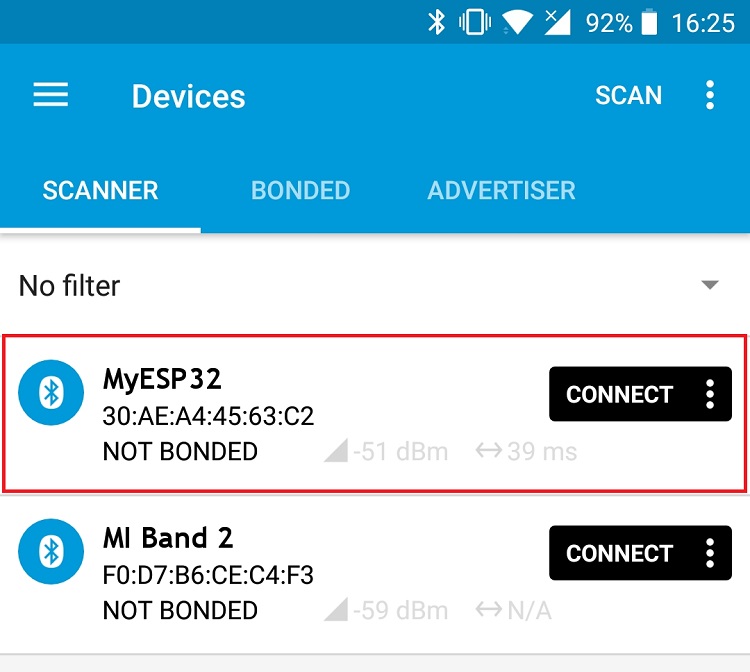
ESP32 跑着 Server 草图时,在 App 里点扫描按钮,设备列表里会出现名为 MyESP32 的设备,点 Connect 连上。连上后能看到一个服务,UUID 就是代码里定义的那个;点开服务展开菜单,特征 UUID、READ 和 WRITE 两个属性都在,特征值显示的正是 setValue 设置的那串字符——读到它,整条链路就算通了。
往收发两头看:读方向刚才已经演示,手机从特征里取到了板子放进去的值;写方向,特征声明了 WRITE 属性,意味着客户端有往板子写值的通道,要把写进来的数据处理起来,需要给特征挂回调,这部分入门教程没有展开,做法可以参考库里的 Notify 和 Server-Client 示例。教程也提了一句:想知道客户端连上时该做点什么,Notify 示例是个现成的参考。
到这里,BLE Server、扫描、手机读写三步都走完了。往实用里走,把 setValue 的内容换成传感器读数,就是最基本的 BLE 数据上报;两块 ESP32 之间互发数据,去看 Server-Client 的进阶教程;只跑 BLE、在意内存占用的场合,ESP-IDF 那边还有更轻的 NimBLE 栈可选。对入门来说,先把这套默认路径跑顺,再谈换栈和加通知,顺序别反了。
之前只拿ESP32跑过经典蓝牙的串口透传,看完才发现BLE这边还有Bluedroid和NimBLE两套栈可以选。文中那个默认UUID我印象很深,网上抄的例子里全是4fafc201开头的那一对,原来就是Kolban库里写死的演示值,不是什么标准服务。回头把nRF Connect装上,把setValue换成DHT11的温湿度读数,手机上直接看数据,比天天盯串口舒服多了。
功耗只有经典蓝牙百分之一这个量级最实在,电池供电项目直接决定选型方向。
扫描那段setWindow不能大于setInterval这个细节,以前翻文档的时候一直没留意到。
照着BLE_server那段代码跑了一遍,nRF Connect里真读到Hello World says Neil,链路一次就通了,入门够顺。