
做小车、做云台、做任何带轮子的东西,绕不开「Arduino 怎么带动电机」这一步。Arduino 的 IO 口只能输出几十毫安,直接怼电机只会把板子烧了,中间必须垫一块电机驱动。近三年很多套件开始用 TB6612FNG 替掉老牌的 L298N,这块比指甲大不了多少的红色小板子,凭什么上位?这次把它和 Uno 的接法、两套能直接烧录的代码一起整理给你,接线图和代码都对着原文核过。
先把底子说清楚:TB6612FNG 是东芝出的双路 H 桥芯片,一片里塞了两个独立桥,能同时驱动两个直流电机。它用 MOSFET 做开关管,这是它和 L298N 最大的分水岭——MOSFET 导通压降小,发热低,效率高。电机供电范围 2.5 到 13.5V,每路连续电流 1.2A、峰值 3.2A,逻辑电平 2.7 到 5.5V,3.3V 和 5V 的单片机都能直连。芯片自带过热关断和低电流待机模式,模块上不用装散热片。
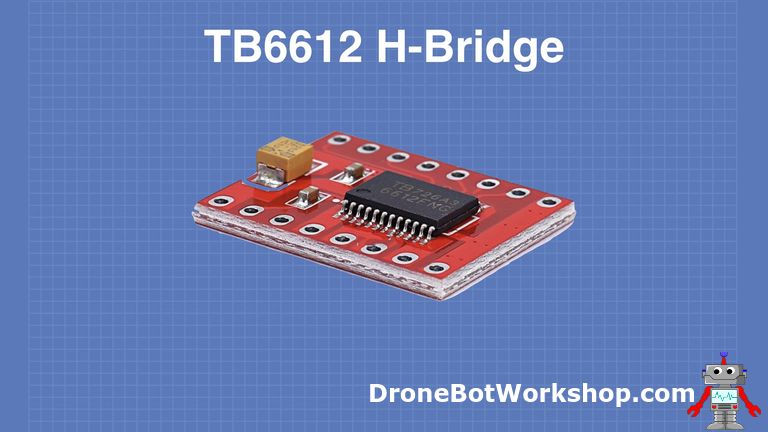
引脚怎么看:一片芯片两组桥
常见模块把输入脚排一侧、输出和电源排另一侧,接线前先分清三个角色:电源脚、方向脚、调速脚。电源侧 VM 接电机电源正极(2.5-13.5V),VCC 接逻辑电源,GND 共地。输出侧 AO1、AO2 接 A 路电机,BO1、BO2 接 B 路。
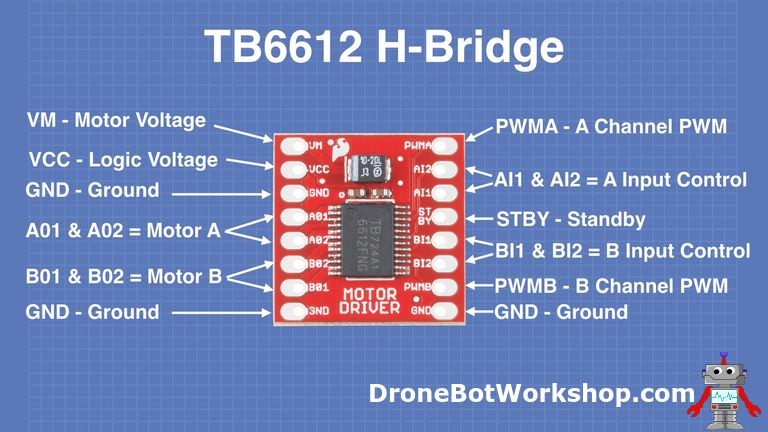
控制侧每路三个脚:AIN1、AIN2 定方向(一高一低正转,反过来反转,两个都低是滑行),PWMA 接 PWM 口调速度。还有个 STBY 待机脚,拉低芯片整体休眠,拉高才工作——新手最容易栽在这,STBY 悬空,代码写得再对电机也一动不动。记住一条:先拉高 STBY,再谈别的。
和 Uno 接线:六个 IO 全搞定
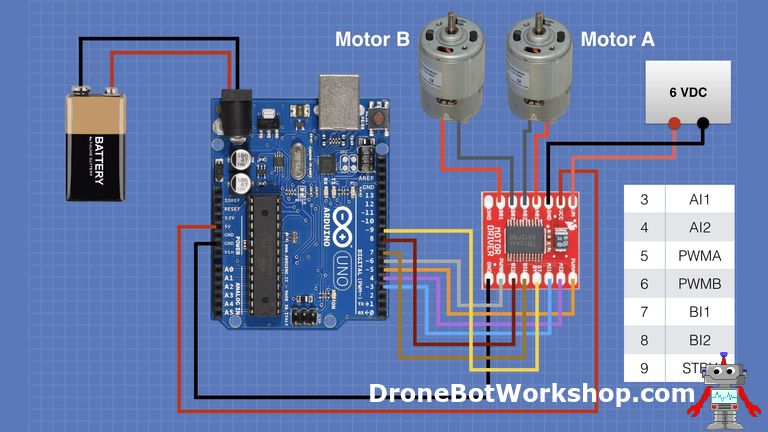
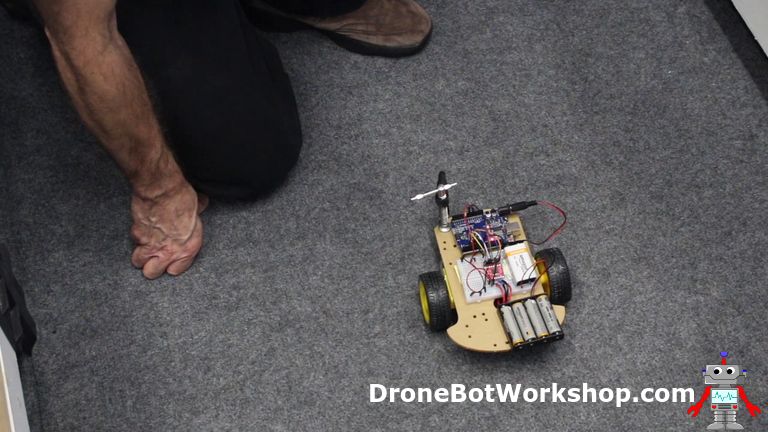
原教程的演示配置用 Uno 的 6 个 IO 口:PWMA 接 5、AIN1 接 3、AIN2 接 4,PWMB 接 6、BIN1 接 7、BIN2 接 8,STBY 直接拉到 5V。3、5、6、9、10、11 这些带波浪号的 PWM 口留两个给 PWMA 和 PWMB 就行,方向脚随便什么数字口都能用。电机电源用 4 节 AA 电池盒,别贪方便从 Uno 的 5V 取电,电机一转电压拉垮,板子直接重启给你看。
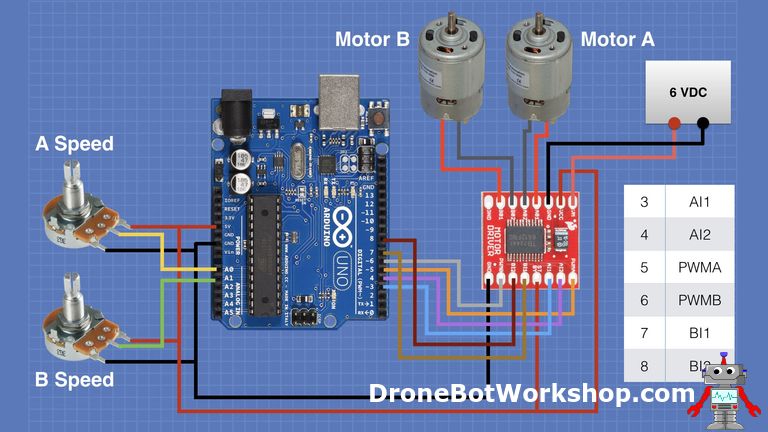
实验用两个 10K 线性电位器分别接 A0、A1 调速,这是把「能不能转」和「速度对不对」两件事分开验证的经典做法:先保证方向控制没问题,再调速度曲线。
演示代码:不装库,直接读写寄存器思路
第一份代码不依赖任何库,analogWrite 调速、digitalWrite 定向,最容易看懂 TB6612 的控制本质——它就是个「方向脚+PWM 脚」的组合,和 L298N 的控制逻辑同源。两个电位器的读数经 map 换算成 0-255 的 PWM 值:
/*
  TB6612FNG H-Bridge Demo
  TB6612-Demo.ino
  Demonstrates use of TB6612FNG H-Bridge Motor Controller
  Drives two DC Motors

  DroneBot Workshop 2019
  https://dronebotworkshop.com
*/

// Motor A

int pwmA = 5;
int in1A = 3;
int in2A = 4;

// Motor B

int pwmB = 6;
int in1B = 7;
int in2B = 8;

// Speed control potentiometers

int SpeedControl1 = A0;
int SpeedControl2 = A1;


// Motor Speed Values - Start at zero

int MotorSpeed1 = 0;
int MotorSpeed2 = 0;

void setup()

{

  // Set all the motor control pins to outputs

  pinMode(pwmA, OUTPUT);
  pinMode(pwmB, OUTPUT);
  pinMode(in1A, OUTPUT);
  pinMode(in2A, OUTPUT);
  pinMode(in1B, OUTPUT);
  pinMode(in2B, OUTPUT);

}

void loop() {

  // Set Motor A forward

  digitalWrite(in1A, HIGH);
  digitalWrite(in2A, LOW);

 // Set Motor B forward

  digitalWrite(in1B, HIGH);
  digitalWrite(in2B, LOW);


  // Read potentiometers and convert to range of 0-255

  MotorSpeed1 = map(analogRead(SpeedControl1), 0, 1023, 0, 255);
  MotorSpeed2 = map(analogRead(SpeedControl2), 0, 1023, 0, 255);


  // Set the motor speeds

  analogWrite(pwmA, MotorSpeed1);
  analogWrite(pwmB, MotorSpeed2);

}
烧进去之后,两个电机应该都能随电位器无级调速。如果某一路反转了,把那一路的 IN1、IN2 对调,或者代码里对调两行 digitalWrite 就行。
上小车:SparkFun 库的正反转与刹车
真做小车时,逐行 digitalWrite 会把主循环写得很乱。SparkFun 有专门的 TB6612FNG 库(Arduino 库管理器搜 TB6612 就有),把每路电机封装成一个 Motor 对象,forward、back、left、right、brake 都是现成函数,速度取值 -255 到 255,负数即倒转。小车版接线只比演示多一条:STBY 接到 Uno 的 9 号口,由程序控制待机。下面这份是库自带的例程 TestRun,原地走一个「之字舞」,前进倒退左右全试一遍:
/******************************************************************************
TestRun.ino
TB6612FNG H-Bridge Motor Driver Example code
Michelle @ SparkFun Electronics
8/20/16
https://github.com/sparkfun/SparkFun_TB6612FNG_Arduino_Library

Uses 2 motors to show examples of the functions in the library.  This causes
a robot to do a little 'jig'.  Each movement has an equal and opposite movement
so assuming your motors are balanced the bot should end up at the same place it
started.

Resources:
TB6612 SparkFun Library

Development environment specifics:
Developed on Arduino 1.6.4
Developed with ROB-9457
******************************************************************************/

// This is the library for the TB6612 that contains the class Motor and all the
// functions
#include "SparkFun_TB6612.h"

// Pins for all inputs, keep in mind the PWM defines must be on PWM pins
// the default pins listed are the ones used on the Redbot (ROB-12097) with
// the exception of STBY which the Redbot controls with a physical switch
#define AIN1 3
#define BIN1 7
#define AIN2 4
#define BIN2 8
#define PWMA 5
#define PWMB 6
#define STBY 9

// these constants are used to allow you to make your motor configuration
// line up with function names like forward.  Value can be 1 or -1
const int offsetA = 1;
const int offsetB = 1;

// Initializing motors.  The library will allow you to initialize as many
// motors as you have memory for.  If you are using functions like forward
// that take 2 motors as arguements you can either write new functions or
// call the function more than once.
Motor motor1 = Motor(AIN1, AIN2, PWMA, offsetA, STBY);
Motor motor2 = Motor(BIN1, BIN2, PWMB, offsetB, STBY);

void setup()
{
 //Nothing here
}


void loop()
{
   //Use of the drive function which takes as arguements the speed
   //and optional duration.  A negative speed will cause it to go
   //backwards.  Speed can be from -255 to 255.  Also use of the
   //brake function which takes no arguements.
   motor1.drive(255,1000);
   motor1.drive(-255,1000);
   motor1.brake();
   delay(1000);

   //Use of the drive function which takes as arguements the speed
   //and optional duration.  A negative speed will cause it to go
   //backwards.  Speed can be from -255 to 255.  Also use of the
   //brake function which takes no arguements.
   motor2.drive(255,1000);
   motor2.drive(-255,1000);
   motor2.brake();
   delay(1000);

   //Use of the forward function, which takes as arguements two motors
   //and optionally a speed.  If a negative number is used for speed
   //it will go backwards
   forward(motor1, motor2, 150);
   delay(1000);

   //Use of the back function, which takes as arguments two motors
   //and optionally a speed.  Either a positive number or a negative
   //number for speed will cause it to go backwards
   back(motor1, motor2, -150);
   delay(1000);

   //Use of the brake function which takes as arguments two motors.
   //Note that functions do not stop motors on their own.
   brake(motor1, motor2);
   delay(1000);

   //Use of the left and right functions which take as arguements two
   //motors and a speed.  This function turns both motors to move in
   //the appropriate direction.  For turning a single motor use drive.
   left(motor1, motor2, 100);
   delay(1000);
   right(motor1, motor2, 100);
   delay(1000);

   //Use of brake again.
   brake(motor1, motor2);
   delay(1000);

}
这个例程的妙处在于每个动作都有等量的反向动作,电机平衡的小车跑完一圈会回到原点附近,等于免费帮你校验左右电机有没有接反、速度有没有偏差。如果小车画圈越走越歪,先别怪代码,八成是两个电机一致性差或者电池电压掉了。
和 L298N 怎么选:看电压和电流,别看情怀
只说事实差异,不拉偏架。参数上 L298N 是 bipolar 工艺,电机电压 4.5-46V、每路连续 2A、峰值 3A;TB6612FNG 是 MOSFET 工艺,电机电压 2.5-13.5V、每路连续 1.2A、峰值 3.2A。L298N 导通压降约 1.4V,效率只有四到七成,必须挂散热片;TB6612FNG 压降只有零点零几伏,效率 91%-95%,模块体积不到 L298N 的四分之一,还带待机模式。
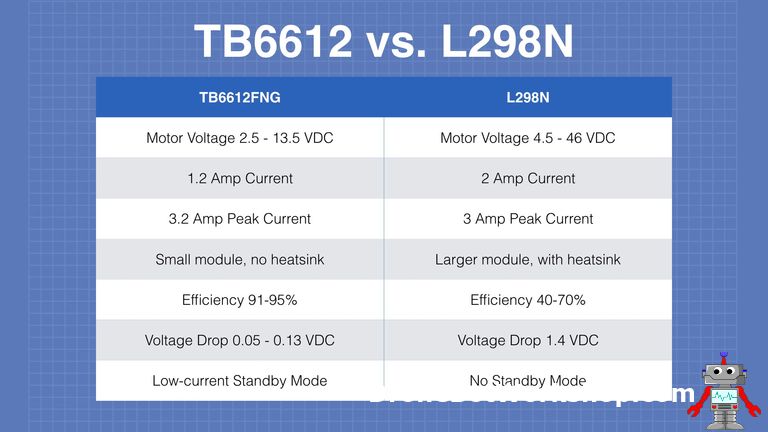
所以选型逻辑很直白:电机电压在 13.5V 以下、电流不超 1.2A,闭眼选 TB6612FNG,小、凉快、省电;你要驱 24V 甚至更高电压的电机,或者长期跑 1.5A 以上,L298N 的高压上限还是没法替代。3V 左右的小电机更是只有 TB6612FNG 能伺候,L298N 的 1.4V 压降直接吃掉一半电压。
写在最后
TB6612FNG 没有什么花活,就是把「方向脚+PWM」这一套做到又小又高效。上手路径三步:拉高 STBY、接对六个 IO、烧一段最小代码,剩下的就是拿电位器慢慢找手感。玩完它再回头看舵机和步进,你会发现直流电机的控制是所有执行器里最简单的一档,值得作为机器人动力系统的第一课。


这篇算是把 STBY 脚的坑讲透了,我第一次玩的时候就是悬空没接,查了半天代码以为板子坏了,最后才反应过来是待机脚没拉高。新手照这个接线图走能少走很多弯路。
看完把吃灰的TB6612找出来了,晚上试一下
效率91-95对比L298N的40-70这数据太直观了,怪不得现在套件都换mosfet的了,L298N摸着烫手
问一下用18650三串11.1V带N20减速电机没问题吧?看参数13.5V上限内,电流也够
map那个调速思路好评,电位器校速度比盲调PWM省事多了