
每个玩ESP32的人都会撞上同一个问题:板子在这儿测着数据,往哪儿放?接屏幕、写SD卡都是路子,但最省事的出口其实是HTTP——往服务器一发,手机电脑哪儿都能看。
这篇我照着Random Nerd Tutorials上Rui Santos写的ESP32 HTTP GET/POST教程理了一遍,那条教程2020年4月发布、2022年10月还有过更新,算是被翻烂的经典底子。代码全部原样搬过来,新手容易卡的地方我单独标出来。
先把边界说清楚:这篇讲的是ESP32当客户端,主动向服务器发请求、拿数据、报读数,不是拿ESP32自己搭网站。方向别搞反了。
GET和POST,先搞清方向
HTTP是客户端和服务器之间"你问我答"的协议:ESP32发出请求,服务器回响应,响应里带状态码,也可能带着你要的内容。教程开篇讲的就是这个往返过程。
GET是用来"要数据"的,参数直接拼在URL后面:
GET /update-sensor?temperature=value1问号后面那串就是查询参数,name是参数名、value是参数值。缺点也明显——直接写在URL上,谁都能看见。
POST是用来"送数据"的,给服务器新建或更新一条资源,比如上报一轮传感器读数。数据放在请求体里,URL上看不见:
POST /update-sensor HTTP/1.1
Host: example.com
api_key=api&sensor_name=name&temperature=value1&humidity=value2&pressure=value3
Content-Type: application/x-www-form-urlencoded
请求体里也可以直接塞JSON对象:
POST /update-sensor HTTP/1.1
Host: example.com
{api_key: "api", sensor_name: "name", temperature: value1, humidity: value2, pressure: value3}
Content-Type: application/json
提醒一句:POST只是"URL上看不见",走明文HTTP的话,抓包照样能看到请求体内容。真有敏感信息,该上HTTPS就上HTTPS。
方向感记住就行:往上送数据用POST,往下取数据用GET。
准备工作:一块ESP32加一台能收请求的服务器
硬件很简单:ESP32开发板一块。服务器那头教程用的是树莓派,配16GB Class10的microSD卡和5V 2.5A电源;杜邦线、面包板是树莓派那头搭环境用的。
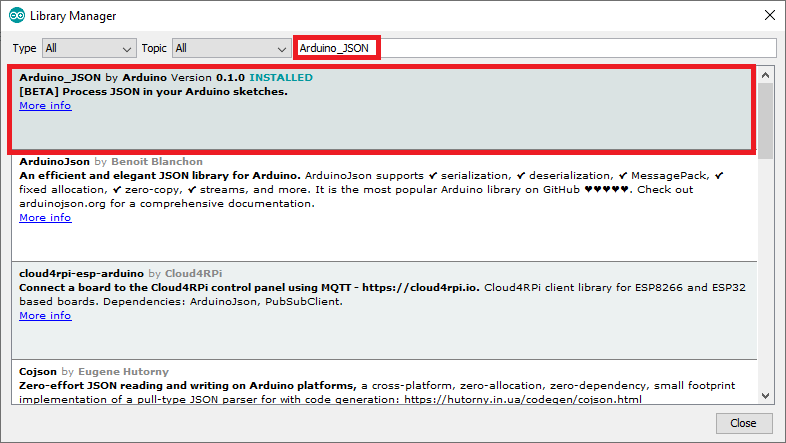
软件两步。第一步,Arduino IDE装好ESP32插件,这一步多数人早就有了。第二步,装Arduino_JSON库,后面解析JSON全靠它——IDE里打开库管理器搜Arduino_JSON,装上就行:
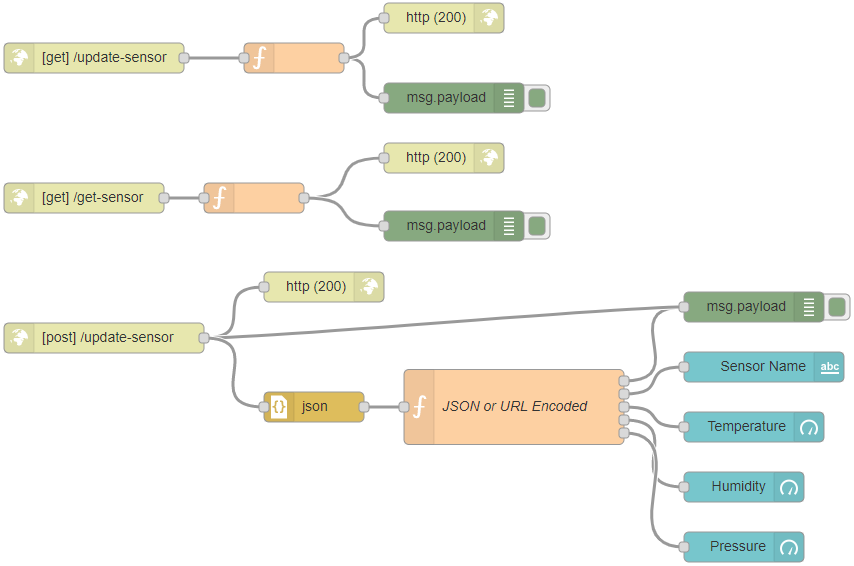
服务器端,浏览器开树莓派IP后面跟:1880,进Node-RED界面。菜单里点Import,把教程给的flow粘进去,就有/update-sensor和/get-sensor两个现成接口:
不想折腾树莓派也行。教程里明说,ThingSpeak、IFTTT的WebHooks、OpenWeatherMap,甚至自己写的PHP页面都能接——把代码里的serverName一换就完事。
第一个实验:GET请求把温度写上服务器
先走最短的路:ESP32每隔5秒发一次GET,温度参数直接拼在URL里。完整代码原样搬来,唯一改动是头文件的尖括号换成了引号(站点编辑器会把尖括号当标签吃掉,两种写法在编译上等价):
/*
  Rui Santos
  Complete project details at Complete project details at https://RandomNerdTutorials.com/esp32-http-get-post-arduino/

  Permission is hereby granted, free of charge, to any person obtaining a copy
  of this software and associated documentation files.

  The above copyright notice and this permission notice shall be included in all
  copies or substantial portions of the Software.
*/

#include "WiFi.h"
#include "HTTPClient.h"

const char* ssid = "REPLACE_WITH_YOUR_SSID";
const char* password = "REPLACE_WITH_YOUR_PASSWORD";

//Your Domain name with URL path or IP address with path
String serverName = "http://192.168.1.106:1880/update-sensor";

// the following variables are unsigned longs because the time, measured in
// milliseconds, will quickly become a bigger number than can be stored in an int.
unsigned long lastTime = 0;
// Timer set to 10 minutes (600000)
//unsigned long timerDelay = 600000;
// Set timer to 5 seconds (5000)
unsigned long timerDelay = 5000;

void setup() {
  Serial.begin(115200);

  WiFi.begin(ssid, password);
  Serial.println("Connecting");
  while(WiFi.status() != WL_CONNECTED) {
    delay(500);
    Serial.print(".");
  }
  Serial.println("");
  Serial.print("Connected to WiFi network with IP Address: ");
  Serial.println(WiFi.localIP());

  Serial.println("Timer set to 5 seconds (timerDelay variable), it will take 5 seconds before publishing the first reading.");
}

void loop() {
  //Send an HTTP POST request every 10 minutes
  if ((millis() - lastTime) > timerDelay) {
    //Check WiFi connection status
    if(WiFi.status()== WL_CONNECTED){
      HTTPClient http;

      String serverPath = serverName + "?temperature=24.37";

      // Your Domain name with URL path or IP address with path
      http.begin(serverPath.c_str());

      // If you need Node-RED/server authentication, insert user and password below
      //http.setAuthorization("REPLACE_WITH_SERVER_USERNAME", "REPLACE_WITH_SERVER_PASSWORD");

      // Send HTTP GET request
      int httpResponseCode = http.GET();

      if (httpResponseCode>0) {
        Serial.print("HTTP Response code: ");
        Serial.println(httpResponseCode);
        String payload = http.getString();
        Serial.println(payload);
      }
      else {
        Serial.print("Error code: ");
        Serial.println(httpResponseCode);
      }
      // Free resources
      http.end();
    }
    else {
      Serial.println("WiFi Disconnected");
    }
    lastTime = millis();
  }
}
要动的就两处:WiFi的SSID和密码换成自己的;serverName换成你服务器的实际地址。新手卡壳多半卡在这——IP打错、端口漏掉,后面就是一堆报错。
loop里拼URL、发请求的核心是这几行:
String serverPath = serverName + "?temperature=24.37";

// Your Domain name with URL path or IP address with path
http.begin(serverPath.c_str());

// If your need Node-RED/server authentication, insert user and password below
//http.setAuthorization("REPLACE_WITH_SERVER_USERNAME", "REPLACE_WITH_SERVER_PASSWORD");

// Send HTTP GET request
int httpResponseCode = http.GET();
ESP32实际访问的就是 http://192.168.1.106:1880/update-sensor?temperature=24.37 这样的地址,问号后面就是要写入的值。
服务器回了什么,靠这段代码接住:
if (httpResponseCode>0) {
  Serial.print("HTTP Response code: ");
  Serial.println(httpResponseCode);
  String payload = http.getString();
  Serial.println(payload);
}
else {
  Serial.print("Error code: ");
  Serial.println(httpResponseCode);
}
响应码大于0说明有回音,200就是成功;负数基本都是连接层面的问题,先查WiFi连没连上,再查地址写没写对。
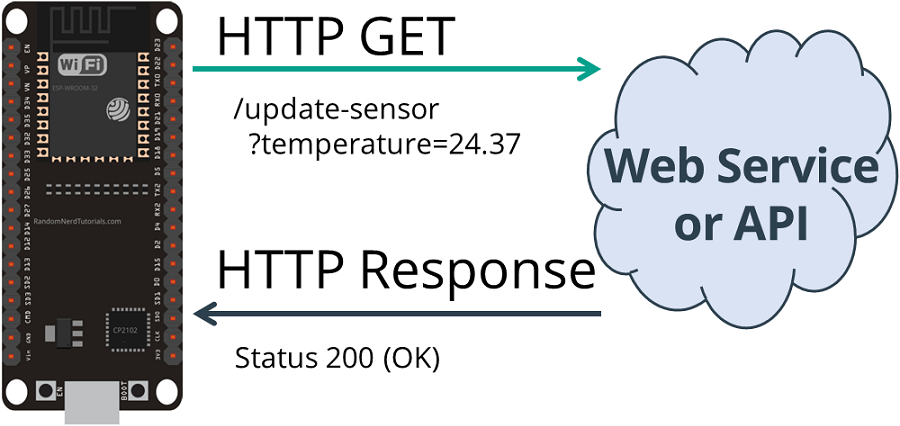
教程作者跑出来的效果:Node-RED调试窗口每隔5秒刷一条,24.37稳稳到账。教程里配的示意图把整个往返画得很直白:ESP32把温度参数拼在URL上发过去,服务器回一个200 OK:
第二个实验:GET拿回JSON再拆开
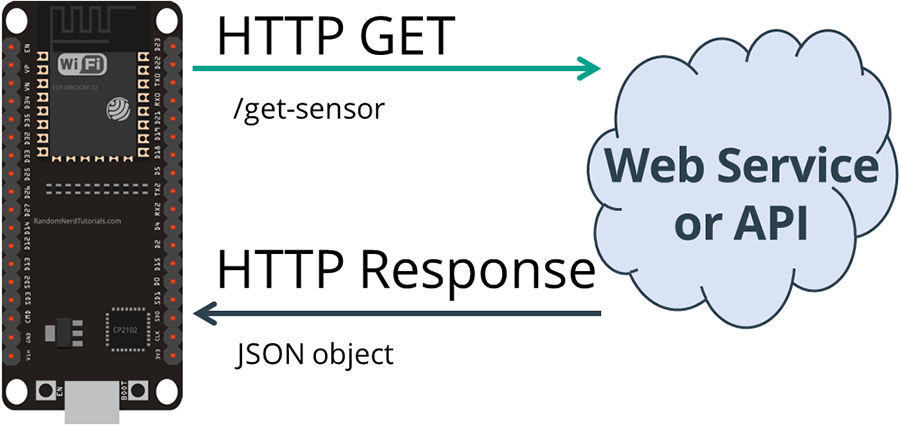
很多API返回的是JSON对象。这次serverName换成/get-sensor,去服务器取读数,拿回来的是这么一串:{"value1":24.25,"value2":49.54,"value3":1005.14}。
发请求的部分,教程封装成了一个httpGETRequest函数,逻辑和前面一样,只是把结果当字符串返回:
String httpGETRequest(const char* serverName) {
  HTTPClient http;

  // Your IP address with path or Domain name with URL path
  http.begin(serverName);

  // If you need Node-RED/server authentication, insert user and password below
  //http.setAuthorization("REPLACE_WITH_SERVER_USERNAME", "REPLACE_WITH_SERVER_PASSWORD");


  // Send HTTP POST request
  int httpResponseCode = http.GET();

  String payload = "{}";

  if (httpResponseCode>0) {
    Serial.print("HTTP Response code: ");
    Serial.println(httpResponseCode);
    payload = http.getString();
  }
  else {
    Serial.print("Error code: ");
    Serial.println(httpResponseCode);
  }
  // Free resources
  http.end();

  return payload;
}
拿到字符串后用JSON.parse拆包,逐个键值打印出来、存进数组:
JSONVar myObject = JSON.parse(sensorReadings);

// JSON.typeof(jsonVar) can be used to get the type of the var
if (JSON.typeof(myObject) == "undefined") {
  Serial.println("Parsing input failed!");
  return;
}

Serial.print("JSON object = ");
Serial.println(myObject);

// myObject.keys() can be used to get an array of all the keys in the object
JSONVar keys = myObject.keys();

for (int i = 0; i < keys.length(); i++) {
  JSONVar value = myObject[keys[i]];
  Serial.print(keys[i]);
  Serial.print(" = ");
  Serial.println(value);
  sensorReadingsArr[i] = double(value);
}
Serial.print("1 = ");
Serial.println(sensorReadingsArr[0]);
Serial.print("2 = ");
Serial.println(sensorReadingsArr[1]);
Serial.print("3 = ");
Serial.println(sensorReadingsArr[2]);
这里的坎在JSON.typeof(myObject)等于"undefined"——解析失败十有八九是服务器没回JSON,可能回了空串或者错误页。别急着怀疑代码,先去看服务器日志。
串口监视器里能看到收到的JSON对象和拆出来的三个值,Node-RED那边的调试窗口同样有记录。实验二配的示意图更直观:向/get-sensor发起GET,服务器直接把JSON对象回给你:
第三个实验:POST三种请求体随便挑
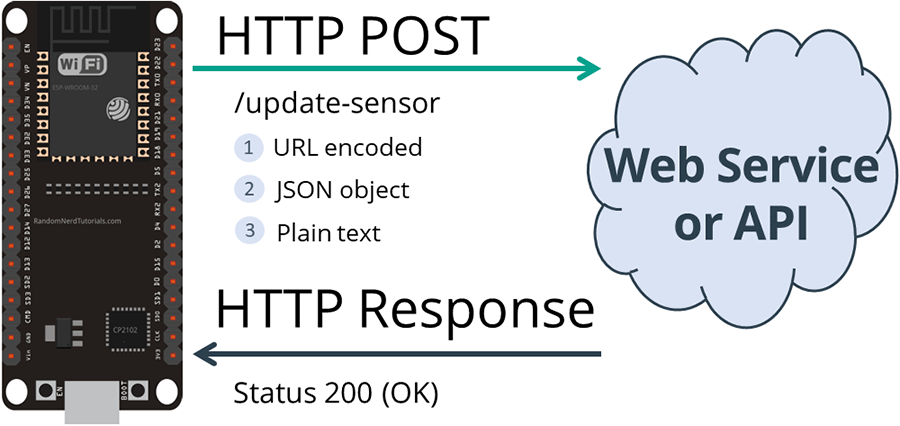
POST比GET热闹,数据全在请求体里。教程给了三种最常见的请求体写法,基本能对上市面上大多数API。
第一种,表单式(URL encoded),头里声明x-www-form-urlencoded:
// Your Domain name with URL path or IP address with path
http.begin(serverName);

// If you need Node-RED/server authentication, insert user and password below
//http.setAuthorization("REPLACE_WITH_SERVER_USERNAME", "REPLACE_WITH_SERVER_PASSWORD");

// Specify content-type header
http.addHeader("Content-Type", "application/x-www-form-urlencoded");

// Data to send with HTTP POST
String httpRequestData = "api_key=tPmAT5Ab3j7F9&sensor=BME280&value1=24.25&value2=49.54&value3=1005.14";

// Send HTTP POST request
int httpResponseCode = http.POST(httpRequestData);
第二种,直接发JSON对象,Content-Type换成application/json:
http.addHeader("Content-Type", "application/json");

int httpResponseCode = http.POST("{\"api_key\":\"tPmAT5Ab3j7F9\",\"sensor\":\"BME280\",\"value1\":\"24.25\",\"value2\":\"49.54\",\"value3\":\"1005.14\"}");
第三种,纯文本,适合只收一串字符的接口:
http.addHeader("Content-Type", "text/plain");

int httpResponseCode = http.POST("Hello, World!");
提醒一下:教程里那个Node-RED的flow不收纯文本,这条要等你去接别家API时才用得上。
效果在Node-RED调试窗口里看得清清楚楚:每5秒一条POST记录,api_key、sensor、三个value全在请求体里躺着。教程作者还把这些值接到了三个仪表盘gauge上。实验三配的示意图,POST的三种请求体都画在里面:
整套流程捋下来就三样东西:serverName写对、请求方法选对、请求体格式对上。GET拼参数、POST填请求体,别的都不玄乎。
这几个实验最大的价值是当模板用:上报读数到ThingSpeak,GET拿天气回来,IFTTT触发个通知,都是把serverName和参数一换就能跑的事。明文的HTTP玩熟了,教程同站还有HTTPS的进阶篇,不急,一步步来。
最后交代一句:代码逐字符搬运自Random Nerd Tutorials的ESP32 HTTP GET/POST教程页,代码版权头里写明可自由使用。照着做卡住了,多半就是你我这种新手都趟过的那几个坑——WiFi没连上、IP写错、端口漏掉,从这三样查起准没错。





Node-RED这个思路不错,导入flow就能测,比自己写PHP省事多了。回头把我阳台上那块板子的数据也这么怼上去。
这个HTTPClient的坑我踩过:serverName里端口号漏掉,返回码一直是负的,折腾一晚上才发现是树莓派重启后IP变了。文章里那句"负数基本都是连接层面的问题"算是说到点子上了。再补一个提醒:Arduino_JSON和ArduinoJson是两个不同的库,装错了JSON.parse直接报undefined,我头一回就这么栽的,新版装对就好。
GET拼URL、POST填请求体,这两句总结到位,收藏了。
刚玩ESP32,正好卡在数据往哪儿发这一步,这篇来得及时,明天照着试一遍。