
给平衡车、云台、四足做姿态反馈时,绕不开一颗六轴 IMU。MPU6050 是这块最经典的入门料:一颗芯片里塞了三轴加速度计加三轴陀螺仪,I2C 两根线就能读数,模块价格长期在几块钱一档。这篇按从接线到算出俯仰、横滚角的顺序把它过一遍,规格和换算系数都对照数据手册口径核过。
姿态角为什么要两颗传感器凑
加速度计测的是线性加速度,静止时各轴感受到的是重力分量,用它反解倾角,静态很稳,但一动起来,运动加速度混进去,角度就抖。陀螺仪测的是角速度,动态响应快,但角度要靠角速度积分累出来,零位误差会随时间漂。
一个稳在静态、一个稳在动态,所以工程上从来不是二选一,而是把两者做融合。MPU6050 这种六轴方案也常被叫作 6 DoF(六个自由度)器件,输出就是加速度三个加角速度三个。芯片里还带一颗温度传感器和一个 DMP 硬件融合处理器,DMP 能在片内算好姿态四元数,这是后话。
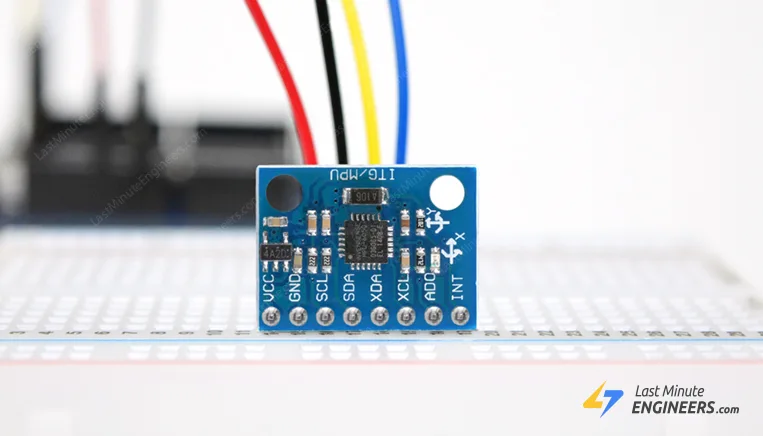
模块规格与引脚
模块厂规格表口径:工作电压 5V,加速度计量程 ±2g/±4g/±8g/±16g 四挡可配,陀螺仪量程 ±250°/s、±500°/s、±1000°/s、±2000°/s 四挡,温度范围 -40 至 +85℃,抗冲击最高 10000g。价格方面,国内渠道散新模块普遍在几元一档(截至11月10日)。
| 引脚 | 作用 |
|---|---|
| VCC | 供电,接 Arduino 5V |
| GND | 地 |
| SCL / SDA | I2C 时钟与数据 |
| XDA / XCL | 辅助 I2C 总线,用于外挂磁力计等传感器 |
| AD0 | I2C 地址选择:接高电平为 0x69,接低电平为 0x68 |
| INT | 中断输出,可配置敲击、晃动等事件触发 |
AD0 这个脚值得多说一句:模块上自带 4.7kΩ 下拉电阻,所以悬空不用接时地址默认就是 0x68。同一总线上想挂两颗 MPU6050,把其中一颗的 AD0 拉高改成 0x69 就不打架。XDA/XCL 挂上磁力计可以凑出 9 DoF,但入门阶段用不到,悬空即可。
接线:两根数据线搞定
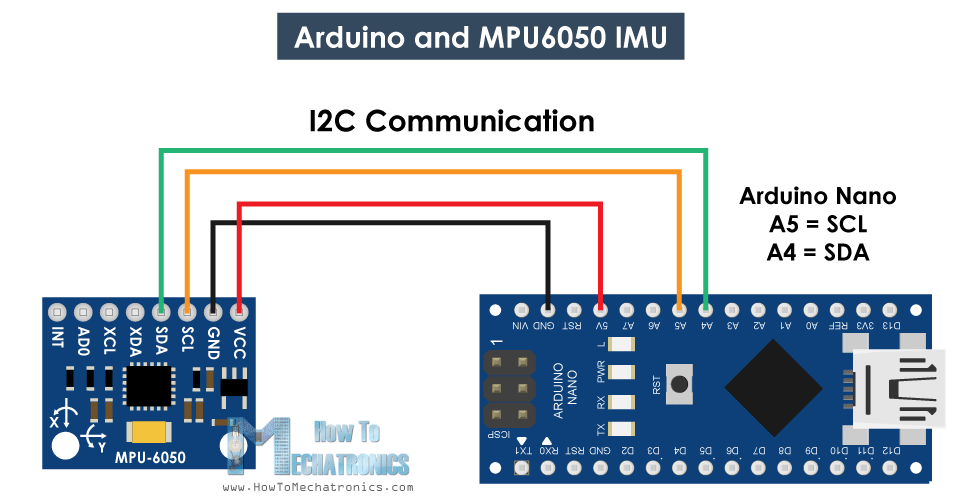
接线很简单,供电两根、I2C 两根。对 R3 布局的 Arduino(Uno、Nano、Mega 都算),SDA、SCL 在 A4、A5 上,Uno 顶部 AREF 旁也有直出的 SDA/SCL 排针,是同一组线。
| MPU6050 | Arduino |
|---|---|
| VCC | 5V |
| GND | GND |
| SCL | A5(SCL) |
| SDA | A4(SDA) |
直接读寄存器:原始数据怎么出来
读 MPU6050 有两条路:用 Adafruit 等封装好的库,几行 getEvent 拿到换算好的单位;或者像下面这份 HowToMechatronics 的代码那样直接操作寄存器,能看到每一步换算,学原理更透。两种我都建议跑一遍,对理解量程和灵敏度帮助很大。
直接寄存器方案的要点:先写 0x6B 寄存器唤醒芯片(上电默认睡),加速度数据从 0x3B 起连续 6 个寄存器,每个轴 16 位分高低字节;±2g 量程下灵敏度是 16384 LSB/g,±250°/s 量程下陀螺仪是 131 LSB/(°/s),这两个系数都出自数据手册的灵敏度表。代码里 accAngleX、accAngleY 那两个常数 0.58、1.58 是那块具体模块的零偏,你自己跑要用文末的误差校准函数重新算,不能照抄。
/*
   Arduino and MPU6050 Accelerometer and Gyroscope Sensor Tutorial
   by Dejan, https://howtomechatronics.com
*/
#include "Wire.h"
const int MPU = 0x68; // MPU6050 I2C address
float AccX, AccY, AccZ;
float GyroX, GyroY, GyroZ;
float accAngleX, accAngleY, gyroAngleX, gyroAngleY, gyroAngleZ;
float roll, pitch, yaw;
float AccErrorX, AccErrorY, GyroErrorX, GyroErrorY, GyroErrorZ;
float elapsedTime, currentTime, previousTime;
int c = 0;
void setup() {
  Serial.begin(19200);
  Wire.begin();                      // Initialize comunication
  Wire.beginTransmission(MPU);       // Start communication with MPU6050 // MPU=0x68
  Wire.write(0x6B);                  // Talk to the register 6B
  Wire.write(0x00);                  // Make reset - place a 0 into the 6B register
  Wire.endTransmission(true);        //end the transmission
  /*
  // Configure Accelerometer Sensitivity - Full Scale Range (default +/- 2g)
  Wire.beginTransmission(MPU);
  Wire.write(0x1C);                  //Talk to the ACCEL_CONFIG register (1C hex)
  Wire.write(0x10);                  //Set the register bits as 00010000 (+/- 8g full scale range)
  Wire.endTransmission(true);
  // Configure Gyro Sensitivity - Full Scale Range (default +/- 250deg/s)
  Wire.beginTransmission(MPU);
  Wire.write(0x1B);                   // Talk to the GYRO_CONFIG register (1B hex)
  Wire.write(0x10);                   // Set the register bits as 00010000 (1000deg/s full scale)
  Wire.endTransmission(true);
  delay(20);
  */
  // Call this function if you need to get the IMU error values for your module
  calculate_IMU_error();
  delay(20);
}
void loop() {
  // === Read acceleromter data === //
  Wire.beginTransmission(MPU);
  Wire.write(0x3B); // Start with register 0x3B (ACCEL_XOUT_H)
  Wire.endTransmission(false);
  Wire.requestFrom(MPU, 6, true); // Read 6 registers total, each axis value is stored in 2 registers
  //For a range of +-2g, we need to divide the raw values by 16384, according to the datasheet
  AccX = (Wire.read() << 8 | Wire.read()) / 16384.0; // X-axis value
  AccY = (Wire.read() << 8 | Wire.read()) / 16384.0; // Y-axis value
  AccZ = (Wire.read() << 8 | Wire.read()) / 16384.0; // Z-axis value
  // Calculating Roll and Pitch from the accelerometer data
  accAngleX = (atan(AccY / sqrt(pow(AccX, 2) + pow(AccZ, 2))) * 180 / PI) - 0.58; // AccErrorX ~(0.58) See the calculate_IMU_error()custom function for more details
  accAngleY = (atan(-1 * AccX / sqrt(pow(AccY, 2) + pow(AccZ, 2))) * 180 / PI) + 1.58; // AccErrorY ~(-1.58)
  // === Read gyroscope data === //
  previousTime = currentTime;        // Previous time is stored before the actual time read
  currentTime = millis();            // Current time actual time read
  elapsedTime = (currentTime - previousTime) / 1000; // Divide by 1000 to get seconds
  Wire.beginTransmission(MPU);
  Wire.write(0x43); // Gyro data first register address 0x43
  Wire.endTransmission(false);
  Wire.requestFrom(MPU, 6, true); // Read 4 registers total, each axis value is stored in 2 registers
  GyroX = (Wire.read() << 8 | Wire.read()) / 131.0; // For a 250deg/s range we have to divide first the raw value by 131.0, according to the datasheet
  GyroY = (Wire.read() << 8 | Wire.read()) / 131.0;
  GyroZ = (Wire.read() << 8 | Wire.read()) / 131.0;
  // Correct the outputs with the calculated error values
  GyroX = GyroX + 0.56; // GyroErrorX ~(-0.56)
  GyroY = GyroY - 2; // GyroErrorY ~(2)
  GyroZ = GyroZ + 0.79; // GyroErrorZ ~ (-0.8)
  // Currently the raw values are in degrees per seconds, deg/s, so we need to multiply by sendonds (s) to get the angle in degrees
  gyroAngleX = gyroAngleX + GyroX * elapsedTime; // deg/s * s = deg
  gyroAngleY = gyroAngleY + GyroY * elapsedTime;
  yaw =  yaw + GyroZ * elapsedTime;
  // Complementary filter - combine acceleromter and gyro angle values
  roll = 0.96 * gyroAngleX + 0.04 * accAngleX;
  pitch = 0.96 * gyroAngleY + 0.04 * accAngleY;

  // Print the values on the serial monitor
  Serial.print(roll);
  Serial.print("/");
  Serial.print(pitch);
  Serial.print("/");
  Serial.println(yaw);
}
void calculate_IMU_error() {
  // We can call this funtion in the setup section to calculate the accelerometer and gyro data error. From here we will get the error values used in the above equations printed on the Serial Monitor.
  // Note that we should place the IMU flat in order to get the proper values, so that we then can the correct values
  // Read accelerometer values 200 times
  while (c < 200) {
    Wire.beginTransmission(MPU);
    Wire.write(0x3B);
    Wire.endTransmission(false);
    Wire.requestFrom(MPU, 6, true);
    AccX = (Wire.read() << 8 | Wire.read()) / 16384.0 ;
    AccY = (Wire.read() << 8 | Wire.read()) / 16384.0 ;
    AccZ = (Wire.read() << 8 | Wire.read()) / 16384.0 ;
    // Sum all readings
    AccErrorX = AccErrorX + ((atan((AccY) / sqrt(pow((AccX), 2) + pow((AccZ), 2))) * 180 / PI));
    AccErrorY = AccErrorY + ((atan(-1 * (AccX) / sqrt(pow((AccY), 2) + pow((AccZ), 2))) * 180 / PI));
    c++;
  }
  //Divide the sum by 200 to get the error value
  AccErrorX = AccErrorX / 200;
  AccErrorY = AccErrorY / 200;
  c = 0;
  // Read gyro values 200 times
  while (c < 200) {
    Wire.beginTransmission(MPU);
    Wire.write(0x43);
    Wire.endTransmission(false);
    Wire.requestFrom(MPU, 6, true);
    GyroX = Wire.read() << 8 | Wire.read();
    GyroY = Wire.read() << 8 | Wire.read();
    GyroZ = Wire.read() << 8 | Wire.read();
    // Sum all readings
    GyroErrorX = GyroErrorX + (GyroX / 131.0);
    GyroErrorY = GyroErrorY + (GyroY / 131.0);
    GyroErrorZ = GyroErrorZ + (GyroZ / 131.0);
    c++;
  }
  //Divide the sum by 200 to get the error value
  GyroErrorX = GyroErrorX / 200;
  GyroErrorY = GyroErrorY / 200;
  GyroErrorZ = GyroErrorZ / 200;
  // Print the error values on the Serial Monitor
  Serial.print("AccErrorX: ");
  Serial.println(AccErrorX);
  Serial.print("AccErrorY: ");
  Serial.println(AccErrorY);
  Serial.print("GyroErrorX: ");
  Serial.println(GyroErrorX);
  Serial.print("GyroErrorY: ");
  Serial.println(GyroErrorY);
  Serial.print("GyroErrorZ: ");
  Serial.println(GyroErrorZ);
}
代码末尾的 calculate_IMU_error() 就是校准函数:模块水平静置,加速度计和陀螺仪各连读 200 次取平均,得到零偏。上电时务必保持模块不动,否则校准值全是废的。
从原始值到俯仰横滚:互补滤波
有了加速度和角速度,姿态角分两步算。第一步,静止倾角用反三角函数从重力分量反解:横滚 roll 来自 atan(AccY/sqrt(AccX²+AccZ²)),俯仰 pitch 来自 atan(-AccX/sqrt(AccY²+AccZ²)),都是转成角度后的值再减零偏。
第二步,把陀螺仪积分角和加速度反解角按 0.96 比 0.04 加权融合,这就是互补滤波:
roll = 0.96 × gyroAngleX + 0.04 × accAngleX,pitch 同理。陀螺仪负责跟快,加速度计负责把漂移一次次拉回来。系数不是圣旨,振动大的场合把加速度计权重加大,响应要求快就把陀螺仪权重加大,0.96 只是常用的起步值。
姿态角的输出长这样:
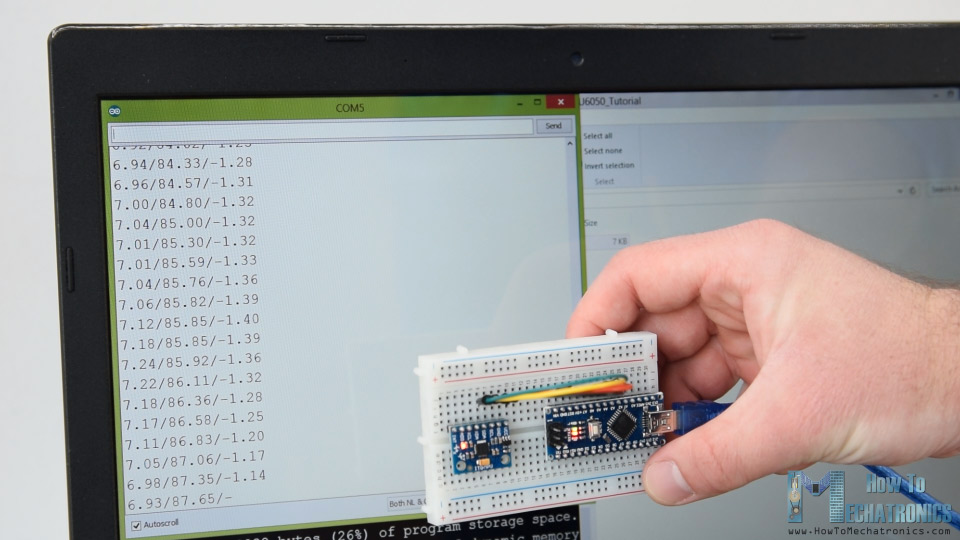
顺带一提,偏航 yaw 只能靠陀螺仪积分,没有磁力计做绝对基准,漂是正常的,想要不漂的航向得加磁力计凑 9 轴。
用 Serial Plotter 看波形更直观
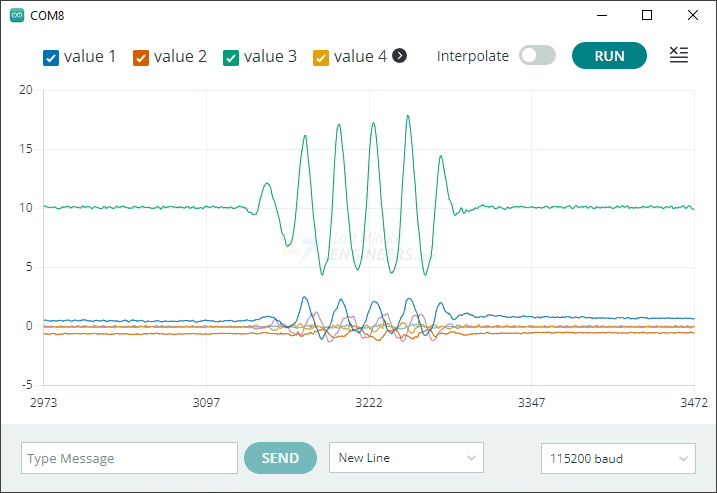
串口打印数字不如画波形直观。Arduino IDE 自带的 Serial Plotter(工具菜单里)可以把多路数据画成实时曲线,配合 Adafruit MPU6050 库的 getEvent 接口,把六个值用逗号分隔打印,每 10ms 读一次,摇动模块就能看到三轴加速度和角速度的波形实时变化。
选型视角的几句小结
MPU6050 的定位很清楚:几块钱的成本拿到 6 DoF 姿态,DMP 还能在片内做融合,对平衡车、云台这类项目完全够用。它的短板也要心里有数:没有磁力计,yaw 会漂;MPU6050 停产多年,现在渠道上的模块多数是兼容芯片或拆机料,WHO_AM_I 寄存器(0x75)读到 0x68 才是真身,兼容芯片寄存器兼容但零偏和噪声特性会有差异。
如果你的项目对姿态精度要求更高,往下可以看 MPU9250(带磁力计)或者更新的 ICM-42688 这类,价格上浮但噪声和漂移都好一截。不过对大多数入门项目,先把这颗几块钱的 MPU6050 玩透,收益最大。



0.96/0.04 这个互补滤波系数确实经典,平衡小车那边的老代码基本都是这个起步,调的时候振动大就把加速度计权重往上加一点。
几块钱的模块玩出姿态角,性价比无敌了。先收藏,周末翻出 Uno 接一下试试。
这篇文章把寄存器这条路讲得比较透。我之前一直用 Adafruit 的库 getEvent 直接拿结果,出了问题都不知道卡在哪,后来看了别人写寄存器的代码才搞明白 0x3B 开始连读那套流程。补充一个我踩过的坑:Wire.requestFrom 拿回来的字节顺序是高位在前,我第一次把高低字节拼反了,加速度 Z 轴读出来永远是 0.3 左右的怪数,查了一晚上。另外上电校准那步真的不能省,桌面不水平的话零偏差得很多,建议把模块贴在盒子上再开机。