
给装在天花板上的 ESP32 更新固件,还要踩着梯子插 USB 线,这种事干过一次就不想干第二次。OTA(Over-The-Air)无线升级就是解决这个问题的:固件通过 Wi-Fi 直接推给板子,免拆机、免拆壳、免串口。这篇把 Arduino IDE 下两条最常用的路线讲透:一是官方的 ArduinoOTA,IDE 里选个网络端口直接推;二是 ElegantOTA 这类网页上传方案,浏览器里选个 .bin 文件就完成升级。全部步骤和代码都有真实出处可对照复现。
OTA 是怎么做到免拆机的
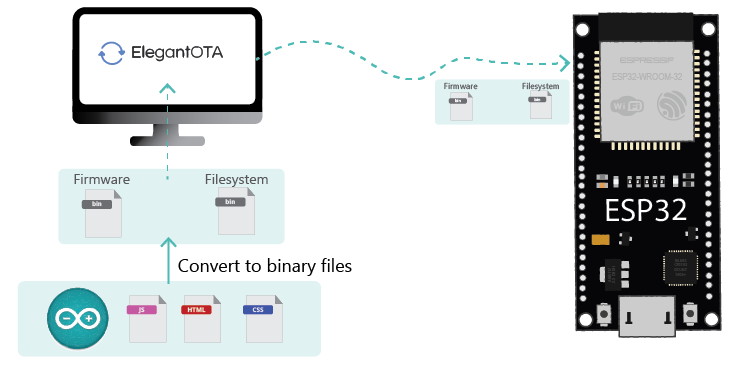
ESP32 出厂分区表默认把 4MB Flash 分成两块应用区:app0 和 app1。当前固件跑在 app0,OTA 升级时新固件写进 app1,写完校验通过再切换启动分区重启;如果新固件传一半断网断电,app0 里的旧固件还在,板子下次照样从旧分区启动,不会因为一次失败的升级就报废。这套机制由 Espressif 的 esp_ota_ops 和 Arduino 封装的 Update 库实现,各方案只是在外面套了不同的壳。
不同方案的区别在"谁来当上传入口"。ArduinoOTA 走 UDP 私有协议,入口是 Arduino IDE 的端口列表;ElegantOTA 和 OTA Web Updater 走 HTTP,入口是一个网页,手机浏览器也能传固件。无论哪条路,第一次烧录都必须走串口——得先让板子连上 Wi-Fi 并跑起 OTA 服务,之后才有无线一说。
路线一:ArduinoOTA,IDE 里选个网络端口就能推
ESP32 板卡支持包自带 ArduinoOTA 库,官方示例叫 BasicOTA,代码取自 Espressif 的 arduino-esp32 仓库示例。整个流程是:WiFi.begin 连上网后调 ArduinoOTA.begin(),它会注册一个 mDNS 主机名并监听 UDP 3232 端口;loop() 里必须持续调用 ArduinoOTA.handle() 处理升级请求。
// Copyright 2024 Espressif Systems (Shanghai) PTE LTD
//
// Licensed under the Apache License, Version 2.0 (the "License");
// you may not use this file except in compliance with the License.
// You may obtain a copy of the License at

//     http://www.apache.org/licenses/LICENSE-2.0
//
// Unless required by applicable law or agreed to in writing, software
// distributed under the License is distributed on an "AS IS" BASIS,
// WITHOUT WARRANTIES OR CONDITIONS OF ANY KIND, either express or implied.
// See the License for the specific language governing permissions and
// limitations under the License.

#include "Arduino.h"
#include "WiFi.h"
#include "ESPmDNS.h"
#include "NetworkUdp.h"
#include "ArduinoOTA.h"

const char *ssid = "..........";
const char *password = "..........";
uint32_t last_ota_time = 0;

void setup() {
  Serial.begin(115200);
  Serial.println("Booting");
  WiFi.mode(WIFI_STA);
  WiFi.begin(ssid, password);
  while (WiFi.waitForConnectResult() != WL_CONNECTED) {
    Serial.println("Connection Failed! Rebooting...");
    delay(5000);
    ESP.restart();
  }

  // Port defaults to 3232
  // ArduinoOTA.setPort(3232);

  // Hostname defaults to esp3232-[MAC]
  // ArduinoOTA.setHostname("myesp32");

  // Password can be set with plain text (will be hashed internally)
  // The authentication uses PBKDF2-HMAC-SHA256 with 10,000 iterations
  // ArduinoOTA.setPassword("admin");

  // Or set password with pre-hashed value (SHA256 hash of "admin")
  // SHA256(admin) = 8c6976e5b5410415bde908bd4dee15dfb167a9c873fc4bb8a81f6f2ab448a918
  // ArduinoOTA.setPasswordHash("8c6976e5b5410415bde908bd4dee15dfb167a9c873fc4bb8a81f6f2ab448a918");

  ArduinoOTA
    .onPrepare([]() {
      // Note: This is called before the OTA update begins, but after authentication.
      // Useful to stop Interrupts or other hardware that might interfere with the update process.
      Serial.println("Prepare for OTA update");
    })
    .onStart([]() {
      String type;
      if (ArduinoOTA.getCommand() == U_FLASH) {
        type = "sketch";
      } else {  // U_SPIFFS
        type = "filesystem";
      }

      // NOTE: if updating SPIFFS this would be the place to unmount SPIFFS using SPIFFS.end()
      Serial.println("Start updating " + type);
    })
    .onEnd([]() {
      Serial.println("\nEnd");
    })
    .onProgress([](unsigned int progress, unsigned int total) {
      if (millis() - last_ota_time > 500) {
        Serial.printf("Progress: %u%%\n", (progress / (total / 100)));
        last_ota_time = millis();
      }
    })
    .onError([](ota_error_t error) {
      Serial.printf("Error[%u]: ", error);
      if (error == OTA_AUTH_ERROR) {
        Serial.println("Auth Failed");
      } else if (error == OTA_BEGIN_ERROR) {
        Serial.println("Begin Failed");
      } else if (error == OTA_CONNECT_ERROR) {
        Serial.println("Connect Failed");
      } else if (error == OTA_RECEIVE_ERROR) {
        Serial.println("Receive Failed");
      } else if (error == OTA_END_ERROR) {
        Serial.println("End Failed");
      }
    });

  ArduinoOTA.begin();

  Serial.println("Ready");
  Serial.print("IP address: ");
  Serial.println(WiFi.localIP());
}

void loop() {
  ArduinoOTA.handle();
}
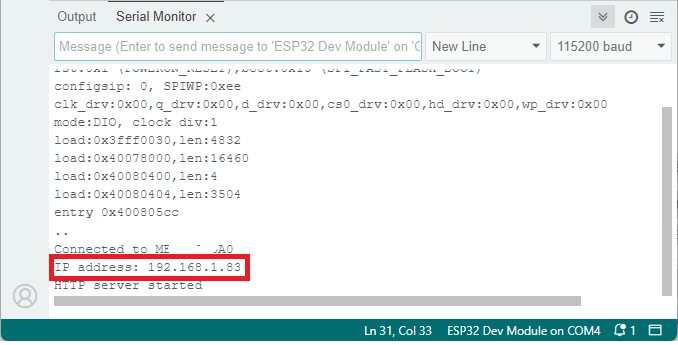
把 ssid 和 password 换成自己的 Wi-Fi 账号密码,第一次先用 USB 线正常烧录。烧完打开串口监视器(波特率 115200),按一下 EN 复位键,能看到板子打印出的 IP 地址。随后回到 IDE 的工具-端口菜单,这时会多出一个网络端口,名字形如 esp3232-xxxxxx,选中它再点上传,固件就走 Wi-Fi 推过去了,不再依赖串口。
最常见的坑是网络端口迟迟不出现:ArduinoOTA 的端口发现依赖 mDNS,而有些环境里 mDNS 服务被禁用,端口就永远刷不出来,板子和电脑必须确认在同一个网段。另外,官方库默认没有设密码,局域网里任何人都能往你板子里推固件,建议把注释里那行 ArduinoOTA.setPassword("admin") 解开,换成自己的口令,认证走的是 PBKDF2-HMAC-SHA256,一万次迭代。
路线二:ElegantOTA,浏览器里传 .bin 固件
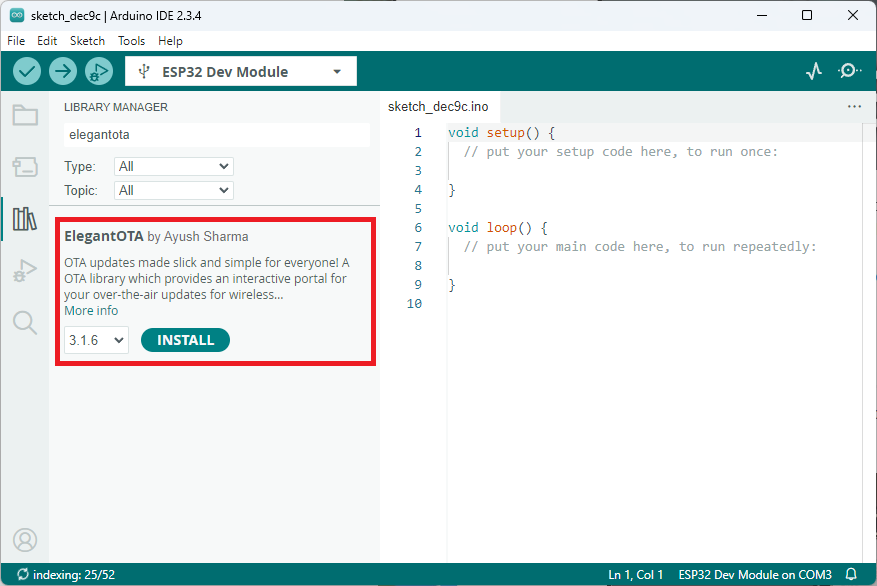
网页上传的好处是不依赖 IDE,手机、平板都能当升级终端。ElegantOTA 是目前用得最多的库之一,仓库在 GitHub 上(ayushsharma82/ElegantOTA),Arduino IDE 库管理器直接搜 ElegantOTA 安装即可。如果要用异步模式配合 ESPAsyncWebServer,还需要在库管理器装 ESPAsyncWebServer 和 AsyncTCP,并把 ElegantOTA.h 里的 ELEGANTOTA_USE_ASYNC_WEBSERVER 宏设为 1。
下面是库的基本示例(取自 Random Nerd Tutorials 教程页),一个极简异步 Web 服务器,根路径返回一句文本,/update 路径就是升级页面:
/*********
  Rui Santos & Sara Santos - Random Nerd Tutorials
  Complete project details at https://RandomNerdTutorials.com/esp32-ota-elegantota-arduino/
  Permission is hereby granted, free of charge, to any person obtaining a copy of this software and associated documentation files. The above copyright notice and this permission notice shall be included in all copies or substantial portions of the Softwar
*********/

#include "Arduino.h"
#include "WiFi.h"
#include "AsyncTCP.h"
#include "ESPAsyncWebServer.h"
#include "ElegantOTA.h"

const char* ssid = "REPLACE_WITH_YOUR_SSID";
const char* password = "REPLACE_WITH_YOUR_PASSWORD";

AsyncWebServer server(80);

void setup(void) {
  Serial.begin(115200);
  WiFi.mode(WIFI_STA);
  WiFi.begin(ssid, password);
  Serial.println("");

  // Wait for connection
  while (WiFi.status() != WL_CONNECTED) {
    delay(500);
    Serial.print(".");
  }
  Serial.println("");
  Serial.print("Connected to ");
  Serial.println(ssid);
  Serial.print("IP address: ");
  Serial.println(WiFi.localIP());

  server.on("/", HTTP_GET, [](AsyncWebServerRequest *request) {
    request->send(200, "text/plain", "Hi! I am ESP32.");
  });

  server.begin();
  Serial.println("HTTP server started");

  ElegantOTA.begin(&server);    // Start ElegantOTA
}

void loop(void) {
  ElegantOTA.loop();
}
编译烧录后,串口监视器拿到 IP,浏览器访问 http://板子IP/ 能看到 Hi! I am ESP32.,访问 http://板子IP/update 就是升级页面。接下来的关键一步:在 IDE 里先选对板子型号,然后走文件-导出已编译的二进制文件(Sketch - Export Compiled Binary),稍等片刻到工程文件夹的 build 目录里找后缀为 .ino.bin 的文件——注意不是 .ino.bin 之外那些 bootloader、partition 开头的文件,就传这一个。
在 /update 页面选 firmware 选项,选好 .ino.bin 点上传,进度条走完出现成功提示,板子自动重启跑新固件。ElegantOTA 的页面还能顺手升级文件系统镜像(.littlefs.bin),改网页前端、换配置文件不用重新编译固件,这在做 Web 控制类项目时非常省事。
原生方案:OTA Web Updater 的登录口令页
不想引第三方库的话,ESP32 板卡包里还有个官方味道更浓的思路:OTAWebUpdater 示例。它在板子上跑一个普通 HTTP 服务器,先访问板子 IP 弹出登录页,账号密码默认都是 admin(在代码里可改),登录后跳到 /serverIndex 页面,就是一个带上传表单和进度条的固件上传页。
它底层用 Update 库手动处理 multipart 分块上传:HTTPUpload 状态机依次进入 UPLOAD_FILE_START、UPLOAD_FILE_WRITE、UPLOAD_FILE_END,开始时 Update.begin(UPDATE_SIZE_UNKNOWN) 申请最大可用空间,分块写入,结束时 Update.end(true) 校验并置大小,然后重启生效。想了解上传全过程的话,Random Nerd Tutorials 的 ESP32 Over-the-air (OTA) Programming 教程页有完整示例可逐段对照。
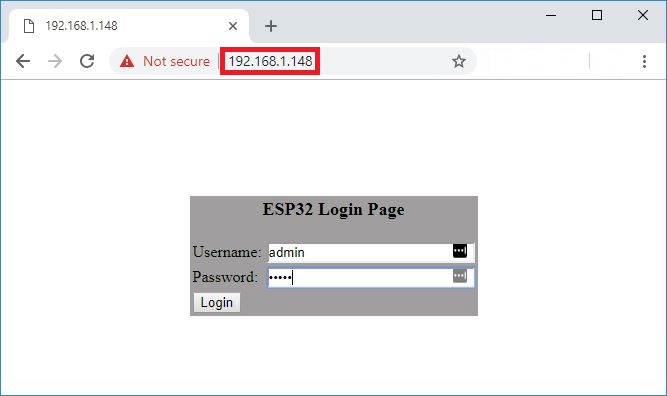
但要提醒一句:这套示例的鉴权只挡登录页,知道 /serverIndex 地址的人可以绕过登录直接打开上传页,默认口令 admin 也是形同虚设。放在家庭局域网练手没问题,要在公共网络环境用就得自己加会话校验或者换成 ElegantOTA 的口令配置(ElegantOTA 支持通过 setAuth 走 HTTP Basic 鉴权)。
分区容量、变砖风险与几条实战建议
固件大小受 OTA 分区限制。ESP32 默认 4MB 分区方案下,app0 和 app1 各分到约 1.2MB,你导出的 .ino.bin 超过这个数,Update.begin 会直接失败,提示空间不足。这时可以在 IDE 的工具-Flash Size 里确认板子实际容量,用更大的分区方案,或者裁剪固件。注意固件里的 OTA 例程必须保留:新固件里要是删掉了 OTA 相关代码(网页服务器、ArduinoOTA.handle 之类),这次升级能成,下次就只能乖乖接串口了。
升级中断的风险要分两面看:因为新固件写在另一个分区,传输中断电、断网,旧固件依然完好,重启后可以重新推,这就是双分区设计的兜底能力;但升级完成后切换启动分区的瞬间掉电,或者新固件本身有死循环 bug,板子就可能起不来,变砖后只能重走串口救。所以正式项目建议升级前校验 bin 文件完整性,升级后加个看门狗或自回滚逻辑(新固件启动时确认服务正常再置 OTA 有效标记,否则 esp_ota_mark_app_invalid_rollback_and_reboot 回到旧版)。
最后两条建议:一是给 ESP32 在路由器上绑定静态 IP,或者代码里 WiFi.config 固定 IP,不然 DHCP 重启换地址,你还得上路由器里翻新 IP;二是别把升级页暴露到公网,局域网玩的收益已经足够大,真要远程升级就走 VPN 或者加一层反向代理鉴权。工具链上 Arduino IDE 2.x 配 ESP32 板卡包 3.x 都能跑通本文两条路线,ElegantOTA 装最新版即可,老教程里"必须降级板卡包到 2.0.x"的提示只针对早已停更的 AsyncElegantOTA 旧版库,用现在库管理器里的 ElegantOTA 3.x 不受影响。




这篇把双分区回滚讲清楚了,之前我一直以为 OTA 升级失败会变砖,原来新固件是写到另一个分区,旧固件还在 app0 兜底。上次给装在楼道里的 ESP32 换固件就是靠 ElegantOTA 网页传的 bin,确实不用拆壳了。
网络端口刷不出来的问题我也遇到过,最后发现是电脑和板子不在同一个网段,换成手机热点试反而一次就出来了
导出 bin 那步容易踩坑,build 目录里一堆文件,其实就传 .ino.bin 那一个,别把 bootloader 开头的也传上去
OTAWebUpdater 的 /serverIndex 能绕登录这个细节提得好,官方示例这块确实不严谨,公网环境千万别裸奔