
调过云台、装过机械臂的都知道,很多参数不该拿螺丝刀拧,该拿旋钮拧。给桌面臂换个零位、给云台拨个角度,用KY-040旋转编码器配Arduino是最顺手的方案:转一格就是一步,正转反转随手拧,比按按键舒服太多。这篇把接线、中断读脉冲、判方向、消抖整条链路一次讲透,最后落到旋钮直接控制舵机角度。
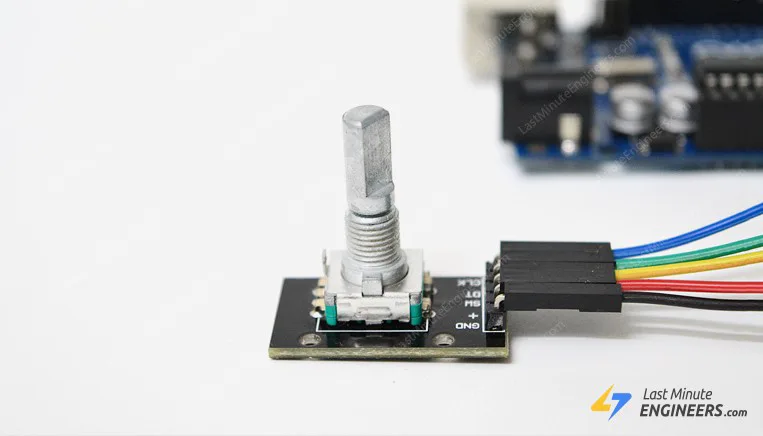
先搞清楚编码器吐的是什么信号
KY-040这类增量式编码器,内部本质上是两片错开安装的触点。转轴带着公共端转动,两个触点一个先接触、一个后接触,于是输出CLK(A相)和DT(B相)两组永远差半拍的方波——技术上叫相位差90度。正转是A先动,反转是B先动,就靠这个先后顺序判方向,这套玩法叫正交编码(Quadrature Encoding)。
判方向的时机也有讲究:只在A相状态跳变的那一瞬间看B相。B相和A相电平不同是一个方向,相同就是另一个方向。一句话,方向信息藏在两路信号的先后关系里,单看任何一路都只能数出脉冲、数不出方向。
触点是机械结构,就绕不开弹跳。触点接触瞬间会来回抖几下才稳定,反映到引脚上就是跳变沿前后多出一串毛刺,这就是消抖问题的由来。后文的代码判据会顺带处理它。
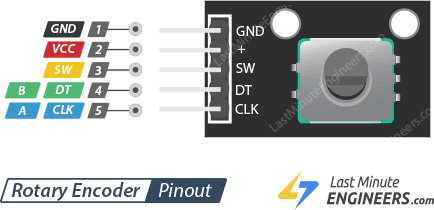
模块一共5个脚:GND接地,VCC接5V或3.3V都行,CLK和DT是两路信号,SW是轴端往下按触发的自带按键。SW平时靠上拉电阻保持高电平,按下才拉低——上拉可以用Arduino内部的上拉,也可以外接。每拧一格(一个detent)CLK就出一个完整脉冲,旋钮的"咔哒"手感和脉冲是一一对应的。
接线:五根线五分钟搞定
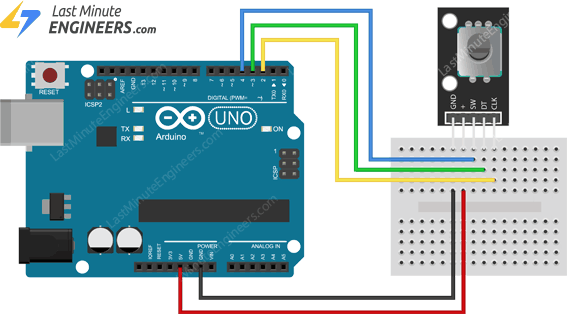
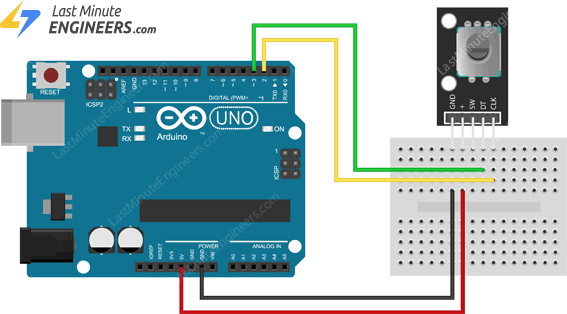
接线没什么悬念:CLK接D2,DT接D3,SW接D4,VCC接5V,GND接GND。D2、D3是Uno上仅有的两个能挂外部中断的引脚,后面上中断版必须占住它们,所以一开始就按这个分配,免得返工。
先跑轮询版,看清脉冲长什么样
第一版先轮询,把原理跑通。核心判据两条:一是只在CLK从0变1、读到高电平的那一刻动作,一个脉冲只数一次,不重复计数;二是这一刻顺手读DT,DT和CLK电平不同就减一(CCW),相同就加一(CW),方向就出来了。
// Rotary Encoder Inputs
#define CLK 2
#define DT 3
#define SW 4

int counter = 0;
int currentStateCLK;
int lastStateCLK;
String currentDir = "";
unsigned long lastButtonPress = 0;

void setup() {

  // Set encoder pins as inputs
  pinMode(CLK, INPUT);
  pinMode(DT, INPUT);
  pinMode(SW, INPUT_PULLUP);

  // Setup Serial Monitor
  Serial.begin(9600);

  // Read the initial state of CLK
  lastStateCLK = digitalRead(CLK);
}

void loop() {

  // Read the current state of CLK
  currentStateCLK = digitalRead(CLK);

  // If last and current state of CLK are different, then pulse occurred
  // React to only 1 state change to avoid double count
  if (currentStateCLK != lastStateCLK && currentStateCLK == 1) {

    // If the DT state is different than the CLK state then
    // the encoder is rotating CCW so decrement
    if (digitalRead(DT) != currentStateCLK) {
      counter--;
      currentDir = "CCW";
    } else {
      // Encoder is rotating CW so increment
      counter++;
      currentDir = "CW";
    }

    Serial.print("Direction: ");
    Serial.print(currentDir);
    Serial.print(" | Counter: ");
    Serial.println(counter);
  }

  // Remember last CLK state
  lastStateCLK = currentStateCLK;

  // Read the button state
  int btnState = digitalRead(SW);

  //If we detect LOW signal, button is pressed
  if (btnState == LOW) {
    //if 50ms have passed since last LOW pulse, it means that the
    //button has been pressed, released and pressed again
    if (millis() - lastButtonPress > 50) {
      Serial.println("Button pressed!");
    }

    // Remember last button press event
    lastButtonPress = millis();
  }

  // Put in a slight delay to help debounce the reading
  delay(1);
}
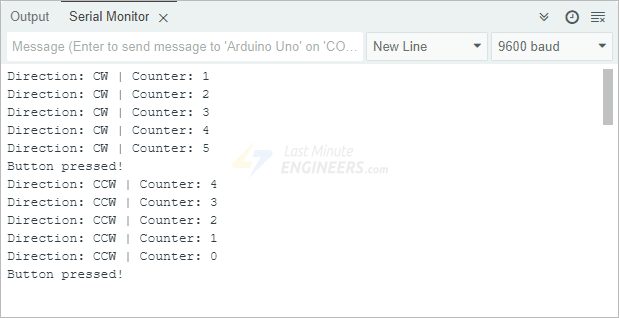
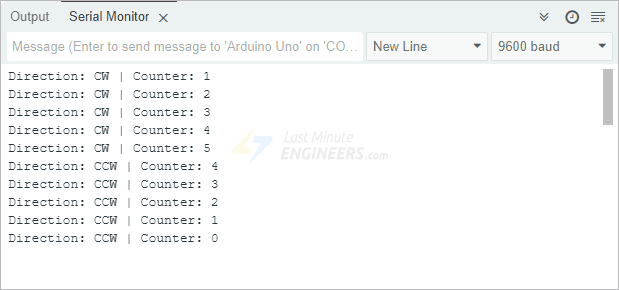
烧进去开串口监视器(9600),拧一圈能看到方向和计数一路跟手,按下旋钮还会打出Button pressed。SW那段的写法也值得留意:读到低电平后用millis()判断距上次按下超过50毫秒才算有效,这是最省事的软件消抖。
但轮询有个绕不过去的坑:loop里只要有delay或者别的活,脉冲来了没接住就丢步。旋钮拧快一点,计数就开始不对劲。做云台、机械臂这种要实时响应的活,轮询版只能当验证工具,正式方案得上中断。
换中断读:loop彻底解放
中断版把判脉冲、判方向的逻辑整体搬进ISR,CLK挂CHANGE中断,电平一变就进updateEncoder(),loop里彻底空出来干正事。ISR里每次先读CLK当前状态、和上次状态比对,确认是真跳变再读DT判方向,末尾把这次状态存回lastStateCLK——整套逻辑和轮询版一模一样,只是换了个触发时机。注意Uno只有D2、D3支持外部中断,这就是前面接线占D2的原因。
// Rotary Encoder Inputs
#define CLK 2
#define DT 3

int counter = 0;
int currentStateCLK;
int lastStateCLK;
String currentDir = "";

void setup() {
  // Set encoder pins as inputs
  pinMode(CLK, INPUT);
  pinMode(DT, INPUT);

  // Setup Serial Monitor
  Serial.begin(9600);

  // Read the initial state of CLK
  lastStateCLK = digitalRead(CLK);

  // Call updateEncoder() when a change is seen on CLK pin
  attachInterrupt(digitalPinToInterrupt(CLK), updateEncoder, CHANGE);
}

void loop() {
  //Do some useful stuff here
}

void updateEncoder() {
  // Read the current state of CLK
  currentStateCLK = digitalRead(CLK);

  // If last and current state of CLK are different, then pulse occurred
  // React to only 1 state change to avoid double count
  if (currentStateCLK != lastStateCLK && currentStateCLK == 1) {

    // If the DT state is different than the CLK state then
    // the encoder is rotating CCW so decrement
    if (digitalRead(DT) != currentStateCLK) {
      counter--;
      currentDir = "CCW";
    } else {
      // Encoder is rotating CW so increment
      counter++;
      currentDir = "CW";
    }

    Serial.print("Direction: ");
    Serial.print(currentDir);
    Serial.print(" | Counter: ");
    Serial.println(counter);
  }

  // Remember last CLK state
  lastStateCLK = currentStateCLK;
}
触发条件选CHANGE而不是RISING是有原因的:CHANGE在CLK的上升沿和下降沿都进一次ISR,代码里那句currentStateCLK == 1就是用来筛掉下降沿那次、只认上升沿的,一个脉冲只计一次。如果换成RISING单边沿触发,ISR次数减半,但丢掉了用下降沿做状态校验的机会,抖动大的时候反而更容易误计。电机测速那种只关心脉冲总数的高速场景,用RISING没问题;旋钮这种要判方向的场景,CHANGE配电平筛选更稳。
还有个细节:ISR里读的变量会被中断异步修改,正式项目里给counter、currentDir这类ISR与loop共享的变量加volatile声明更规范;演示代码量少、直接在ISR里打印输出,能跑通但别照搬进大项目。
烧进去再拧,快拧慢拧一格都不丢,串口输出干净利落:
消抖这一关怎么过
编码器触点抖不抖,直接决定计数虚不虚。这套代码里其实内置了三层防线。第一层是状态机判据本身:只在CLK读到高电平且与上次状态不同才动作,触点抖动产生的多余毛刺,大多数会被"上一态相等"这个条件挡掉。第二层是SW按键的millis() 50毫秒时间窗,抖动期内的连续低电平只认一次。第三层是轮询版结尾那个delay(1),给触点抖动留出稳定时间。
如果模块批次差、抖得厉害,还有两个补救:CLK和GND之间并一颗0.1µF电容做硬件滤波;或者把判据升级成A、B两相四状态的正交解码表,只按合法的跳变序列走,不在表里的毛刺直接丢弃。多数KY-040用代码层的两层就够稳,先别急着加料。
进阶:旋钮直接拧舵机角度
最后落到本职:旋钮控舵机。在中断版基础上加Servo库,舵机信号线接D9,计数器上下限卡在0到179,逆时针拧减、不到0就停在0,顺时针拧加、超过179停在179,每拧一格舵机走一度。整段代码如下(头文件按平台排版要求用了引号写法,Arduino下与尖括号写法编译等价):
// Include the Servo Library
#include "Servo.h"

// Rotary Encoder Inputs
#define CLK 2
#define DT 3

Servo servo;
int counter = 0;
int currentStateCLK;
int lastStateCLK;
String currentDir = "";

void setup() {
  // Set encoder pins as inputs
  pinMode(CLK, INPUT);
  pinMode(DT, INPUT);

  // Setup Serial Monitor
  Serial.begin(9600);

  // Attach servo on pin 9 to the servo object
  servo.attach(9);
  servo.write(counter);

  // Read the initial state of CLK
  lastStateCLK = digitalRead(CLK);

  // Call updateEncoder() when a change is seen on CLK pin
  attachInterrupt(digitalPinToInterrupt(CLK), updateEncoder, CHANGE);
}

void loop() {
  //Do some useful stuff here
}

void updateEncoder() {
  // Read the current state of CLK
  currentStateCLK = digitalRead(CLK);

  // If last and current state of CLK are different, then pulse occurred
  // React to only 1 state change to avoid double count
  if (currentStateCLK != lastStateCLK && currentStateCLK == 1) {

    // If the DT state is different than the CLK state then
    // the encoder is rotating CCW so decrement
    if (digitalRead(DT) != currentStateCLK) {
      counter--;
      if (counter < 0)
        counter = 0;
    } else {
      // Encoder is rotating CW so increment
      counter++;
      if (counter > 179)
        counter = 179;
    }
    // Move the servo
    servo.write(counter);
    Serial.print("Position: ");
    Serial.println(counter);
  }

  // Remember last CLK state
  lastStateCLK = currentStateCLK;
}
拧动旋钮,舵机跟着一格一格走,180度全程不跳步。供电要单独说一句:别用Arduino的5V直接带大扭矩舵机,舵机的电流冲击会把噪声灌进5V线,编码器读数跟着遭殃,分路供电最省心。
三个最常见的坑
一是方向反了:多半是CLK和DT接反,或者拧的习惯方向和代码定义相反,对调两个信号线就能改过来。二是拧了没反应:先查VCC和GND,再确认代码里的引脚定义和实物接线一致。三是快拧丢步:说明还停在轮询版,按上文换中断版就能解决。
放到舵机项目里,这套组合能干的事很具体:云台的两个轴各挂一个编码器,调平、设限位不用再怼着螺丝刀微调;桌面机械臂的夹爪开合角度,拧旋钮比按加减键直观得多;舵机测试台上,旋钮扫一遍0到180度,虚位、死区、卡顿在哪个角度段一目了然。这些活之前都试过用按键方案,按一下走一度,拧过旋钮的人不会再想回去。
写在最后
KY-040两三块钱一个,配中断读法就是最便宜的"旋钮人机界面":判相位定方向、只认单边沿防重复计数、millis时间窗给按键消抖,三板斧齐了就能上项目。云台调参、机械臂微调、桌面小车的速度旋钮,都是现成的用武之地。拧过一次你就回不去了。



拧一格走一度,这个手感是按键给不了的
问下SW那个按键是按下编码器轴就触发吗?想做个菜单确认键
补充一下:CLK上并0.1uF电容那招真的好用,我买的杂牌编码器抖成筛子,加电容后干干净净
中断版那段代码直接抄走了,D2占中断这点没毛病
这篇把丢步的根因讲透了。我之前做云台限位就是轮询读编码器,loop里还塞了个OLED刷新,旋钮拧快了直接丢一半步,换了attachInterrupt挂CHANGE之后一格不丢。补一句踩坑:ISR里别加Serial.print,Uno上串口发送慢,中断里打印偶尔会把count搞乱,先把方向和计数存volatile变量、loop里再打印才稳。