
手边一堆机器人小项目里,出现频率最高的步进电机就是 28BYJ-48:几块钱一只,自带减速箱,配上那块蓝色 ULN2003 驱动板,几乎是每个 Arduino 套件的标配。但真把它接起来转起来,不少人卡在接线、库和步数上。这篇把参数、接线、两套库的代码一次理顺,代码全部逐字符搬运自 Makerguides 的 28BYJ-48 教程,可以放心照抄。
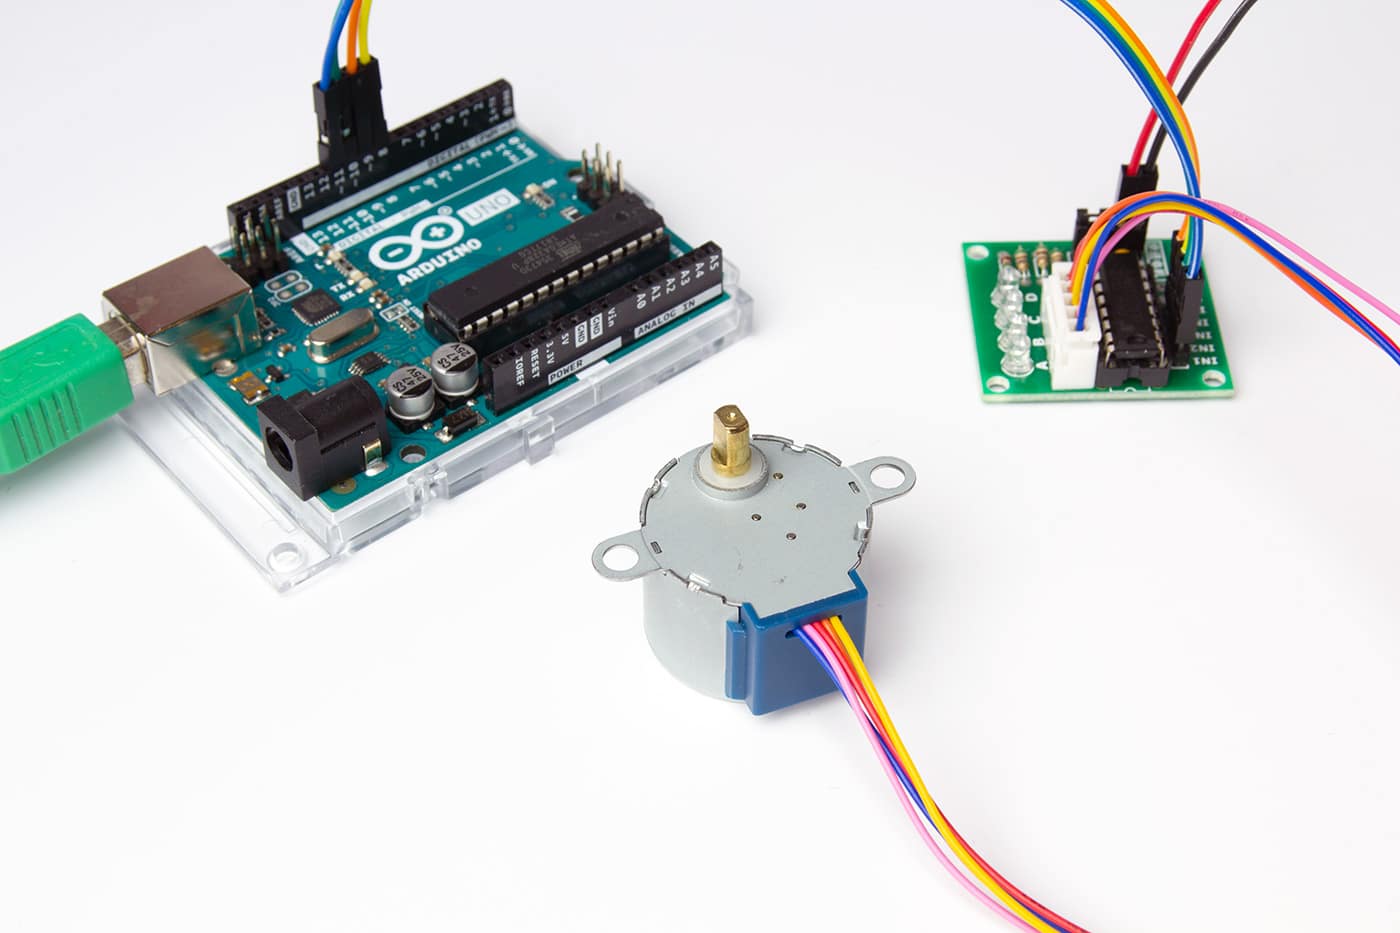
先把参数摸清:这只电机的底子
28BYJ-48 是四相永磁齿轮步进电机,官方标称减速比 1/64,四根引线加插头,工作电压 5V。 datasheet 给的关键参数如下:
| 项目 | 参数 |
|---|---|
| 步距角(半步模式,推荐) | 0.0879° |
| 步距角(整步模式) | 0.176° |
| 每转步数(半步) | 4096 |
| 每转步数(整步) | 2048 |
| 减速比 | 1/64(标称) |
| 相数 | 4 |
| 电机类型 | 永磁齿轮步进电机 |
有个坑值得记一笔:标称减速比 1/64,但 Arduino 论坛上有人真拆开电机数过齿轮,实际是 63.68395:1,换算下来半步模式一圈约 4076 步而不是 4096 步。差这 20 步对多数演示无所谓,但要做准确定位就得自己校。另一点,减速比大了扭矩上来,转速却慢——这是它能推小机构、却跑不快的根子。
ULN2003 驱动板与接线
28BYJ-48 每相要吸几十毫安,Arduino 引脚直接驱动会烧,所以中间必须垫一块 ULN2003 达林顿驱动板。电机插头直接插到驱动板左侧白色座子上,剩下的就是把驱动板四根输入接 Arduino,再解决供电。接线对照如下:
| ULN2003 驱动板 | 接 Arduino |
|---|---|
| IN1 | Pin 8 |
| IN2 | Pin 9 |
| IN3 | Pin 10 |
| IN4 | Pin 11 |
| −(逻辑地) | GND |
| +(电源) | 外接 5V 电源正极 |
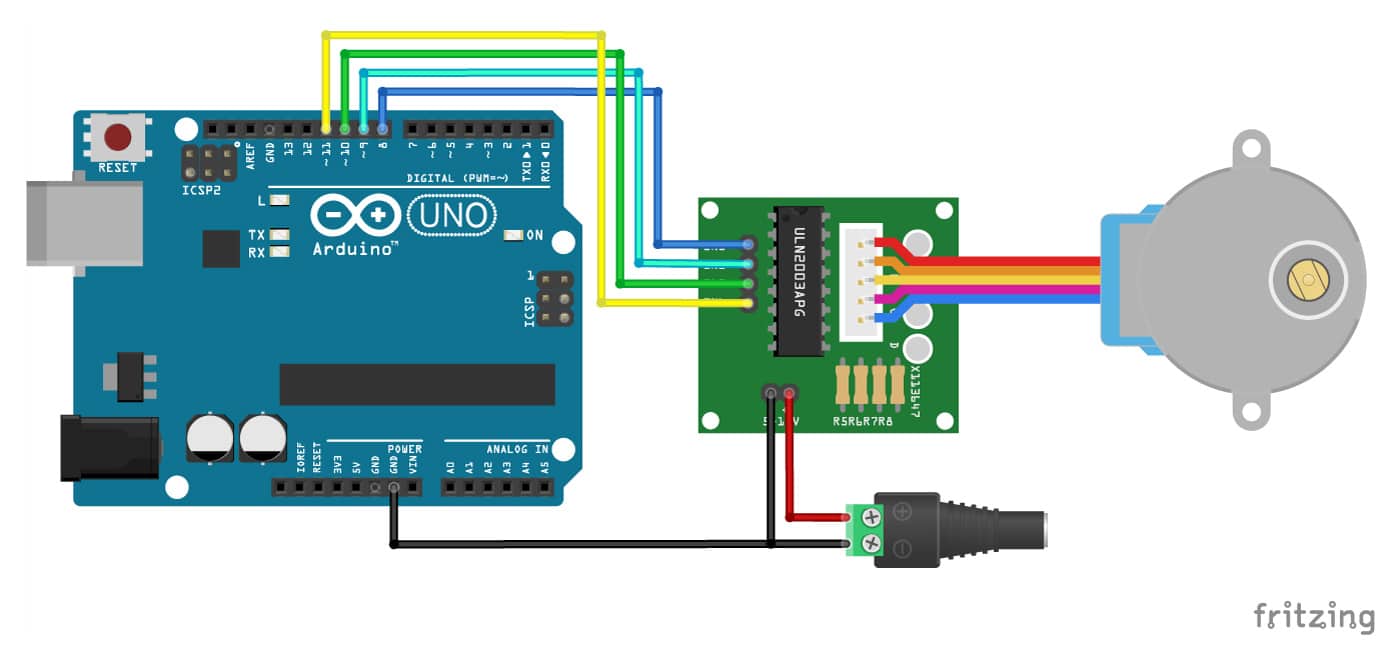
供电别图省事直接从 Arduino 的 5V 输出取。底稿原作者明确写过:电机电流一大可能损坏 Arduino,而且只用 USB 供电时他碰到过电机表现不稳定的问题。老玩家的建议一致:电机电源单独给一路 5V,同时把 Arduino 的 GND 和驱动板 − 端共地,否则逻辑电平没有参考点,电机照样抽风。驱动板上电源旁边那根跳线帽可以用来断开电机供电,调试程序时先拔掉它,电机不响不热,逻辑先跑通。
装库:Stepper 自带,AccelStepper 要装
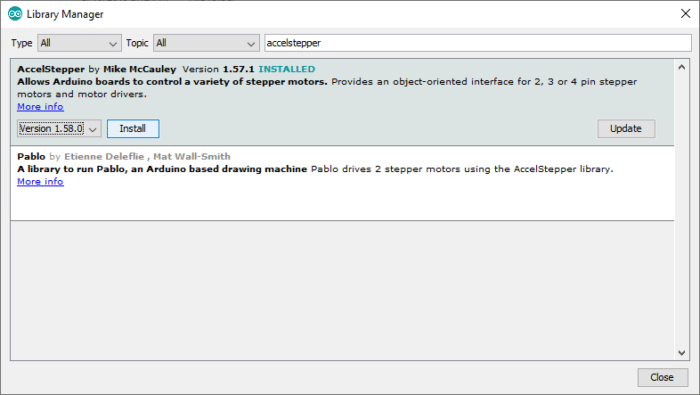
第一套方案用 Arduino IDE 自带的 Stepper 库,零安装。第二套 AccelStepper 功能强得多,支持加减速和位置控制,需要手动装:IDE 里打开 Tools 菜单的 Manage Libraries(Windows 快捷键 Ctrl + Shift + I),在库管理器里搜 accelstepper,认准 Mike McCauley 的那个,选最新版本点 Install 就行。
第一段代码:Stepper 库正反转一圈
先跑最简的。Stepper 库写法有个反直觉的地方——构造函数里引脚顺序要按 IN1-IN3-IN2-IN4 填,即 8, 10, 9, 11,照着 IN1 到 IN4 顺序填电机会抖着不动。下面代码可直接上传:
/*
  Example sketch to control a 28BYJ-48 stepper motor
  with ULN2003 driver board and Arduino UNO.
  More info: https://www.makerguides.com
*/

// Include the Arduino Stepper.h library:
#include "Stepper.h"

// Define number of steps per rotation:
const int stepsPerRevolution = 2048;

// Wiring:
// Pin 8 to IN1 on the ULN2003 driver
// Pin 9 to IN2 on the ULN2003 driver
// Pin 10 to IN3 on the ULN2003 driver
// Pin 11 to IN4 on the ULN2003 driver

// Create stepper object called 'myStepper', note the pin order:
Stepper myStepper = Stepper(stepsPerRevolution, 8, 10, 9, 11);

void setup() {
  // Set the speed to 5 rpm:
  myStepper.setSpeed(5);

  // Begin Serial communication at a baud rate of 9600:
  Serial.begin(9600);
}

void loop() {
  // Step one revolution in one direction:
  Serial.println("clockwise");
  myStepper.step(stepsPerRevolution);
  delay(500);

  // Step one revolution in the other direction:
  Serial.println("counterclockwise");
  myStepper.step(-stepsPerRevolution);
  delay(500);
}
代码里 stepsPerRevolution 取 2048,是整步模式的每转步数,负值就是反转。烧完打开串口(波特率 9600),能看到电机先顺时针转一圈、停半秒、再逆时针转一圈。Stepper 库的 setSpeed 以 rpm 为单位,5 rpm 对这只带 64 倍减速箱的电机来说已经不算慢,硬往上加转速容易丢步,这点后面 AccelStepper 的例子里更明显。顺带说一句,示例中头文件统一写成引号形式(#include "Stepper.h"),与尖括号写法编译等价。
进阶:AccelStepper 控步数、带加减速
Stepper 库只能定速转,想控位置、加减速就得换 AccelStepper。接口类型填 8,代表四线电机半步模式;同样注意构造函数里 motorPin1, motorPin3, motorPin2, motorPin4 这个顺序。先看按步数转的写法:
/* Example sketch to control a 28BYJ-48 stepper motor with
  ULN2003 driver board, AccelStepper and Arduino UNO
  More info: https://www.makerguides.com */

#include "AccelStepper.h"

// Motor pin definitions:
#define motorPin1  8      // IN1 on the ULN2003 driver
#define motorPin2  9      // IN2 on the ULN2003 driver
#define motorPin3  10     // IN3 on the ULN2003 driver
#define motorPin4  11     // IN4 on the ULN2003 driver

// Define the AccelStepper interface type; 4 wire motor in half step mode:
#define MotorInterfaceType 8

// Initialize with pin sequence IN1-IN3-IN2-IN4 for using the AccelStepper library with 28BYJ-48 stepper motor:
AccelStepper stepper = AccelStepper(MotorInterfaceType, motorPin1, motorPin3, motorPin2, motorPin4);

void setup() {
  // Set the maximum steps per second:
  stepper.setMaxSpeed(1000);
}

void loop() {
  // Set the current position to 0:
  stepper.setCurrentPosition(0);

  // Run the motor forward at 500 steps/second until the motor reaches 4096 steps (1 revolution):
  while (stepper.currentPosition() != 4096) {
    stepper.setSpeed(500);
    stepper.runSpeed();
  }
  delay(1000);

  // Reset the position to 0:
  stepper.setCurrentPosition(0);

  // Run the motor backwards at 1000 steps/second until the motor reaches -4096 steps (1 revolution):
  while (stepper.currentPosition() != -4096) {
    stepper.setSpeed(-1000);
    stepper.runSpeed();
  }

  delay(1000);

  // Reset the position to 0:
  stepper.setCurrentPosition(0);
  // Run the motor forward at 1000 steps/second until the motor reaches 8192 steps (2 revolutions):
  while (stepper.currentPosition() != 8192) {
    stepper.setSpeed(1000);
    stepper.runSpeed();
  }

  delay(3000);
}
半步模式一圈 4096 步,setSpeed(500) 就是每秒 500 步,换算约 7 rpm。这段用 currentPosition() 配 while 循环按步数精确控制:正转一圈、反转一圈、再连转两圈,注释里的目标值和速度都对着改就行。
最后是带加减速的版本,用 moveTo() 定目标位置,runToPosition() 阻塞跑到位,加减速由 setAcceleration() 管:
/*
  Example sketch to control a 28BYJ-48 stepper motor with ULN2003 driver board,
  AccelStepper and Arduino UNO: acceleration and deceleration.
  More info: https://www.makerguides.com
*/

#include "AccelStepper.h"

// Motor pin definitions:
#define motorPin1  8      // IN1 on the ULN2003 driver
#define motorPin2  9      // IN2 on the ULN2003 driver
#define motorPin3  10     // IN3 on the ULN2003 driver
#define motorPin4  11     // IN4 on the ULN2003 driver

// Define the AccelStepper interface type; 4 wire motor in half step mode:
#define MotorInterfaceType 8

// Initialize with pin sequence IN1-IN3-IN2-IN4
AccelStepper stepper = AccelStepper(MotorInterfaceType, motorPin1, motorPin3, motorPin2, motorPin4);

void setup() {
  // Set the maximum steps per second:
  stepper.setMaxSpeed(1000);
  // Set the maximum acceleration in steps per second^2:
  stepper.setAcceleration(200);
}

void loop() {
  // Set target position:
  stepper.moveTo(8192);
  // Run to position with set speed and acceleration:
  stepper.runToPosition();

  delay(1000);

  // Move back to original position:
  stepper.moveTo(0);
  // Run to position with set speed and acceleration:
  stepper.runToPosition();

  delay(1000);
}
总结
整个链路其实就三件事:接线按 IN1 到 IN4 对 8、9、10、11,电机电源单独供并共地;Stepper 库记死 8, 10, 9, 11 的引脚顺序,每转 2048 步;要位置控制和加减速就上 AccelStepper,接口类型 8、半步一圈 4096 步。参数上留个心眼:标称 64:1 的减速比实测是 63.68395:1,做精确定位时拿一圈 4076 步去校更靠谱。这只几块钱的电机定位谈不上精度,但拿来做云台缓动、分料盘、小车转向这类慢速小负载,性价比很难有对手。



这套件里那只白蓝小电机我拆过两个,齿轮箱确实是63点多比1,不是标称的64,一圈转完总有十几步的累积偏差。做指针钟这种对精度敏感的,还是得拿4076步去校,教程里把这个坑写出来挺难得。
8,10,9,11这个引脚顺序真的是新手第一大坑,当年我照IN1到IN4填进去,电机光抖不走,查了一晚上才发现是Stepper库的坑。
AccelStepper那个接口类型8代表四线半步,这个点很多教程都不讲,收藏了。
独立供电加共地这条务必听,我用USB直推过,电机一转整块板子就重启,差点以为板子坏了。