
想给阳台的鱼缸、花盆和窗外各放一个温度探头?我最近就折腾了这个需求,最后选了 DS18B20 防水探头配 ESP32。这东西最讨我喜欢的一点是:不管你挂几个探头,MCU 上都只占一个 GPIO。这篇就把我理顺的接线、库安装和代码完整记下来,新手照着做应该能一次点亮。
先交代底稿口径:本篇参考的是 makerguides 的 DS18B20 Arduino 教程,原教程按 Arduino Uno 写的;我按派单主题改成 ESP32 用法,接线电压和引脚差异都在文中单独说明,代码本身一个字符没改,在 ESP32 上直接能跑。这也是我查资料时最烦的点——很多文章写接 5V,ESP32 的 GPIO 是 3.3V 的,照抄会出问题,下面细说。
DS18B20 是什么,凭什么一条总线挂多个
DS18B20 是 Maxim(原 Dallas Semiconductor,现属 ADI)出的数字温度传感器,用的是自家 Dallas 1-Wire 协议。说人话:它只需要一根数据线(外加电源和地)就能跟主控通信,有点像 I2C,但速度更慢、能拉更长的线。
它能做"多点测温"的关键在两点:一是每个 DS18B20 出厂时都带一个唯一的 64 位序列号,主控可以靠这个序列号区分总线上的每一个探头;二是多个探头直接并联在同一条总线上就行,同名引脚接在一起,整条总线只需要一个上拉电阻。也就是说,10 个探头也只占 ESP32 一个引脚,这对像我这种引脚数不多还老不够用的新手太友好了。
规格表我抄官方数据手册核对过:
| 参数 | 数值 |
|---|---|
| 供电电压 | 3.0 – 5.5 V(3.3V 的 ESP32 直接兼容) |
| 测温范围 | -55 ℃ 至 +125 ℃ |
| 精度 | ±0.5 ℃(-10~85 ℃);±1 ℃(-30~100 ℃);±2 ℃(全量程) |
| 分辨率 | 9/10/11/12 位可编程,对应 0.5 / 0.25 / 0.125 / 0.0625 ℃,默认 12 位 |
| 12 位转换时间 | 最长 750 ms |
| 工作电流 | 1.5 mA,待机 1 μA |
| 封装 | TO-92 三引脚 / 模块板 / 防水探头(带电缆) |
防水探头就是 TO-92 芯片封进不锈钢壳、拖一根电缆的版本,适合插水里、插土里。有一个坑要提前知道:探头电缆通常是 PVC 护套,官方教程建议不超过 100 ℃ 用,想测开水温度的别硬上。
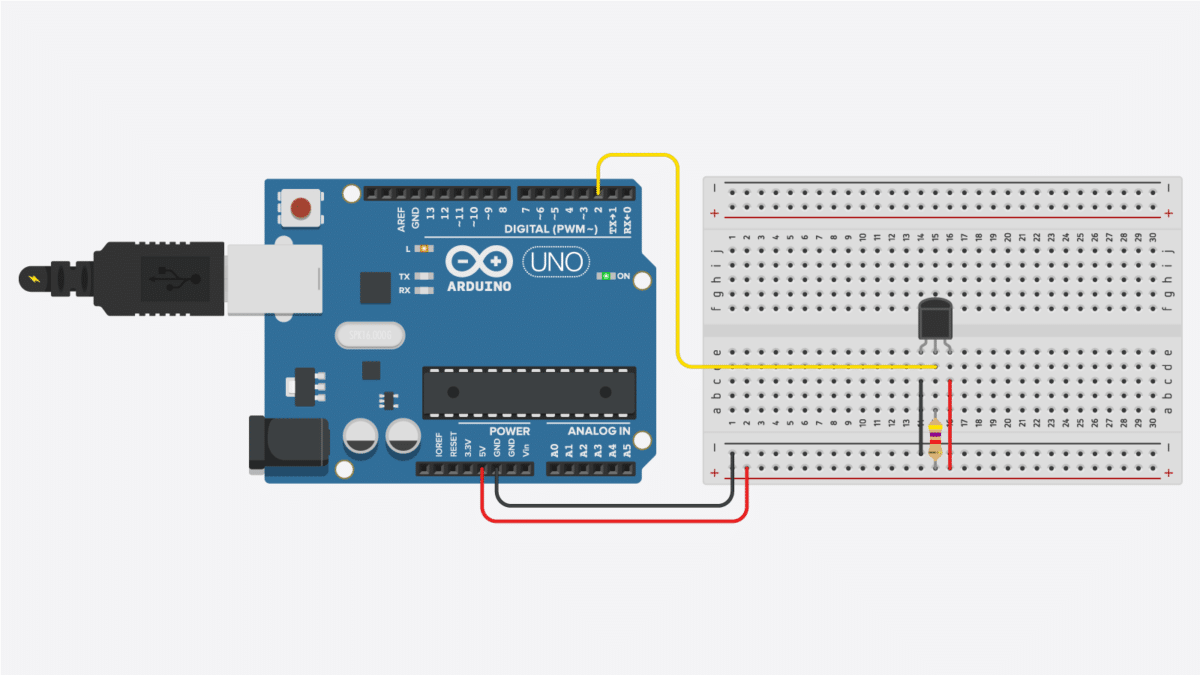
接线:单个和多个的接法
TO-92 直插版本,印字面朝自己,从左到右是 GND、DQ、VDD。防水探头则是靠线色区分,但线色各家不统一,最稳的办法是接到板上先用万用表或先插一颗试出来:黑/蓝一般是 GND,红是 VDD,黄/白是 DQ(数据线)。
原教程按 Arduino Uno 接 DQ 到数字脚 2,上拉电阻接 5V。换成 ESP32 我是这样接的:
- 探头 VDD → ESP32 的 3V3
- 探头 GND → ESP32 的 GND
- 探头 DQ → 一个 GPIO(我用 GPIO 4),同时经 4.7 kΩ 上拉电阻接到 3V3
三个改动点记牢:供电从 5V 改 3.3V、上拉接 3.3V 而不是 5V、数据线别接 ESP32 的输入不耐压引脚。原教程把 DQ 接到 Uno 的 Pin 2,代码里 #define ONE_WIRE_BUS 2 这个宏在 ESP32 上对应 GPIO 2,也能用,我自己挪到了 GPIO 4,改宏里的数字就行。
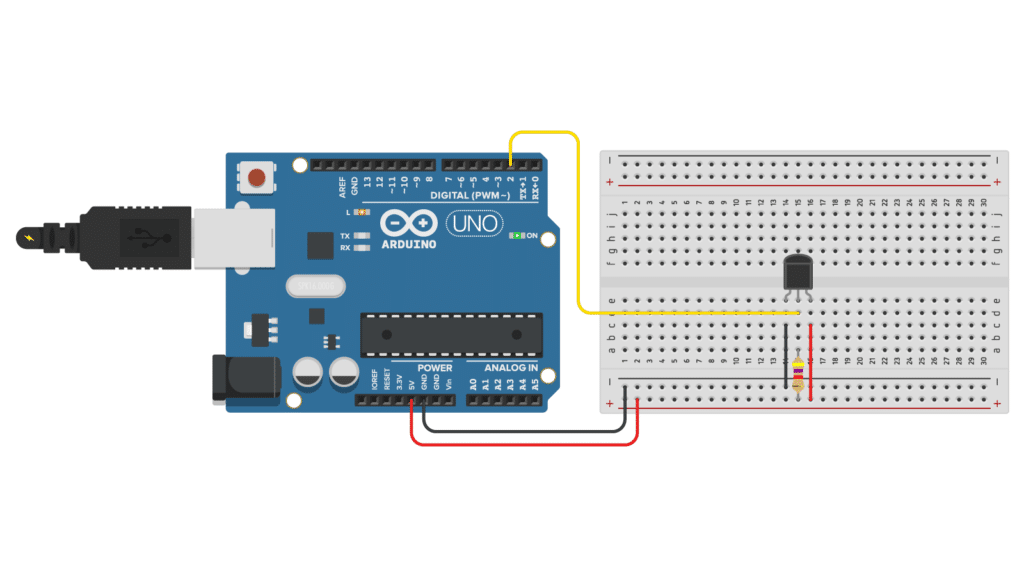
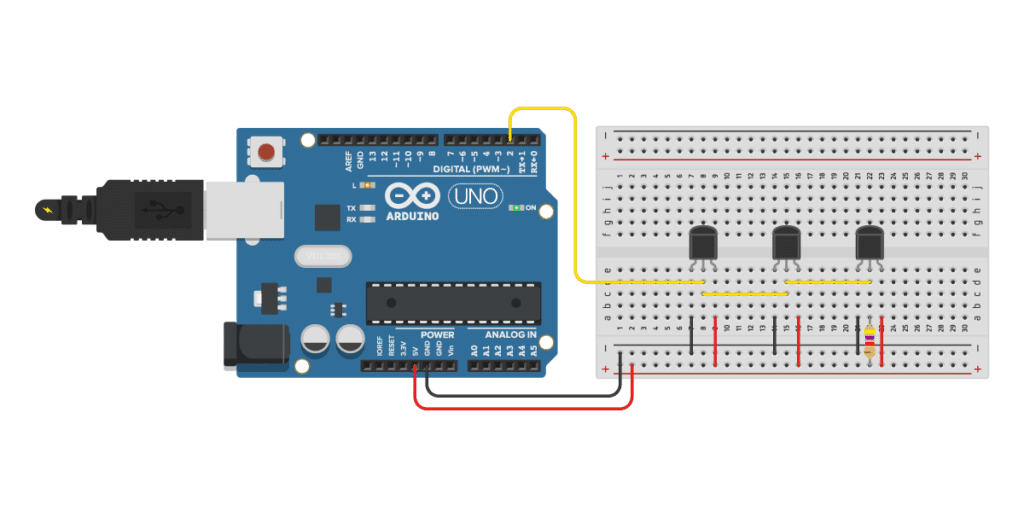
上拉电阻是整个电路里最容易翻车的地方:4.7 kΩ 的电阻必须接在 DQ 和 VDD 之间,不接的话 1-Wire 总线空闲电平不稳,读出来全是 -127 或乱码。我第一次焊的时候漏了它,对着串口刷了半天屏才反应过来。多个探头就是把它们的 VDD 并 VDD、GND 并 GND、DQ 并 DQ,整条总线仍然共用那一个 4.7 kΩ 上拉。
装库:两个库,装完就能写
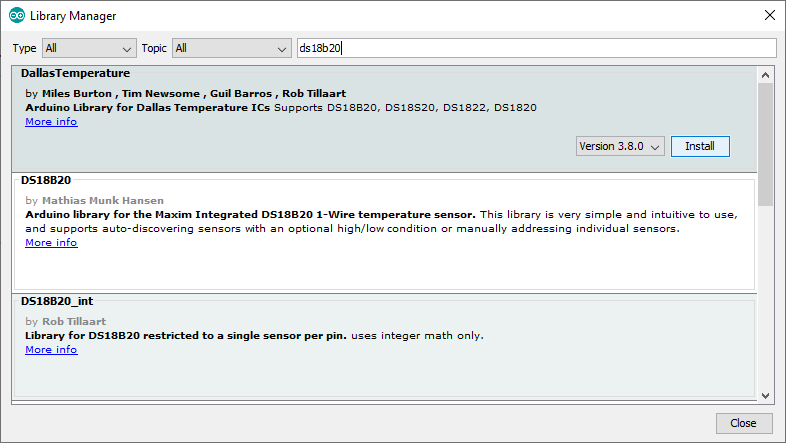
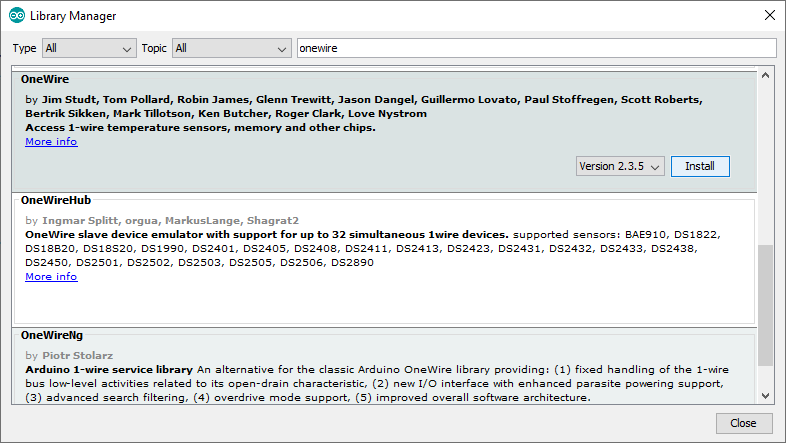
需要装两个 Arduino 库:处理 1-Wire 协议的 OneWire(Jim Studt 维护),以及在它之上封装了好用 API 的 DallasTemperature(Miles Burton 的 Arduino-Temperature-Control-Library)。Arduino IDE 里打开 Tools → Manage Libraries,搜 "ds18b20" 和 "onewire" 装最新版即可。
代码一:读一个探头
下面是原教程的单传感器示例代码,原样照搬。逻辑很直白:建一个 OneWire 对象交给 DallasTemperature,loop 里先 requestTemperatures() 让总线上所有设备做一次温度转换,再用 getTempCByIndex(0) 读第一个设备。12 位分辨率转换最长要 750 ms,所以末尾延时 1 秒,别删。
/* DS18B20 1-Wire digital temperature sensor with Arduino example code.
   https://www.makerguides.com */

// Include the required Arduino libraries:
#include "OneWire.h"
#include "DallasTemperature.h"

// Define to which pin of the Arduino the 1-Wire bus is connected:
#define ONE_WIRE_BUS 2

// Create a new instance of the oneWire class to communicate with any OneWire device:
OneWire oneWire(ONE_WIRE_BUS);

// Pass the oneWire reference to DallasTemperature library:
DallasTemperature sensors(&oneWire);

void setup() {
  // Begin serial communication at a baud rate of 9600:
  Serial.begin(9600);
  // Start up the library:
  sensors.begin();
}

void loop() {
  // Send the command for all devices on the bus to perform a temperature conversion:
  sensors.requestTemperatures();

  // Fetch the temperature in degrees Celsius for device index:
  float tempC = sensors.getTempCByIndex(0); // the index 0 refers to the first device
  // Fetch the temperature in degrees Fahrenheit for device index:
  float tempF = sensors.getTempFByIndex(0);

  // Print the temperature in Celsius in the Serial Monitor:
  Serial.print("Temperature: ");
  Serial.print(tempC);
  Serial.print(" \xC2\xB0"); // shows degree symbol
  Serial.print("C  |  ");

  // Print the temperature in Fahrenheit
  Serial.print(tempF);
  Serial.print(" \xC2\xB0"); // shows degree symbol
  Serial.println("F");

  // Wait 1 second:
  delay(1000);
}
Serial Monitor 波特率设 9600,能看到每秒一行温度输出。ESP32 烧录时选对应的开发板型号即可,库对 ESP32 是兼容的。
代码二:一条总线读多个探头
多探头有两种读法。最省事的是按索引读:getDeviceCount() 先数总线上挂了几个设备,然后 for 循环按索引逐个读。探头插上就自动被发现,不用任何配置。
/* Multiple DS18B20 1-Wire digital temperature sensors with Arduino example code. M
   https://www.makerguides.com */

#include "OneWire.h"
#include "DallasTemperature.h"

#define ONE_WIRE_BUS 2

OneWire oneWire(ONE_WIRE_BUS);
DallasTemperature sensors(&oneWire);

int deviceCount = 0;
float tempC;
float tempF;

void setup() {
  Serial.begin(9600);
  sensors.begin();

  Serial.println("Locating devices...");
  Serial.print("Found ");
  deviceCount = sensors.getDeviceCount();
  Serial.print(deviceCount);
  Serial.println(" devices");
}

void loop() {
  sensors.requestTemperatures();

  for (int i = 0;  i < deviceCount;  i++) {
    Serial.print("Sensor ");
    Serial.print(i + 1);
    Serial.print(" : ");
    tempC = sensors.getTempCByIndex(i);
    tempF = sensors.getTempFByIndex(i);
    Serial.print(tempC);
    Serial.print(" \xC2\xB0");
    Serial.print("C  |  ");
    Serial.print(tempF);
    Serial.print(" \xC2\xB0");
    Serial.println("F");
  }

  Serial.println();
  delay(1000);
}
按索引读有个隐患:索引顺序不保证固定,重新上电或插拔探头后可能变。想固定"哪个探头是几号"(比如 1 号缸永远显示 1 号缸),就得按 64 位地址读。先烧一个地址查找器把每个探头的地址抄下来:
#include "OneWire.h"
#include "DallasTemperature.h"

#define ONE_WIRE_BUS 2

OneWire oneWire(ONE_WIRE_BUS);
DallasTemperature sensors(&oneWire);

int deviceCount = 0;
DeviceAddress deviceAddress;

void setup() {
  Serial.begin(9600);
  sensors.begin();

  Serial.println("Locating devices...");
  Serial.print("Found ");
  deviceCount = sensors.getDeviceCount();
  Serial.println(" devices");

  Serial.println("Printing addresses...");
  for (int i = 0;  i < deviceCount;  i++) {
    Serial.print("Sensor ");
    Serial.print(i + 1);
    Serial.print(" : ");
    sensors.getAddress(deviceAddress, i);
    printAddress(deviceAddress);
  }
}

void loop() {
}

void printAddress(DeviceAddress deviceAddress) {
  for (uint8_t i = 0; i < 8; i++) {
    Serial.print("0x");
    if (deviceAddress[i] < 0x10) {
      Serial.print("0");
    }
    Serial.print(deviceAddress[i], HEX);
    if (i < 7) {
      Serial.print(", ");
    }
  }
  Serial.println();
}
把打印出来的地址数组填进读取程序,用 getTempC(地址) 读,探头怎么插拔顺序都不会乱:
// Addresses of DS18B20 sensors connected to the 1-Wire bus
byte sensor1[8] = {0x28, 0x18, 0xB4, 0x49, 0x0C, 0x00, 0x00, 0x7C};
byte sensor2[8] = {0x28, 0xCC, 0x19, 0x49, 0x0C, 0x00, 0x00, 0xBB};
byte sensor3[8] = {0x28, 0x19, 0xEF, 0x48, 0x0C, 0x00, 0x00, 0x21};

void printTemperature(DeviceAddress address) {
  float tempC = sensors.getTempC(address);
  float tempF = sensors.getTempF(address);
  Serial.print(tempC);
  Serial.print(" \xC2\xB0");
  Serial.print("C  |  ");
  Serial.print(tempF);
  Serial.print(" \xC2\xB0");
  Serial.println("F");
}
踩坑清单和几个实用函数
把容易翻车的点归拢一下:
- 不接 4.7 kΩ 上拉,读数全是 -127 或乱码——这是新手第一大坑
- 防水探头线色不统一,接线前先核对,别信"红正黑负黄数据"的口诀
- 12 位模式下别把轮询间隔压到 1 秒以内,读会不完整;要快就 setResolution() 降分辨率,9 位只要 93.75 ms
- 探头电缆是 PVC 护套,长期用建议别超 100 ℃
- 挂多个探头共用一个上拉电阻即可,每个探头都加反而多余
DallasTemperature 库还有几个顺手的功能:setResolution(9) 全局或按地址设分辨率;toFahrenheit() 转华氏;setHighAlarmTemp()/setLowAlarmTemp() 设高低温报警阈值,配合 hasAlarm() 可以做超温提醒,鱼缸加热棒、爬宠箱恒温这类场景直接能用。
我的小结:DS18B20 是"多点测温"这个需求目前最省引脚、最省事的方案,1-Wire 一条线挂一圈探头,ESP32 上 3.3V 直接能跑。下一步我打算把读数推到手机上,做个带历史曲线的鱼缸监控,做好了再来写下一篇。


上拉电阻这个坑我上周刚踩过,没接4.7k电阻读出来一直是-127,查了一晚上才明白是1-Wire总线空闲电平的问题。后来还发现探头线接反了红黑,因为买的三颗探头线色居然不一样,文章里说线色不统一真是经验之谈。现在鱼缸、水培箱和窗外各挂了一颗,就占一个GPIO,确实省事。
ESP32上3.3V供电这个点很重要,网上不少教程都照着Uno抄5V,新手容易忽略GPIO耐压。
按索引读顺序会变的提醒很实在,我当时三颗探头编号老串,后来也是老老实实烧地址查找器抄地址。
getTempCByIndex那个0原来是指第一个设备,之前一直没搞懂这个索引机制,今天看懂了。
12位转换要750ms所以间隔1秒这条记下了,之前把延时删了读数确实怪怪的。