
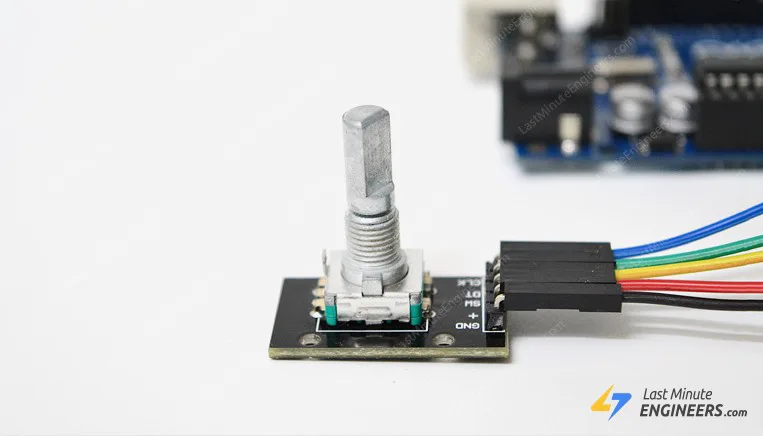
 逛器件店的时候,几块钱一个的KY-040旋转编码器大概是全场最不起眼的小东西:一个能转的旋钮,往下按还能当按键,别的什么都不带。但就是这么个小玩意,在很多成品设备里都是常客——音响的音量旋钮、示波器的菜单旋钮,很多用的就是同款结构。这篇就把它从接线到代码完整走一遍,照着做就能在串口监视器里看到自己转出来的脉冲。
先搞明白它是什么:两圈相位差90度的触点
很多人第一次听说"编码器"会以为是电位器,其实完全不是。电位器转到头就停了,读的是电阻值;KY-040是增量式的机械编码器,转多少圈都行,没有终点,它吐出来的不是电压值,而是一格一格的脉冲信号。
拆开看,里面一个金属触点接在公共端(我们接GND),另外两个触点错开一点位置排布,对应CLK和DT两个脚。转一格,这两个触点按先后顺序分别导通——因为错位,两路方波刚好相差90度相位。正转时CLK先落,反转时DT先落,单片机靠判断"谁先动"就知道方向。
模块上还带了两个上拉电阻(10千欧)和一颗按下去才导通的按键,对应SW脚。往下按旋钮,SW接地,经常被拿来当"确认"键用,比如菜单旋钮转着选,按一下进入。
接线:三个信号脚加电源,五根线搞定
KY-040一共五个脚:GND、VCC(+)、SW、DT、CLK。接Arduino UNO的话,GND接GND,VCC接5V,CLK接D2,DT接D3,SW接D4。D2和D3是UNO上仅有的两个外部中断引脚,后面我们走中断方案就靠它们。
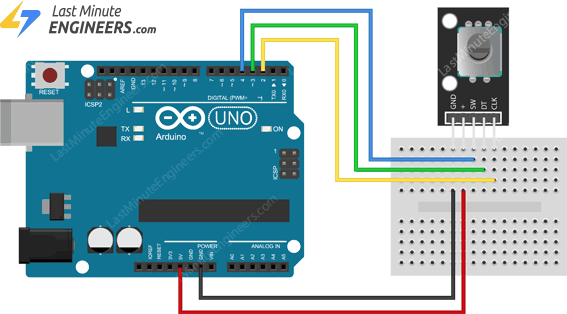
第一次接的小白最容易犯的错误是把CLK和DT记混。其实对纯看方向和计数来说接反了也能跑,只是正转变成了反转,程序里把加号减号对调一下就行。真正麻烦的是悬空:如果忘了接VCC,模块上的上拉电阻就不工作,信号脚会飘,串口里能看到一堆乱跳的计数。
还有一个小白常问的问题:能不能不接VCC?模块的上拉是拉到VCC的,不接就没有上拉,CLK和DT基本读不到稳定的高电平,老老实实接上吧。
轮询版代码:先把脉冲读出来
第一版先不玩中断,用最朴素的循环轮询,方便理解信号长什么样。整个程序的核心逻辑是:每次loop都读CLK,发现它从上一次的状态变了、而且当前是高电平,就当作转了一格;这时再去读DT,如果DT和CLK不一样,说明是正转(顺时针,计数加一),一样就是反转(计数减一)。
下面这段代码可以逐字符直接抄进Arduino IDE:
// Rotary Encoder Inputs
#define CLK 2
#define DT 3
#define SW 4

int counter = 0;
int currentStateCLK;
int lastStateCLK;
String currentDir = "";
unsigned long lastButtonPress = 0;

void setup() {

  // Set encoder pins as inputs
  pinMode(CLK, INPUT);
  pinMode(DT, INPUT);
  pinMode(SW, INPUT_PULLUP);

  // Setup Serial Monitor
  Serial.begin(9600);

  // Read the initial state of CLK
  lastStateCLK = digitalRead(CLK);
}

void loop() {

  // Read the current state of CLK
  currentStateCLK = digitalRead(CLK);

  // If last and current state of CLK are different, then pulse occurred
  // React to only 1 state change to avoid double count
  if (currentStateCLK != lastStateCLK && currentStateCLK == 1) {

    // If the DT state is different than the CLK state then
    // the encoder is rotating CCW so decrement
    if (digitalRead(DT) != currentStateCLK) {
      counter--;
      currentDir = "CCW";
    } else {
      // Encoder is rotating CW so increment
      counter++;
      currentDir = "CW";
    }

    Serial.print("Direction: ");
    Serial.print(currentDir);
    Serial.print(" | Counter: ");
    Serial.println(counter);
  }

  // Remember last CLK state
  lastStateCLK = currentStateCLK;

  // Read the button state
  int btnState = digitalRead(SW);

  //If we detect LOW signal, button is pressed
  if (btnState == LOW) {
    //if 50ms have passed since last LOW pulse, it means that the
    //button has been pressed, released and pressed again
    if (millis() - lastButtonPress > 50) {
      Serial.println("Button pressed!");
    }

    // Remember last button press event
    lastButtonPress = millis();
  }

  // Put in a slight delay to help debounce the reading
  delay(1);
}
烧进去之后打开串口监视器(波特率9600),慢转一圈,能看到Direction和Counter一格格地变。这里有个必须解释的点:为什么只在CLK等于1的时候才反应一次?因为转一格,CLK其实完成了一次"高—低"的完整跳变,如果不挑状态,一格会被数两次。只认上升那半拍,一格就是一个计数。
按键部分用的是软件消抖:SW接地是低电平,检测到低电平时记下时间戳,间隔超过50毫秒的按下才算一次真的按键。末尾那个delay(1)也是在帮忙消抖,机械触点闭合瞬间的抖动被这一毫秒粗粗滤掉了。
轮询版的缺点小白用一段时间就会撞上:loop里只要有别的活儿(比如刷新显示),转快一点就开始丢脉冲,计数和手感对不上。
中断版:把读脉冲的事交给硬件
更稳的做法是用中断。把updateEncoder()挂到CLK脚的变化中断上,CLK一跳变,主循环不管在干什么,都会被打断先去处理读脉冲。主循环里就可以放心去干别的活,计数一点不丢。
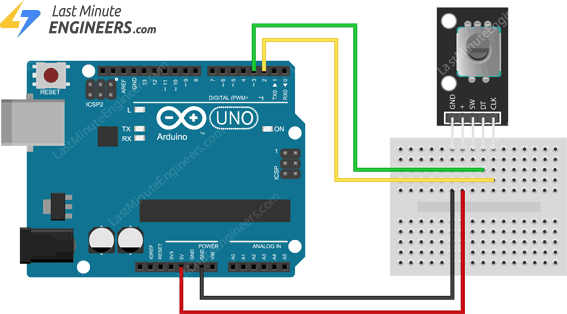
中断版完整代码如下:
// Rotary Encoder Inputs
#define CLK 2
#define DT 3

int counter = 0;
int currentStateCLK;
int lastStateCLK;
String currentDir = "";

void setup() {
  // Set encoder pins as inputs
  pinMode(CLK, INPUT);
  pinMode(DT, INPUT);

  // Setup Serial Monitor
  Serial.begin(9600);

  // Read the initial state of CLK
  lastStateCLK = digitalRead(CLK);

  // Call updateEncoder() when a change is seen on CLK pin
  attachInterrupt(digitalPinToInterrupt(CLK), updateEncoder, CHANGE);
}

void loop() {
  //Do some useful stuff here
}

void updateEncoder() {
  // Read the current state of CLK
  currentStateCLK = digitalRead(CLK);

  // If last and current state of CLK are different, then pulse occurred
  // React to only 1 state change to avoid double count
  if (currentStateCLK != lastStateCLK && currentStateCLK == 1) {

    // If the DT state is different than the CLK state then
    // the encoder is rotating CCW so decrement
    if (digitalRead(DT) != currentStateCLK) {
      counter--;
      currentDir = "CCW";
    } else {
      // Encoder is rotating CW so increment
      counter++;
      currentDir = "CW";
    }

    Serial.print("Direction: ");
    Serial.print(currentDir);
    Serial.print(" | Counter: ");
    Serial.println(counter);
  }

  // Remember last CLK state
  lastStateCLK = currentStateCLK;
}关键就一行:attachInterrupt(digitalPinToInterrupt(CLK), updateEncoder, CHANGE),CHANGE模式表示电平每次变化(不论高低)都触发。中断服务函数里不要放Serial.print这种慢操作——严格说上面这段为了演示在ISR里打印了,真做项目更稳妥的写法是ISR里只更新counter,主循环里再打印。另外counter要加volatile修饰,这是中断共享变量的规矩,演示代码里省了,抄到自己项目里建议补上。
关于消抖,机械编码器抖动在中断模式下更明显,转一格偶尔会蹦两个数。粗暴但常用的办法是ISR里比较两次中断间隔,太近(比如小于1到2毫秒)的直接忽略;讲究一点可以上状态机法或者直接换用现成的 Encoder 库。新手先接受"偶尔跳一格"的瑕疵,能用起来再说。
拿来干什么:音量旋钮和菜单旋钮
计数能稳稳拿到,后面的应用就随意了。最经典的是做音量旋钮:把counter的数值映射成音量等级,转到头就钳住上下限。原文给了一个接舵机的例子,把counter限制在0到179,每次转动直接servo.write(counter),旋钮拧多少度舵机就转多少度,特别直观。
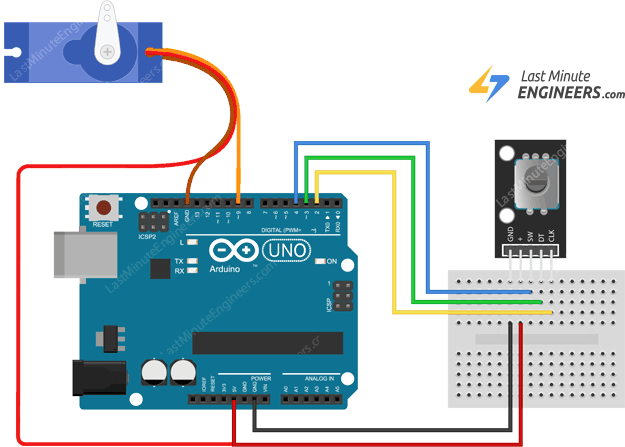
照这个思路改,接舵机时的完整程序是这样的:
// Include the Servo Library
#include "Servo.h"

// Rotary Encoder Inputs
#define CLK 2
#define DT 3

Servo servo;
int counter = 0;
int currentStateCLK;
int lastStateCLK;
String currentDir = "";

void setup() {
  // Set encoder pins as inputs
  pinMode(CLK, INPUT);
  pinMode(DT, INPUT);

  // Setup Serial Monitor
  Serial.begin(9600);

  // Attach servo on pin 9 to the servo object
  servo.attach(9);
  servo.write(counter);

  // Read the initial state of CLK
  lastStateCLK = digitalRead(CLK);

  // Call updateEncoder() when a change is seen on CLK pin
  attachInterrupt(digitalPinToInterrupt(CLK), updateEncoder, CHANGE);
}

void loop() {
  //Do some useful stuff here
}

void updateEncoder() {
  // Read the current state of CLK
  currentStateCLK = digitalRead(CLK);

  // If last and current state of CLK are different, then pulse occurred
  // React to only 1 state change to avoid double count
  if (currentStateCLK != lastStateCLK && currentStateCLK == 1) {

    // If the DT state is different than the CLK state then
    // the encoder is rotating CCW so decrement
    if (digitalRead(DT) != currentStateCLK) {
      counter--;
      if (counter < 0)
        counter = 0;
    } else {
      // Encoder is rotating CW so increment
      counter++;
      if (counter > 179)
        counter = 179;
    }
    // Move the servo
    servo.write(counter);
    Serial.print("Position: ");
    Serial.println(counter);
  }

  // Remember last CLK state
  lastStateCLK = currentStateCLK;
}
想改成音量旋钮,把舵机那两行换成自己的音量设置函数就行,上下限从0和179改成你的音量范围。做菜单的话,SW按键当"进入",旋转当"上下选择",一个旋钮就能操作一整套界面,这也是它比一排按键优雅的地方。
踩坑清单和小白总结
最后把容易栽的坑归一下:一是VCC必须接,上拉靠它;二是中断方案下counter记得加volatile,别在ISR里干慢活;三是计数偶尔跳格是机械触点抖动的正常现象,消抖逻辑能救大部分;四是CLK和DT接反不用慌,把程序里的加减对调即可。
几块钱的东西,能转出方向、圈数,还自带一个确认键,把它玩明白之后,你的第一个"有真实交互手感"的Arduino小作品就有了着落。买的时候顺便多囤两个,这东西跟电阻一样,永远不知道什么时候就想用。



这个正好是我上周折腾的东西。一开始我也是用轮询读,loop里加了OLED刷新之后转快了就开始丢步,计数跟手感完全对不上,换成中断版才稳。文章里那句“counter要加volatile”提醒得很到位,我当时就是忘了加,偶尔会蹦出一个奇怪的值,查了半天。另外补一句,淘宝上这模块还有不带上拉电阻的版本,买之前最好问一下,不然真会像我一样遇到信号乱飘。
CLK和DT接反正转变反转这个太真实了,我第一次接就反的,还以为模块坏了
50ms按键消抖那个细节讲得清楚,之前抄别人的代码一直没搞明白为什么那里要记时间戳。
音量旋钮这个应用场景好,几块钱做出成品设备的手感,比按键舒服多了
转一格数两次的问题我也踩过,就是没挑高电平那半拍,看了这篇才彻底明白原因。