
做硬件项目最怕的一种翻车:设备明明设好了参数,一断电、一重启,全回到出厂状态。Wi-Fi 密码没了,校准值归零,运行次数清零。问题多半不在程序逻辑,而你可能压根没把数据写进断电不丢的地方。
ESP32 板载的 Flash 有一块分区专门干这件事,新版 Arduino 核心里对应的库叫 Preferences,它是对 NVS(Non-Volatile Storage,非易失性存储)分区的封装,数据以"命名空间 + 键值对"的形式存进去,掉电不丢。这篇把 begin/put/get/end 的用法、两个完整例程和清数据的姿势一次讲清,代码原样取自 Random Nerd Tutorials 的《ESP32 Save Data Permanently using Preferences Library》教程,新手照着能直接跑。
Flash 与 NVS:参数到底存在哪
Flash 和老玩家熟悉的 EEPROM 一样,都是非易失存储器,写进去的数据复位、断电都在。它适合记三类东西:变量的最后状态、设备配置、以及"执行了多少次"这类累计值。
但 Flash 有个绕不开的物理限制:读随便读,写有寿命,大多数器件的设计写次数在 10 万到 100 万次之间。所以别在 loop 里高频率 put,状态变了才写一次,这是用 NVS 的基本功。
顺带交代历史:早年 ESP32 教程用 EEPROM 库模拟,在 ESP32 上最多只能用 512 字节,还要手动 begin(size) 和 commit。Random Nerd Tutorials 的老 EEPROM 教程页已明确标注过时,指向 Preferences 方案。另外记住一条边界:Preferences 存"变量",要存文件(配置文件、网页资源)那是 SPIFFS/LittleFS 的活,两者别混。
Preferences 的基本动作:begin、put/get、end、clear
先引库、建实例。顺带说明一句:站点编辑器会把尖括号头文件剥掉,所以本文所有代码里的 #include "Preferences.h" 在你本地 Arduino IDE 里写成尖括号形式,两种写法对库搜索路径等价,编译结果一致。
#include "Preferences.h"Preferences preferences;用之前要打开一个命名空间。命名空间的作用是隔离——不同模块各用各的,避免 key 撞名。第二个参数 false 是读写模式,true 是只读。命名空间名和 key 名都限制 15 个字符,超长会踩坑。
preferences.begin("my-app", false); 如果只想读不写,把第二个参数换成 true,打开的就是只读模式,防止代码意外改写配置。调试阶段还有一个实用组合:先用读写模式写一次,正式固件里改成只读打开,凭据就不怕被后面调试代码误覆盖。
读写方法按类型成对出现:putInt/getInt、putUInt/getUInt、putString/getString、putBool/getBool、putFloat/getFloat、putBytes/getBytes 等等。get 系列的最后一个参数是缺省值,key 不存在时返回它,所以首次上电不会读到垃圾值。注意写入和读取的类型必须一致,putUInt 存的用 getInt 读是不行的。
清数据的三个动作也先放这里:clear() 清掉当前命名空间下所有键值(命名空间本身还在),remove("counter") 只删单个 key,end() 关闭当前命名空间。调试时想把数据归零,把 clear 或 remove 的注释解开烧一次就行。
preferences.clear();preferences.remove(key);preferences.end();还有一种极端情况:项目反复改命名空间,NVS 分区可能被写满。Preferences 没有删命名空间的方法,教程给的兜底是把整个 NVS 分区擦掉重格式化:
#include "nvs_flash.h"

void setup() {
  nvs_flash_erase(); // erase the NVS partition and...
  nvs_flash_init(); // initialize the NVS partition.
  while(true);
}

void loop() {

}
这段代码跑完必须马上烧新程序进去,否则每次上电都会重新格式化 NVS,之前存的数据全没了。这是排障手段,别当常规操作。
示例一:上电计数器,看断电到底丢不丢
这个例程叫 StartCounter,逻辑最直白:每次启动读出 counter,加一,打印,存回去,10 秒后自动重启。烧进去打开串口监视器(波特率 115200),按几下 ESP32 板上的 EN 复位键,你会看到计数值一直往上走——这就是断电保存的最直接证明。
/*
 ESP32 startup counter example with Preferences library.

 This simple example demonstrates using the Preferences library to store how many times the ESP32 module has booted.
 The Preferences library is a wrapper around the Non-volatile storage on ESP32 processor.

 created for arduino-esp32 09 Feb 2017 by Martin Sloup (Arcao)

 Complete project details at https://RandomNerdTutorials.com/esp32-save-data-permanently-preferences/
*/

#include "Preferences.h"

Preferences preferences;

void setup() {
  Serial.begin(115200);
  Serial.println();

  // Open Preferences with my-app namespace. Each application module, library, etc
  // has to use a namespace name to prevent key name collisions. We will open storage in
  // RW-mode (second parameter has to be false).
  // Note: Namespace name is limited to 15 chars.
  preferences.begin("my-app", false);

  // Remove all preferences under the opened namespace
  //preferences.clear();

  // Or remove the counter key only
  //preferences.remove("counter");

  // Get the counter value, if the key does not exist, return a default value of 0
  // Note: Key name is limited to 15 chars.
  unsigned int counter = preferences.getUInt("counter", 0);

  // Increase counter by 1
  counter++;

  // Print the counter to Serial Monitor
  Serial.printf("Current counter value: %u\n", counter);

  // Store the counter to the Preferences
  preferences.putUInt("counter", counter);

  // Close the Preferences
  preferences.end();

  // Wait 10 seconds
  Serial.println("Restarting in 10 seconds...");
  delay(10000);

  // Restart ESP
  ESP.restart();
}

void loop() {

}
串口实际输出长这样,复位前后计数从 3 接着变成 4,说明 NVS 里的值跨复位保留了:
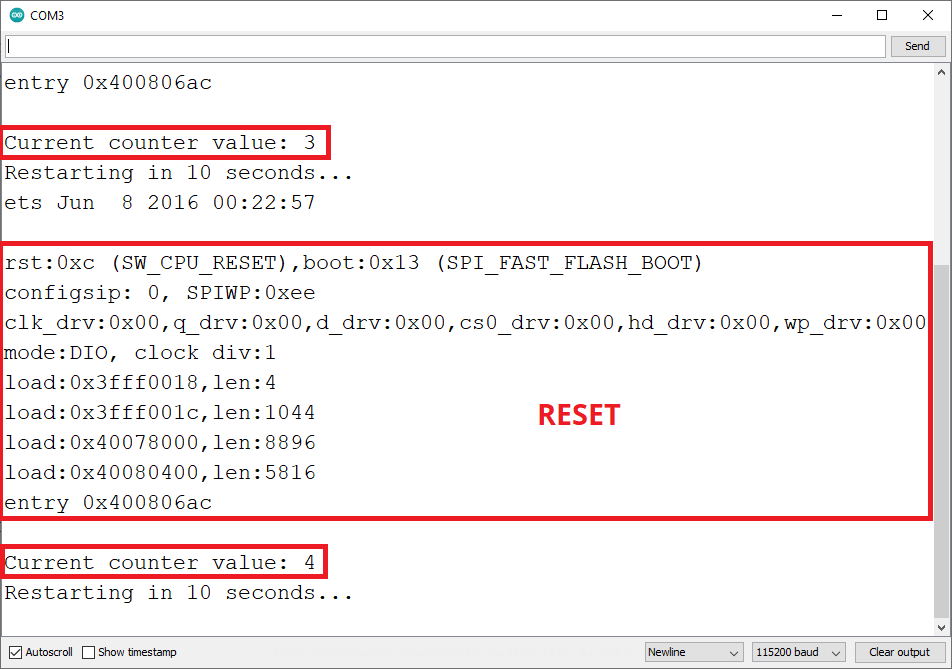
代码里 getUInt("counter", 0) 的第二个参数 0 就是缺省值:第一次上电 key 还不存在,返回 0,从零开始数。想重新从零计数,解开 preferences.remove("counter") 那行烧一次即可。另外注意代码注释里反复强调的两条:命名空间名限 15 字符,key 名同样限 15 字符,超长会被截断或报错,key 起名别贪长。
示例二:Wi-Fi 凭据字符串的写入与读取
字符串是最常用的场景之一:把 Wi-Fi 的 SSID 和密码写进 NVS,开机读出来直接连网。写入用 putString,先建一个叫 credentials 的命名空间:
/*
  Rui Santos
  Complete project details at https://RandomNerdTutorials.com/esp32-save-data-permanently-preferences/

  Permission is hereby granted, free of charge, to any person obtaining a copy
  of this software and associated documentation files.

  The above copyright notice and this permission notice shall be included in all
  copies or substantial portions of the Software.
*/

#include "Preferences.h"

Preferences preferences;

const char* ssid = "REPLACE_WITH_YOUR_SSID";
const char* password = "REPLACE_WITH_YOUR_PASSWORD";

void setup() {
  Serial.begin(115200);
  Serial.println();

  preferences.begin("credentials", false);
  preferences.putString("ssid", ssid);
  preferences.putString("password", password);

  Serial.println("Network Credentials Saved using Preferences");

  preferences.end();
}

void loop() {

}
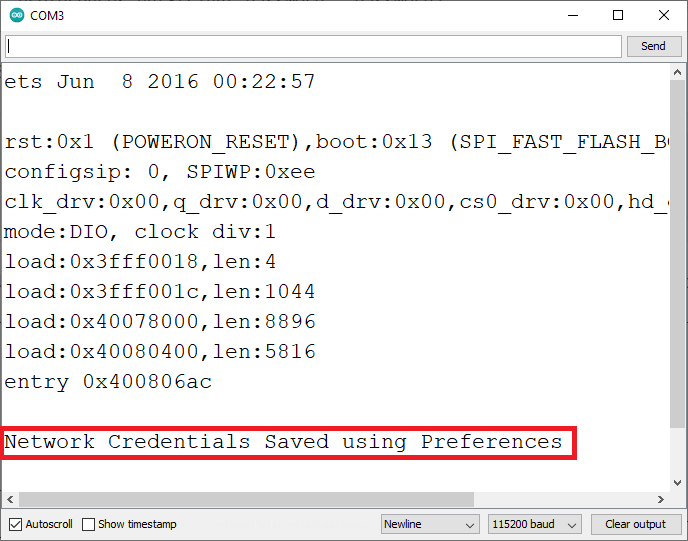
烧录后串口打印"Network Credentials Saved using Preferences",数据就落进 Flash 了:
读的方向反过来,getString 带缺省空串,读到空就说明没存过,别急着连网:
/*
  Rui Santos
  Complete project details at https://RandomNerdTutorials.com/esp32-save-data-permanently-preferences/

  Permission is hereby granted, free of charge, to any person obtaining a copy
  of this software and associated documentation files.

  The above copyright notice and this permission notice shall be included in all
  copies or substantial portions of the Software.
*/

#include "Preferences.h"
#include "WiFi.h"

Preferences preferences;

String ssid;
String password;

void setup() {
  Serial.begin(115200);
  Serial.println();

  preferences.begin("credentials", false);

  ssid = preferences.getString("ssid", "");
  password = preferences.getString("password", "");

  if (ssid == "" || password == ""){
    Serial.println("No values saved for ssid or password");
  }
  else {
    // Connect to Wi-Fi
    WiFi.mode(WIFI_STA);
    WiFi.begin(ssid.c_str(), password.c_str());
    Serial.print("Connecting to WiFi ..");
    while (WiFi.status() != WL_CONNECTED) {
      Serial.print('.');
      delay(1000);
    }
    Serial.println(WiFi.localIP());
  }
}

void loop() {
  // put your main code here, to run repeatedly:
}
这段读出来后会直接用拿到的 SSID 和密码连 Wi-Fi,连不上每秒打一个点。把凭据和固件代码解耦的好处很实际:换路由器只改存储里的两个字符串,代码一行不动,固件也不用重新编译。
断电记住 GPIO 状态:按键点灯的经典组合
第三个例子解决开头那个场景: ESP32 控制灯,断电重启后灯要回到之前的状态,而不是默认熄灭。硬件只需要按键接 GPIO 4、LED 接 GPIO 5,按下图接(各串一个限流电阻):
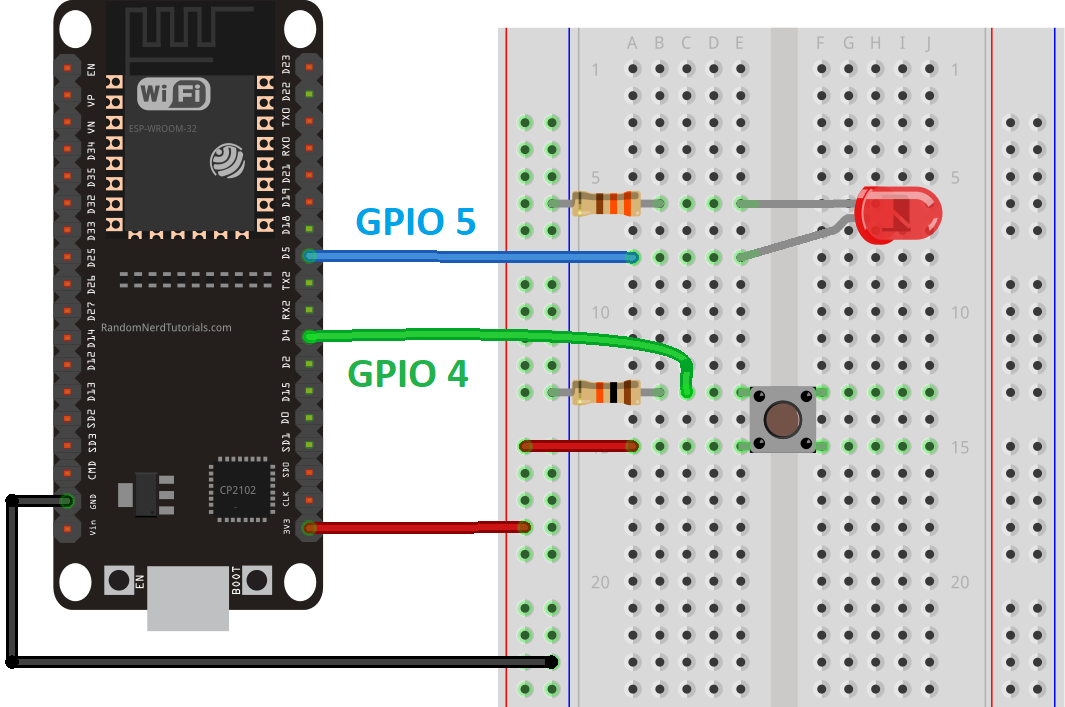
状态用 bool 存,命名空间叫 gpio。setup 里读回上次的灯态并直接作用于引脚;loop 里做 50 毫秒消抖,状态真的变了才翻转 LED 并写入 Flash。关键三步如下,完整例程在教程页:
preferences.begin("gpio", false);ledState = preferences.getBool("state", false); // save the LED state in flash memory
preferences.putBool("state", ledState);
Serial.printf("State saved: %d \n", ledState);消抖那 50 毫秒不是可省的装饰:机械按键触点闭合瞬间会弹跳,电平抖动会让 loop 把一次按压读成好几次,不加消抖,灯态乱翻、Flash 也跟着多写。用 millis() 记时间戳、超时才认可是标准解法,EEPROM 时代的经典按键例程就是这么写的。
注意写入时机:digitalRead(ledPin) 不等于 ledState 才 putBool,一次按键翻转只写一次 Flash。这正好呼应前面说的写寿命——高频循环里只读不写,NVS 才能撑得住整台设备的使用周期。
收尾:什么该存、什么不该存
总结一下这套工具的分工:配置类(Wi-Fi 凭据、阈值、模式开关)、状态类(最后的灯态)、计数类(启动次数、使用次数),这三类进 Preferences/NVS 都合适;大体积文件走 LittleFS,纯临时的中间变量留在 RAM 里就行。
上手成本几乎为零:库是 ESP32 Arduino 核心自带的,不用装任何依赖,三个例程烧上去就能跑。烧录链路上新手常卡的就两处:串口监视器波特率要选 115200,选成 9600 会看到整屏乱码;开发板选 ESP32 Dev Module、端口选对,烧完按 EN 复位观察输出。
写之前想清楚三件事:key 怎么命名(15 字符内、见名知义)、什么频率写(状态变化才写)、读不到时给什么缺省值(给一个安全值而不是垃圾值)。这三件事想明白了,剩下就是 put 和 get 的事。下次你的设备再"断电失忆",先想想是不是压根没往 NVS 里写。





写寿命那段提得好,loop 里别乱 put,状态变了再写
putString 存 WiFi 密码这招实在,换路由器不用重编固件
nvs_flash_erase 那个警告很关键,擦完必须马上烧新固件,不然每次上电都格式化,血泪教训
上电计数这个例程留着,等板子到了就试
这个 Preferences 库我之前一直没搞明白 begin 第二个参数啥意思,这篇文章讲得透,false 读写 true 只读,还有 15 字符限制这个坑,注释里藏着不仔细看真容易漏。我之前 key 起了 20 个字符的名字,读出来一直是空,查了半天原来是截断了,早看到这篇能少走一小时弯路。 counting 启动次数这个例程思路确实好用,复位键按几下就能验证 NVS 有没有生效,比瞎猜强多了。