
想给机器人加个"能感知重量"的本事,最便宜的路径就是称重传感器加HX711放大器配ESP32。几十块钱的件,接四根线,就能做出一台能读克数的电子秤,还能顺手接到桌面机械臂上做抓取力度反馈。这篇把接线、装库、校准、读数一路走完,最后再加一块OLED屏和去皮按键,做成完整的小台秤。
先把结构说清楚:教程里三段代码全部逐字符取自真实项目源码,只有一个平台兼容处理——C/C++尖括号头文件在站点会被剥掉,所以代码里的#include统一写成引号形式,比如#include "HX711.h",在Arduino IDE里和尖括号写法编译等价,直接能跑。
认识称重传感器和HX711
常见的称重传感器是应变片式:一根金属梁上贴着应变片,受力变形时电阻按比例变化。通常四个应变片接成惠斯通电桥,就是为了把这么微小的电阻变化测准。红黑绿白四根线,分别是正激励E+、负激励E-、输出正A+、输出负A-。
问题在于这个信号实在太弱,毫伏级,单片机直接读不了。所以市面上称重传感器几乎都和HX711放大器一起卖:HX711是一片24位ADC,一边接传感器的四根线,另一边用两根线(时钟和数据)跟ESP32通信。板子上E+、E-、A+、A-四个焊点接传感器,GND、DT、SCK、VCC四个焊点接主控,排针一般要自己焊。
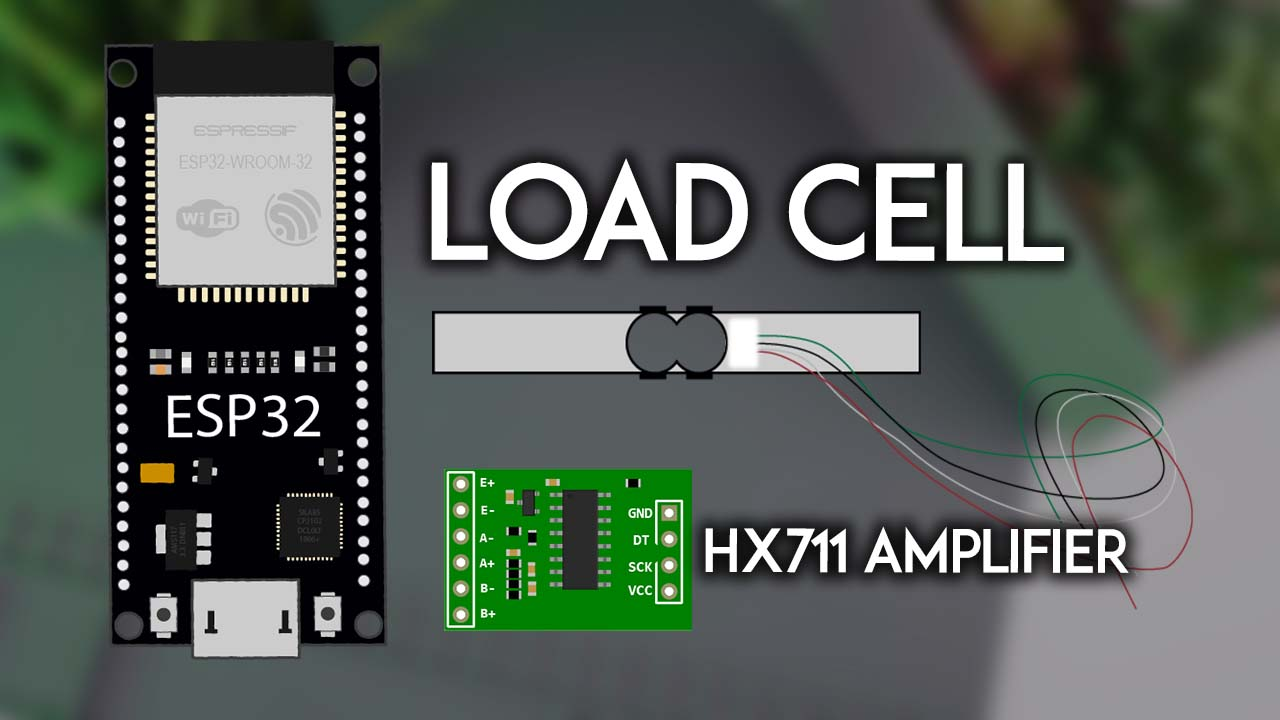
传感器量程按需选,常见1kg、5kg、10kg、20kg,做桌面小秤1kg够用。另外要给它配个机械结构:套件一般带两块亚克力板,下板固定传感器一端,上板装在另一端,物体放上板,金属梁中间受力产生应变。没有套件的话,木板或3D打印板都行。
接线:传感器到HX711再到ESP32
HX711是两线接口,DT和SCK可以接ESP32任意可用GPIO,这里按原教程用DT接GPIO 16、SCK接GPIO 4,供电接3.3V。完整对应关系如下:
| 称重传感器线色 | HX711焊点 | HX711 | ESP32 |
|---|---|---|---|
| 红(E+) | E+ | GND | GND |
| 黑(E-) | E- | DT | GPIO 16 |
| 白(A-) | A- | SCK | GPIO 4 |
| 绿(A+) | A+ | VCC | 3.3V |
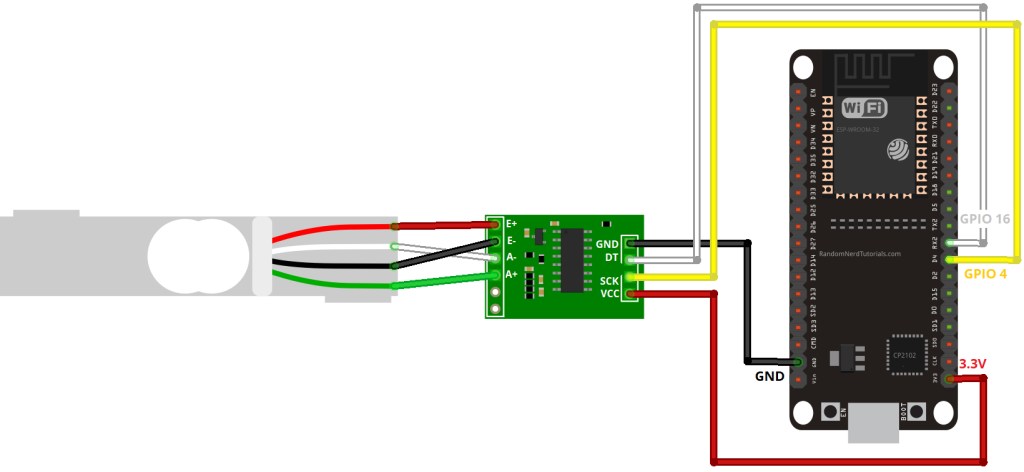
提醒一句,传感器引出的四根漆包线又细又脆,焊的时候别反复弯折,一扯就断。焊完先别急着上电,对照原理图再核一遍线色,E+和A+接反是新手最常见的翻车点。
装HX711库
库选bogde写的HX711,兼容ESP32、ESP8266和Arduino。Arduino IDE里走Sketch、Include Library、Manage Libraries,搜HX711装Bogdan Necula那个就行。
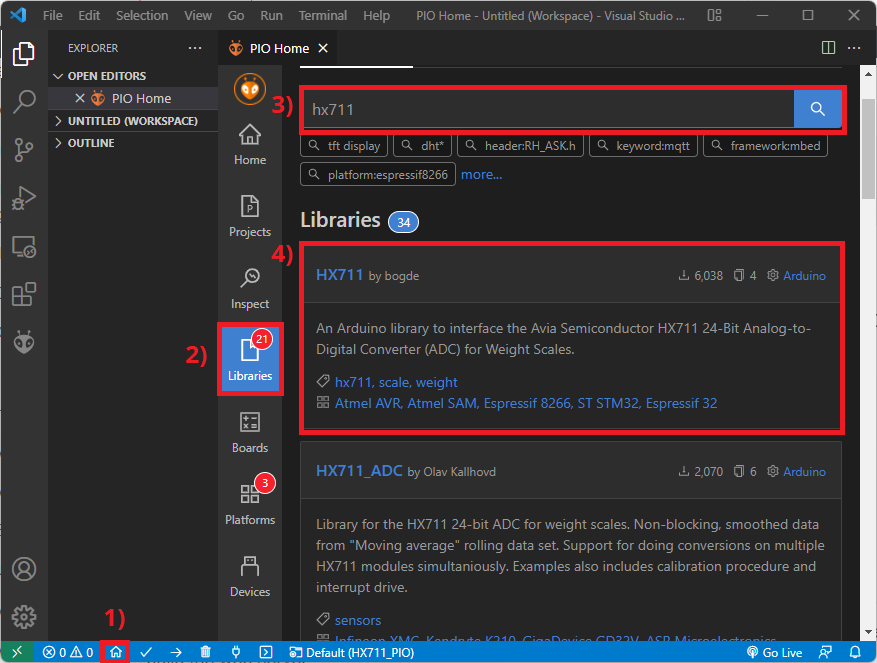
用VS Code加PlatformIO的话,在PIO Home的Libraries里搜HX711,选bogde那个,Add to Project即可。platformio.ini里会多一行lib_deps = bogde/HX711@^0.7.5,顺手把串口速率加上monitor_speed = 115200。
校准:拿到你自己的校准系数
每个传感器的输出都不一样,校准系数必须自己测,这步不能跳。准备一个已知重量的东西,原教程用的是厨房秤称出来的一杯水,300克。先烧录下面这段校准代码:
/*
  Rui Santos
  Complete project details at https://RandomNerdTutorials.com/esp32-load-cell-hx711/

  Permission is hereby granted, free of charge, to any person obtaining a copy
  of this software and associated documentation files.

  The above copyright notice and this permission notice shall be included in all
  copies or substantial portions of the Software.
*/

// Calibrating the load cell
#include "Arduino.h"
#include "soc/rtc.h"
#include "HX711.h"

// HX711 circuit wiring
const int LOADCELL_DOUT_PIN = 16;
const int LOADCELL_SCK_PIN = 4;

HX711 scale;

void setup() {
  Serial.begin(115200);
  rtc_cpu_freq_config_t config;
  rtc_clk_cpu_freq_get_config(&config);
  rtc_clk_cpu_freq_to_config(RTC_CPU_FREQ_80M, &config);
  rtc_clk_cpu_freq_set_config_fast(&config);
  scale.begin(LOADCELL_DOUT_PIN, LOADCELL_SCK_PIN);
}

void loop() {

  if (scale.is_ready()) {
    scale.set_scale();
    Serial.println("Tare... remove any weights from the scale.");
    delay(5000);
    scale.tare();
    Serial.println("Tare done...");
    Serial.print("Place a known weight on the scale...");
    delay(5000);
    long reading = scale.get_units(10);
    Serial.print("Result: ");
    Serial.println(reading);
  }
  else {
    Serial.println("HX711 not found.");
  }
  delay(1000);
}

//calibration factor will be the (reading)/(known weight)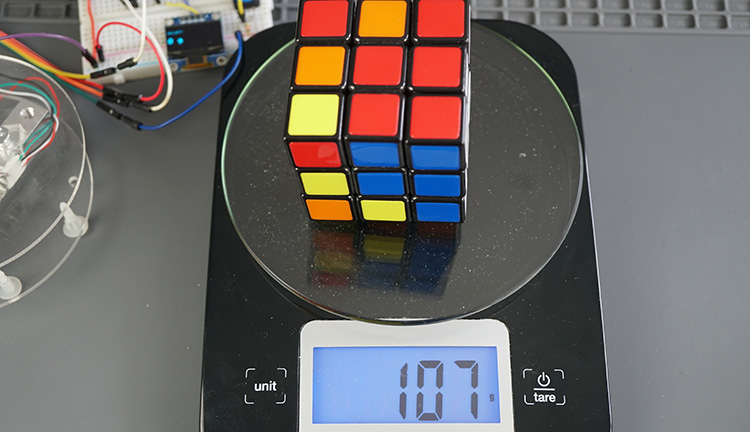
烧录后打开115200的串口监视器,按提示操作:先移走秤上所有东西等它去皮,再把已知重量的物体放上去,等串口吐出一个读数。校准系数就用这个公式:读数除以已知重量。原教程那次的读数是-141449,除以300克,校准系数就是-471.497。
你这个系数几乎肯定和这个值不同,记下来,后面所有代码都要用。顺便说一句,输出和受力成正比,所以单位随你定,克、千克甚至"一块猫粮"都行,只要换算一致。
读重量:跑通库自带示例
拿到系数后,先跑库自带的示例把读数流程走通。代码里那行scale.set_scale(INSERT YOUR CALIBRATION FACTOR);要把括号里换成你自己的系数,其余照搬:
/*
 * Complete project details at https://RandomNerdTutorials.com/esp32-load-cell-hx711/
 *
 * HX711 library for Arduino - example file
 * https://github.com/bogde/HX711
 *
 * MIT License
 * (c) 2018 Bogdan Necula
 *
**/
#include "Arduino.h"
#include "HX711.h"
#include "soc/rtc.h"

// HX711 circuit wiring
const int LOADCELL_DOUT_PIN = 16;
const int LOADCELL_SCK_PIN = 4;

HX711 scale;

void setup() {
  Serial.begin(115200);
  rtc_cpu_freq_config_t config;
  rtc_clk_cpu_freq_get_config(&config);
  rtc_clk_cpu_freq_to_config(RTC_CPU_FREQ_80M, &config);
  rtc_clk_cpu_freq_set_config_fast(&config);
  Serial.println("HX711 Demo");

  Serial.println("Initializing the scale");

  scale.begin(LOADCELL_DOUT_PIN, LOADCELL_SCK_PIN);

  Serial.println("Before setting up the scale:");
  Serial.print("read: \t\t");
  Serial.println(scale.read());      // print a raw reading from the ADC

  Serial.print("read average: \t\t");
  Serial.println(scale.read_average(20));   // print the average of 20 readings from the ADC

  Serial.print("get value: \t\t");
  Serial.println(scale.get_value(5));   // print the average of 5 readings from the ADC minus the tare weight (not set yet)

  Serial.print("get units: \t\t");
  Serial.println(scale.get_units(5), 1);  // print the average of 5 readings from the ADC minus tare weight (not set) divided
            // by the SCALE parameter (not set yet)

  scale.set_scale(INSERT YOUR CALIBRATION FACTOR);
  //scale.set_scale(-471.497);                      // this value is obtained by calibrating the scale with known weights; see the README for details
  scale.tare();               // reset the scale to 0

  Serial.println("After setting up the scale:");

  Serial.print("read: \t\t");
  Serial.println(scale.read());                 // print a raw reading from the ADC

  Serial.print("read average: \t\t");
  Serial.println(scale.read_average(20));       // print the average of 20 readings from the ADC

  Serial.print("get value: \t\t");
  Serial.println(scale.get_value(5));   // print the average of 5 readings from the ADC minus the tare weight, set with tare()

  Serial.print("get units: \t\t");
  Serial.println(scale.get_units(5), 1);        // print the average of 5 readings from the ADC minus tare weight, divided
            // by the SCALE parameter set with set_scale

  Serial.println("Readings:");
}

void loop() {
  Serial.print("one reading:\t");
  Serial.print(scale.get_units(), 1);
  Serial.print("\t| average:\t");
  Serial.println(scale.get_units(10), 5);

  scale.power_down();             // put the ADC in sleep mode
  delay(5000);
  scale.power_up();
}setup里先打印配置前后的原始读数对比,loop里每5秒输出一次单次读数和10次平均。这几行rtc_clk开头的代码是把ESP32主频降到80MHz,HX711对时序敏感,降频能提高读取稳定性,别删。
进阶:OLED显示加去皮按键的完整小台秤
想做成能日常用的样子,加一块SSD1306 OLED和一个按键即可:OLED走I2C,按键接GPIO 19,按一下去皮。接线在原理图基础上加三根线:
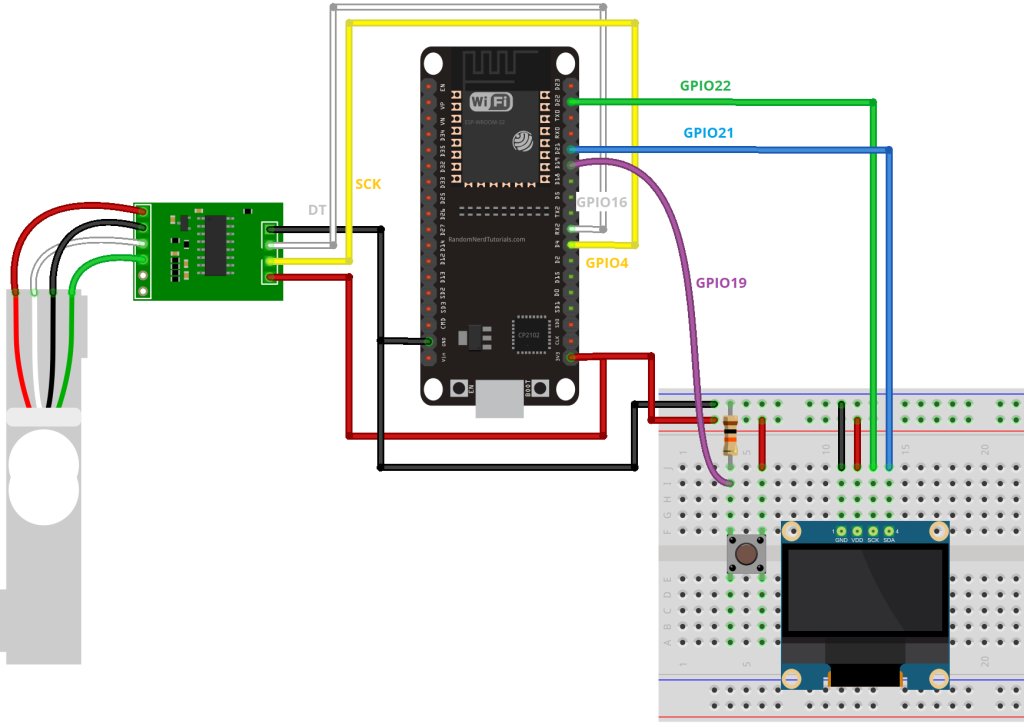
完整代码如下,校准系数在宏定义里替换:
/*
  Rui Santos
  Complete project details at https://RandomNerdTutorials.com/esp32-load-cell-hx711/

  Permission is hereby granted, free of charge, to any person obtaining a copy
  of this software and associated documentation files.

  The above copyright notice and this permission notice shall be included in all
  copies or substantial portions of the Software.
*/

// Library HX711 by Bogdan Necula: https://github.com/bogde/HX711
// Library: pushbutton by polulu: https://github.com/pololu/pushbutton-arduino

#include "Arduino.h"
#include "HX711.h"
#include "soc/rtc.h"
#include "Wire.h"
#include "Adafruit_GFX.h"
#include "Adafruit_SSD1306.h"
#include "Pushbutton.h"

// HX711 circuit wiring
const int LOADCELL_DOUT_PIN = 16;
const int LOADCELL_SCK_PIN = 4;

HX711 scale;
int reading;
int lastReading;
//REPLACE WITH YOUR CALIBRATION FACTOR
#define CALIBRATION_FACTOR -471.497

//OLED Display
#define SCREEN_WIDTH 128 // OLED display width, in pixels
#define SCREEN_HEIGHT 64 // OLED display height, in pixels

// Declaration for an SSD1306 display connected to I2C (SDA, SCL pins)
#define OLED_RESET     -1 // Reset pin # (or -1 if sharing Arduino reset pin)
Adafruit_SSD1306 display(SCREEN_WIDTH, SCREEN_HEIGHT, &Wire, OLED_RESET);

//Button
#define BUTTON_PIN 19
Pushbutton button(BUTTON_PIN);

void displayWeight(int weight){
  display.clearDisplay();
  display.setTextSize(1);
  display.setTextColor(WHITE);
  display.setCursor(0, 10);
  // Display static text
  display.println("Weight:");
  display.display();
  display.setCursor(0, 30);
  display.setTextSize(2);
  display.print(weight);
  display.print(" ");
  display.print("g");
  display.display();
}

void setup() {
  Serial.begin(115200);
  rtc_cpu_freq_config_t config;
  rtc_clk_cpu_freq_get_config(&config);
  rtc_clk_cpu_freq_to_config(RTC_CPU_FREQ_80M, &config);
  rtc_clk_cpu_freq_set_config_fast(&config);

  if(!display.begin(SSD1306_SWITCHCAPVCC, 0x3C)) {
    Serial.println(F("SSD1306 allocation failed"));
    for(;;);
  }
  delay(2000);
  display.clearDisplay();
  display.setTextColor(WHITE);

  Serial.println("Initializing the scale");
  scale.begin(LOADCELL_DOUT_PIN, LOADCELL_SCK_PIN);

  scale.set_scale(CALIBRATION_FACTOR);   // this value is obtained by calibrating the scale with known weights; see the README for details
  scale.tare();               // reset the scale to 0
}

void loop() {
  if (button.getSingleDebouncedPress()){
    Serial.print("tare...");
    scale.tare();
  }

  if (scale.wait_ready_timeout(200)) {
    reading = round(scale.get_units());
    Serial.print("Weight: ");
    Serial.println(reading);
    if (reading != lastReading){
      displayWeight(reading);
    }
    lastReading = reading;
  }
  else {
    Serial.println("HX711 not found.");
  }
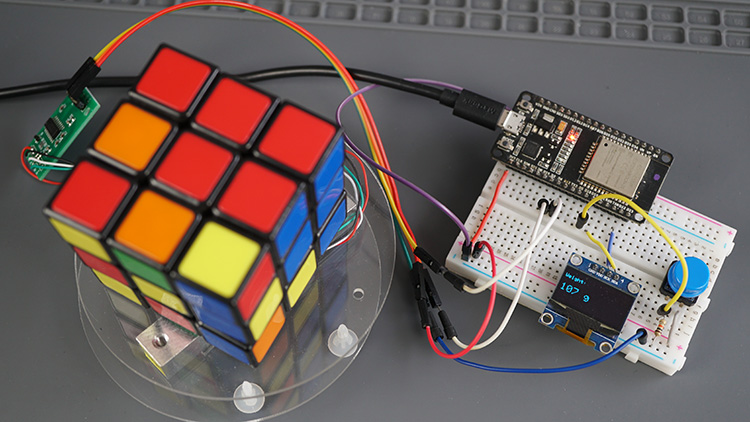
}这段用wait_ready_timeout(200)代替阻塞式读取,200毫秒内数据没就绪就走else分支报HX711 not found,而不是卡死在里面。读数变化才刷新屏幕,能减少OLED闪烁。按键库用的是pololu的pushbutton,库管理器里同名安装。成品长这样,放个魔方上去克数实时刷新:
踩坑提醒和收尾
几个高频问题提前说。第一,串口一直报HX711 not found,先查接线,DT和SCK接反或者VCC没接好都会这样。第二,读数狂跳不稳,十有八九是机械结构没装好,上下板必须让金属梁中间受力,也别把秤放在软桌布上。第三,数值为负或者差一个倍数,是校准系数没换成自己的,或者传感器四根线序接错。
整体下来,这套方案的乐趣在于便宜、简单、立刻能用。称重传感器加HX711接ESP32,从接线到出克数,一个下午够了。后面想接进桌面机械臂做抓取力反馈,或者做个自动喂食器记录余量,都是这套读数的延伸,把get_units()的值喂给你的控制逻辑就行。

直接抄作业成功,OLED显示那部分代码一次点亮。
按这篇接好了,厨房秤对了一下克数,误差在1克以内,校准这步真不能省。
那个把主频降到80M的细节太真实了,之前读数跳得像股票,加了那几行rtc_clk立马稳。
这篇把我上次踩的坑全写了:HX711的DT和SCK接反就会一直报HX711 not found,我当时查了半天以为是库的问题,其实重接两根线就好了。校准那段也很实用,-141449除以300这个例子给得具体,新手照着算就不会懵。